Moving that igniter around so that it touches the edge of the hole is too fiddly for me. The other thing that occurred to me while I was doing this is that this is probably a drain hole for the pan in case of rain or washing down the grill, in which case that weak electrical connection is going to be subject to contamination and corrosion. Not exactly clear thinking at Weber, I suspect. Anyway, drilling that hole out and using a wire plugged into the bottom of the terminal is probably the best way to go. There's a screw that attaches the electrode that a guy could use a ring terminal on for a good ground right at the electrode.
If that hole is a drain hole, it doesn't work all that well, judging by the corrosion at one end of the burner pan where the water was pooled up. I soldered a piece of brass across the hole, and that works well enough electrically. Right now, with the grill all taken apart, I didn't want to deal with a terminal sticking out of the bottom of the pan, and my thought was that I'm going to find a table and use that in place of the burner, and swap them back and forth as needed, so a terminal sticking out of the bottom isn't good for me.
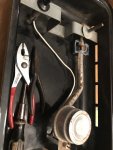
Here's what I did: First, the bracket comes out easily enough, by squeezing the bracket at the U in the middle. I did not bend the bracket at the igniter...that's the way I found it. You can see the screw that mounts the ceramic electrode...that's a good location for a ground connection (if it wasn't so rusty) for a two-wire setup.

Then I hit the outside area around the hole with a file to clean it up. I cut a piece of brass shim stock to fit the bottom of the dimple and used the round end of my cleaning brush to bend it enough to fit the radius at the bottom of the hole. I held the piece of brass in place with a magnet.

I took my big soldering iron and soldered the brass in place.

Again, I don't think the brass piece will move around if you don't solder it, but I didn't want the hassle of sanding the porcelain off the bottom of the dimple on the inside.
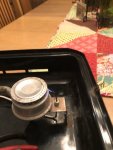
Voila. Ready for grease or spray. The tension from the bent bracket holds it in contact. Again, for my use, plugging what may be a drain hole is not an issue for me, but having a wire hanging out of the bottom would definitely be a problem.