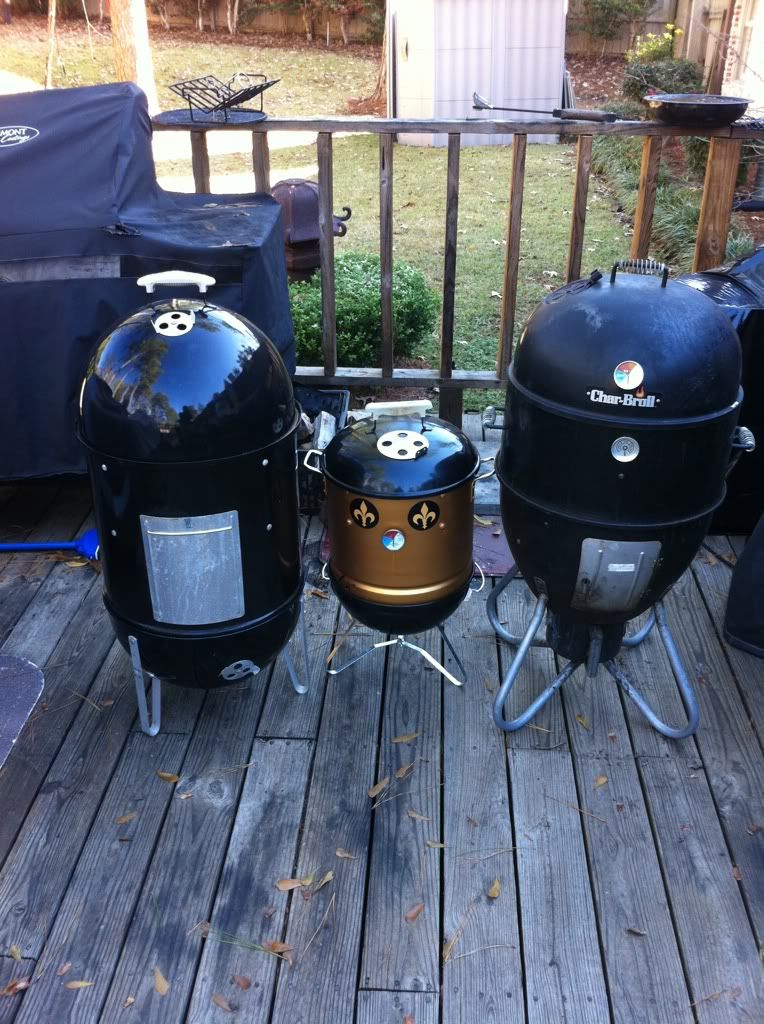
S J. Gold Mini WSM Smoker


Status
Not open for further replies.
Originally posted by JHunter:
...

1. Its not a high temp cooker, its a low and slow smoker.

...
5. I think the rule for this cooker is 250 or less use it, 300 or more use the kettle.

...
jay

I agree with you. My cooker may be a little different than yours because I use a smokey joe Gold, but mine tops out at about 325 and seems to "want" to run between 225-300 which is a pretty narrow window when you think about it. Every single time I use it, I'm amazed and how consistently it holds those lower temps.

It's like what makes it a bad high heater is exactly what makes it a great smoker. You are never going to look up and find the sucker running at 450 because your forgot to close the vents for whatever reason.
icon_wink.gif
 
On my SJS I added Gold Holes on the sides and made covers out of aluminum. Also use a foiled 10 inch aluminum pie pan purchased at a Restaraunt Supply.

I usually run with all air holes open and can get in the high 200s. I use an air pump directed into the vents to jump start the coals.

One of the downsides is that material is thin aluminum which is one of the worst insulators. Maybe adding a thermal blanket can help retain some heat.

John
 
Did some ribs tonight. They came out great!! I am really starting to get the seasoning the way I like it, the mini smoker makes cooking a no brainer. I go from using the 2-1-1 method to using the 4 method (put them on wait 4 hours). Starting to get enough cooks, that I can tell when the seasoning is just sitting on the top of the meat, and will start seasoning and wrapping over night.

Here are the pics/description of the cook.


Most of the seasoning is on the otherside where the meat is located. I am showing this side because I wanted you to see that I had to cut the 3 full racks into 6 half racks.
IMG_4473.JPG


First level of Ribs on the bottom rack, as you can see I seasoned them pretty well on the top.
IMG_4475.JPG


Second rack on the second level.
IMG_4476.JPG


Third rack on the tip top. I am surprised at how often I use the third rack, and I am REALLY glad I built this with three racks instead of just two.
IMG_4478.JPG


Here is my fire setup. Two pices of Hickory for flavor.
IMG_4479.JPG


Had to show this. Ribs going in the mini, and I have a 4lb roast going in the kettle. The temp on the kettle shot up to 350-400 almost as soon as I put the lid on. The Mini stays right at 200 or so...
IMG_4508.JPG


4 hours later the ribs are done. I liked the rub I made this time, bit more spice and not to sweet (That's what the Sweet Baby Rays is for).
IMG_4531.JPG


Second rack coming off...
IMG_4531.JPG


Third rack coming off. I put the meater ribs at the bottom of the cooker. Its hotter on the bottom closer to the fire. (side note there is enough room for a small skillet of beans. Good for catching the rib drippings).
IMG_4542.JPG


Yes this thing really can make some good RIBS.
IMG_4544.JPG


Ribs didn't take as much smoke as normal, I had them sit out for about an hour while I was seasoning them; but they took enough.
IMG_4545.JPG


And the payoff.... Took more effort to make the slaw and the beans than it took to make the ribs.
IMG_4549.JPG


This thing really is good. It takes a bit longer to get a cook going because I am dealing with three racks and because you are lighting fewer coals, you have to light them after all your meat is seasoned. With the kettle, I light the coals, then season the meat so its a bit quicker to get the food on. Conversely, I don't have to work so hard to set up the coals in the mini smoker if I want to do a long smoke. This is probably my last post on this smoker unless I do something really unique. You should see it can cook all your basic meats.

jay
 
Built my Mini two weeks ago, did a seasoning burn last week, and will do a real cook this weekend.

Here are some photos of my variations:
1. Gathered the pieces-parts. http://s1204.photobucket.com/a...rrent=components.jpg

2. Was going to build a frame to hold the water bowl, but the removable steamer tray looked sufficient, so I cut out the center and folded down some tabs. Drilled some additional smoke holes in the top and sides. http://s1204.photobucket.com/a...owl_support_ring.jpg

3. Stainless Steel dog bowl fits in and just clears the bottom of the steamer. http://s1204.photobucket.com/a...upport_with_bowl.jpg

4. Water bowl in place. http://s1204.photobucket.com/a...nt=bowl_in_place.jpg

5. Invert steamer piece and holds terra-cotta saucer. http://s1204.photobucket.com/a...t=plate_in_place.jpg

6. Cut hole in bottom of steamer. http://s1204.photobucket.com/a...rrent=bottom_cut.jpg

7. 2 coats of high-gloss engine paint. http://s1204.photobucket.com/a...ck_from_painting.jpg

8. Assembled unit. Used 3/4" threaded rod couplers for the grill supports as it gives a nice flat surface. http://s1204.photobucket.com/a...inished_interior.jpg

9. Brass grommets in the side for temperature probes, and a fixed thermometer in the lid, and it's under smoke. Seasoned it with lump charcoal and a 1 lb roll of cheap sausage. http://s1204.photobucket.com/a...&current=smoking.jpg

It saw a blast to build, and I'm looking forward to many meals off this baby.
 
The neat thing is that everyone adds a little to the build! Very happy with mine for tailgating, need to get high temp stickers or make a saints stencil.
I'm doing to make another this spring & steal some of the new idea's
d0e020f8.jpg
 
I thought we decided we weren't going to use those stickers John.
icon_rolleyes.gif
If you find some high heat stickers, you wouldn't want to hook a colts fan up would you?
icon_razz.gif
Hey Jay Hunter, you have your thermometer where I would like to put one when I do this. Have you found any problems as far as interference with the food on the top grate?
 
Gotta say it looks alot better with the stickers gone! Just kidding. Thanks for all the info on this thing. I haven't been this excited since I got my WSM! People have to go nuts over this thing when you are tailgating!
icon_cool.gif
 
Originally posted by S Mitchell: Hey Jay Hunter, you have your thermometer where I would like to put one when I do this. Have you found any problems as far as interference with the food on the top grate?

No no problems yet. It just keeps track of the temp at the top. I picked up an SJG, and I am going to give that a shot this weekend. I want to do a turkey breast, but might do a chuck roast...

I am WAY interested if I can get 300+ degrees with the sjg and the vent holes on the side vs <250 (with the clay pot) on the SJS.

Jay
 
i would like three racks in mine but here is my problem, i see so many posts on different ways to do things like a dog water bowl and what not. do i need that?

what if i were to just put the charcoal in the smokey joe like normal and then a rack above that for the water bowl and then my 2 or three racks?

i aint gonna use a clay saucer if i dont have to. I had one for the UDS but it sucked up all the mositer during the winter and it was soo water logged that i couldnt get my temps past 125 with 30 lit coals. haha

thanks
 
John,

thanks. how well does the holes work rather than just cutting the bottom out?

maybe ill just the bottom oput and use the steamer try as an insert.
 
do i really need the clay saucer or can i use a metal bowl with hot water? and still get away with three racks
 
Couple of thoughts...

1. The steamer insert will work. But you need to know how you are going to handle the drippings when you cook.

2. The bottom will get smoky and dirty if you don't cut it out. This is only an issue if are worried about where you are going to set it down.

3. I like the clay saucer because you can cover it with foil. It also keeps the temps at 225 or so.

Good look and have fun!!!
 
Matt
Check out page 2 on Mini Smoker Mod thread to see how I handled this. Metal bowls boil off the water quickly and the temps will skyrocket when it goes dry. I went to the foiled clay saucer and have not had this problem; there is still water and drippings in there at the end of an 8 hour run. I can run 4 racks depending on what I want to smoke.
 
Matt the holes work fine, the surface area of the holes is much larger than the area of the vents.
For home use I use a foiled clay planter base.
For tailgating I just fashion a saucer out of HD foil & lay on the bottom of pot ( just for cleanup ease)
 
Status
Not open for further replies.


Back
Top