You are using an out of date browser. It may not display this or other websites correctly.
You should upgrade or use an alternative browser.
You should upgrade or use an alternative browser.
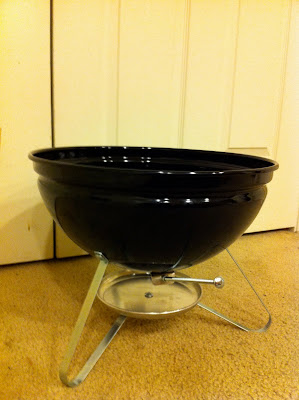
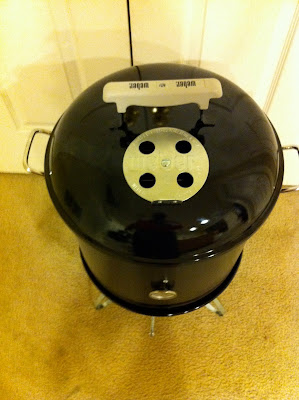
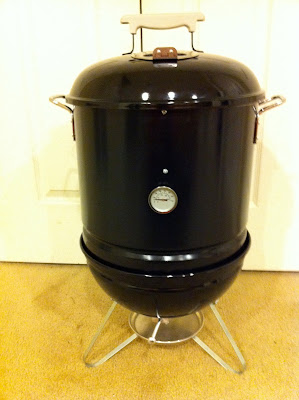
S J. Gold Mini WSM Smoker
- Thread starter LDean
- Start date
- Status
- Not open for further replies.

John Ford
TVWBB Pro
Looks professional ! I also had decided to make the bottom of my pan into the heat shield,by drilling holes around the out side of bottom , but may try your idea. Paint job looks great!
1) what type paint?
2) how far from top of pot is each rack?
3) three racks correct?
4) what size bolts for supports?
5) is pot flimsy enough to need washers for bolt supports?
3
1) what type paint?
2) how far from top of pot is each rack?
3) three racks correct?
4) what size bolts for supports?
5) is pot flimsy enough to need washers for bolt supports?
3
Originally posted by John Ford:
Looks professional ! I also had decided to make the bottom of my pan into the heat shield,by drilling holes around the out side of bottom , but may try your idea. Paint job looks great!
1) what type paint?
2) how far from top of pot is each rack?
3) three racks correct?
4) what size bolts for supports?
5) is pot flimsy enough to need washers for bolt supports?
3
Thanks John answers follow.
1. Rustoleum high heat ultra (good to 1200 degrees)
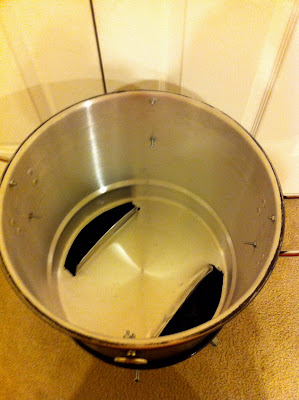
2. 1/4" - 4" - 9.5"(indentation ring)
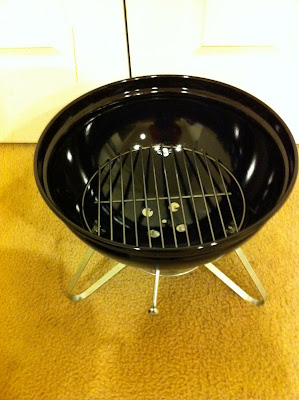
3. Yes. My plan was to be able to cook two buts and I should be able to do this fine with just two racks. But then I had the original rack sitting there, and thought doing ABTs or wings would be real nice with a third rack)
4. 8-32x 3/4" (I cut them down on the top so that I could get the 2nd rack into smoker, I don't think the screw size is all that important. I wanted to make sure I could clear the screws when I put in the bottom rack).
5. Not sure, it feels strong enough, but I will keep an eye on it as I do my cooks.
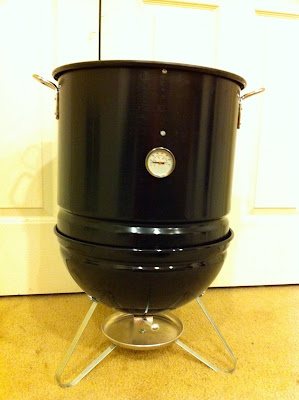
Another thought, people keep saying "a nice smoker for one or two people" but thats not the case. I can smoke for 6 people with the kettle, and if food is setup right I can smoke for 10 people (two buts, three chicken, lots of abts/wings, three brisket flats, two/three small roasts, etc...) If this thing can hold a temp reliably, I don't know why you would need more than this and a kettle. (but I said that when I had just the kettle and here I am).
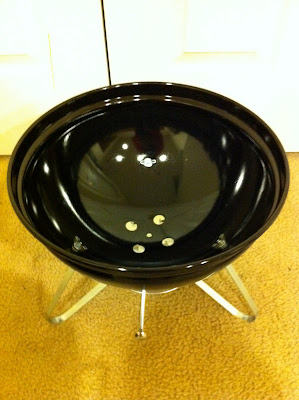
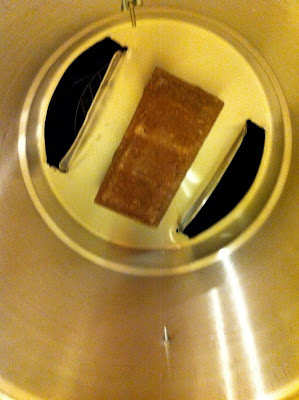
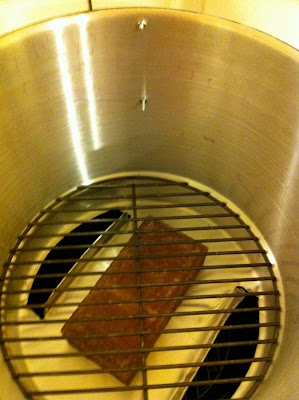
Regarding the bottom. When I cut the bottom and folded the metal over the bottom became much stiffer. When I put the bricks in the bottom of the pot would dip. With this metal fold the bottom no longer does this. The only questions I have are will enough smoke rise up, and will the bottom deteriorate. If not enough smoke, I will cut some additional holes. If it deteriorates, I will replace it with some expanded metal, or maybe two angle iron bars. But the bricks wrapped in aluminum are the way to go for me.
Going to set a fire in it now to burn the coating off the charcoal racks and season it. more later...
j
I wanted to address this point in general.Originally posted by John Ford:
2) how far from top of pot is each rack?
My top grate is about 1 1/2" below the top edge of the pot. I have found that this gives me about an inch or two less headspace under the lid than between the two racks. I recommend taking a ruler and measuring from the bottom rack to the top of the lid and then deciding how you want the space apportioned. I would have preferred a more equal division.
-walt
Originally posted by WalterWhite:
My top grate is about 1 1/2" below the top edge of the pot. I have found that this gives me about an inch or two less headspace under the lid than between the two racks. I recommend taking a ruler and measuring from the bottom rack to the top of the lid and then deciding how you want the space apportioned. I would have preferred a more equal division.
-walt
Walt,
I agree with you on this, when I started the build I measured from the first grate. And up, so that I would know my cooking space.
So from the bottom rack, to the second rack I have about 5 1/2" from the second rack to the lid I have another 6" - 8".
Between the middle and top rack I have 4".
And betwwn the top rack and the lid its about 2" - 3".
Right now I have had the burn going for about 2 hours, the burn has taken the following time.
20 minutes to get to 225.
Another 30 minutes to get to about 325.
Now its settled down to 225 for the last hour.
I may clear out some ashes and see if the temp goes up.
More later...
My goals for this thing were pretty clear...
Smoke 2 butts for 10 hours.
But it should have been
Smoke 2 butts for 10 hours with lump without adding fuel.
I don't see this happening without a few mods...
Expanded wire base, so the lump won't fall through.
The capacity to hold more fuel.
MAYBE a charcoal basket.
MAYBE remove the bottom of the pot in total.
I am encouraged to see that this thing is viable, as a smoker.
George Curtis
TVWBB Olympian
grease catcher ?
ok we have a winner!!! This thing just smoked a nice chicken for me. Smoked at 300 for 2 hours (I had to leave so the chicken was a bit over cooked). Plenty of coals left over so probably could have gotten a 4-6 hour cook with the full load. The smoke flavor is MUCH better than I got with my kettle. I am a bit surprised by that but happy nonetheless.
Regarding a grease catcher, I just need to line the bottom with foil, or replace the brick with a drip pan.
I am not sure the drip pan is needed. But what I am sure of is that having that piece of metal in the bottom to hold things up is a huge benefit. The holes are allowing an adequate amount of smoke up, and this thing is air tight. Much tighter than my kettle. Can't wait to do some ribs on this thing.
Oh and as a side benefit, I told a friend I had just built this thing, and they didn't believe me. They thought it was a commercial unit it was only AFTER I explained to them that it was a tamale steamer and showed them the original SJS that they understood what they were looking at. It was a huge boost to my ego.
I have eaten two pieces of the chicken while writing this and its like crack. I want a third piece, and I am afraid I may eat the whole bird.

pics/etc... later..
Regarding a grease catcher, I just need to line the bottom with foil, or replace the brick with a drip pan.
I am not sure the drip pan is needed. But what I am sure of is that having that piece of metal in the bottom to hold things up is a huge benefit. The holes are allowing an adequate amount of smoke up, and this thing is air tight. Much tighter than my kettle. Can't wait to do some ribs on this thing.
Oh and as a side benefit, I told a friend I had just built this thing, and they didn't believe me. They thought it was a commercial unit it was only AFTER I explained to them that it was a tamale steamer and showed them the original SJS that they understood what they were looking at. It was a huge boost to my ego.
I have eaten two pieces of the chicken while writing this and its like crack. I want a third piece, and I am afraid I may eat the whole bird.
pics/etc... later..
Pics of today's cook...
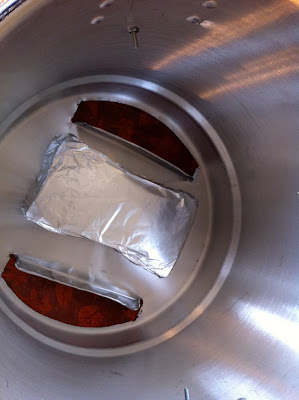
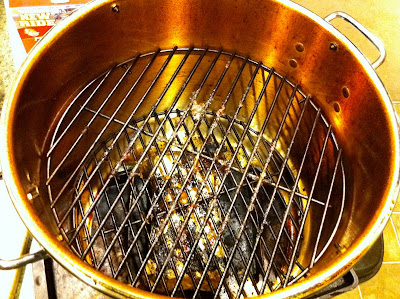
Wrapped the brick up in foil before taking it out.
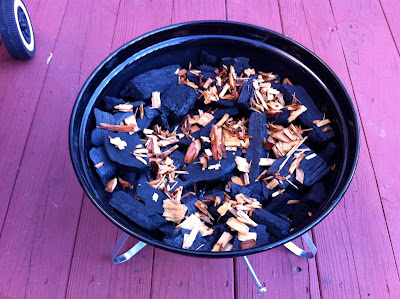
Fuel for the smoke, I added a lot more for the actual cook as I wanted high heat and lots of smoke.
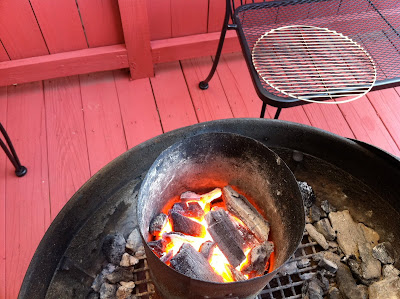
Starter fuel, about 1/3 - 1/2 a cannister.
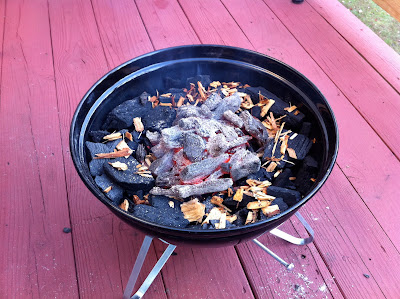
Fuel is dumped and ready to go...
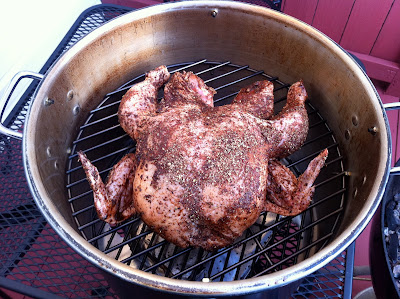
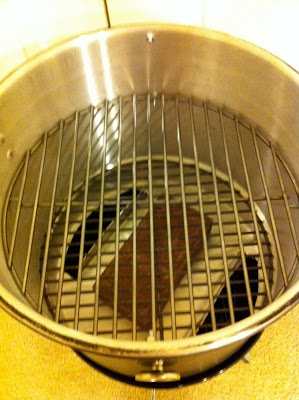
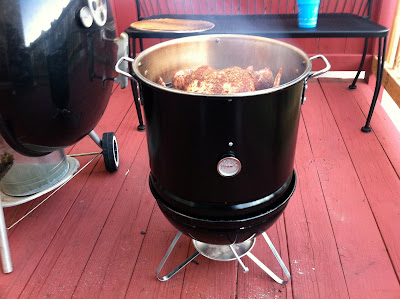
I did a rush job on the seasoning and started spatchcocking the chicken. This shot should give you a good idea of how much room is on the inside. I had the chicken on the second tray.
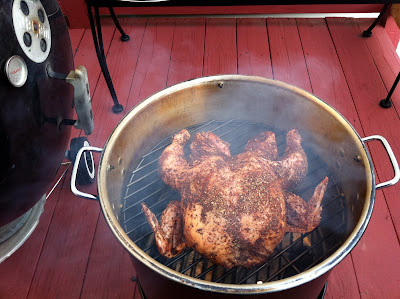
Chicken sitting on the fire. As you can see the smoke had no trouble getting to the bird...
Another shot right befor I put the lid on...
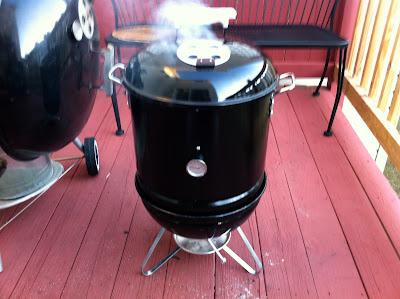
Look Ma! No leaks!! smoke ONLY came out of the top vents. You gotta love that...
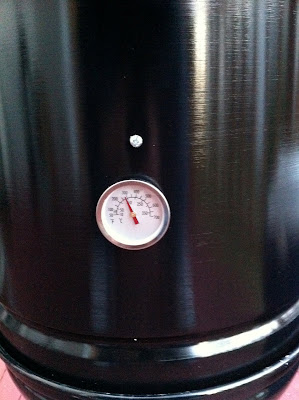
Temp up to almost 300 degrees. Keep in mind the chicken is resting just above the thermometer (where the screw is located so the temp was probably a bit higher.
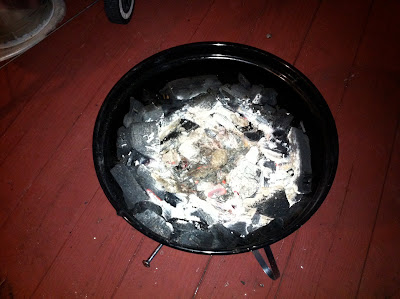
Here is the end of the cook. LOTS of fuel left I could have kept going for at least another 2-3 hours...
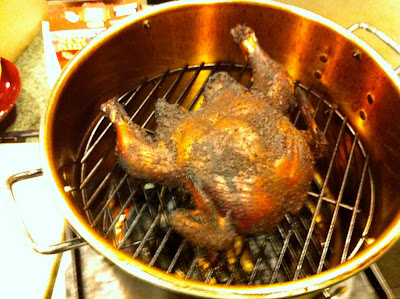
Bird cooked for two hours so its a bit over cooked, but still very flaverful, and my last minute rub wasn't that bad either. Skin needs to be firmed up but other wise a good piece of chicken.
Inside of pot, lots of drippings. But not too bad. Will foil the bottom for my next cook or add a drip pan and remove the brick. This did make for a lot of extra smoke after an hour. I may call this the flavorizer brick.
I am VERY happy with this set up. Like I said can't wait to do some ribs or a brisket...
Wrapped the brick up in foil before taking it out.
Fuel for the smoke, I added a lot more for the actual cook as I wanted high heat and lots of smoke.
Starter fuel, about 1/3 - 1/2 a cannister.
Fuel is dumped and ready to go...
I did a rush job on the seasoning and started spatchcocking the chicken. This shot should give you a good idea of how much room is on the inside. I had the chicken on the second tray.
Chicken sitting on the fire. As you can see the smoke had no trouble getting to the bird...
Another shot right befor I put the lid on...
Look Ma! No leaks!! smoke ONLY came out of the top vents. You gotta love that...
Temp up to almost 300 degrees. Keep in mind the chicken is resting just above the thermometer (where the screw is located so the temp was probably a bit higher.
Here is the end of the cook. LOTS of fuel left I could have kept going for at least another 2-3 hours...
Bird cooked for two hours so its a bit over cooked, but still very flaverful, and my last minute rub wasn't that bad either. Skin needs to be firmed up but other wise a good piece of chicken.
Inside of pot, lots of drippings. But not too bad. Will foil the bottom for my next cook or add a drip pan and remove the brick. This did make for a lot of extra smoke after an hour. I may call this the flavorizer brick.
I am VERY happy with this set up. Like I said can't wait to do some ribs or a brisket...
George Curtis
TVWBB Olympian
you could put a lipped, foiled tray on top of the brick to catch the grease. my tray leaves a 1.5 inch gap on the outside and it works perfectly.
Fantastic!
As a reference for cook time, I can get 9 hours on my SJS Conversion at 250 degrees with either lump or briquettes. I did do a mod to cover the bottom vent with an inverted stainless steel puppy food bowl with 4 holes drilled at the upper edge of the vertical side of the inverted bowl to prevent the ash from choking off the fire.
Again, fantastic looking cook! Keep those cards, letters and pics coming!
Pat
Brian Moriarty
TVWBB All-Star
While Left Hand Smoke was cooking at the Jack Daniels, we got a surprise visit from the C&C Grilling Co. crew! Chris Byrd and Chris Perres presented me with a prototype Mini Cajun Bandit Smokey Joe conversion and I'd love to post pics here, but apparently I have not played by the rules and am unable to do so.
I will say that it is a solid addition to the SJ and it has 2 grate levels, charcoal ring, stainless steel waterpan and access door.
You can see pics on the Brethren site in Q-Talk, I'd be happy to answer any questions and looking for feedback to my mods.
I will say that it is a solid addition to the SJ and it has 2 grate levels, charcoal ring, stainless steel waterpan and access door.
You can see pics on the Brethren site in Q-Talk, I'd be happy to answer any questions and looking for feedback to my mods.
Have they announced a priced yet? For $100 you can built this smoker with all NEW parts...
Originally posted by Brian Moriarty:
While Left Hand Smoke was cooking at the Jack Daniels, we got a surprise visit from the C&C Grilling Co. crew! Chris Byrd and Chris Perres presented me with a prototype Mini Cajun Bandit Smokey Joe conversion and I'd love to post pics here, but apparently I have not played by the rules and am unable to do so.
I will say that it is a solid addition to the SJ and it has 2 grate levels, charcoal ring, stainless steel waterpan and access door.
You can see pics on the Brethren site in Q-Talk, I'd be happy to answer any questions and looking for feedback to my mods.
chris schnautz
New member
Brian has now posted some action shots of the little bandit! Like this:

Got to see this myself tonight. I was impressed with quality of contruction, and how well it fit the smokey joe. Very stable, no leaks.
Will be looking at purchasing one of these as soon as they are available.
Got to see this myself tonight. I was impressed with quality of contruction, and how well it fit the smokey joe. Very stable, no leaks.
Will be looking at purchasing one of these as soon as they are available.
George Curtis
TVWBB Olympian
i'm one of those that thinks this should be a cheap mod one does themselves. simpler and cheaper the better. course one is welcome to do what they darn please but------.
chris schnautz
New member
I hear you George! I really do...my daughter and I made our mod together. This was part of her 2nd grade science project (on the formation of a smoke ring). Katie earned both a blue ribbon for 2nd grade, and a best of show award.
At the science fair we were able to display several ribbons/trophies. The weekend before the science fair we entered a one-day competition here in Seattle...used what we call our "smoker joe" to cook our sausage entry (got a 2nd in sausage and went on to be Grand Champions).
This little smoker gets used a lot. Both at home and in competitions (most recently used for cooking tri-tip for Katie's "oaky smokey tri tip chili." A 2nd place finish at our church's chili cookoff). It's always going to be special to us.
I will be adding the Cajun Bandit version asap. It's going to be yet another tool for us...a tool that allows even more father/daughter time. Just like when we cook on our $350 WSM, or the UDS that cost me $50.00 to build.
I, for one, am not overly concerned with the cost of any of our equipment (believe me, I'm no wealthy man either...5 kids mod) for the results from cooking with all of them have been priceless.
Originally posted by george curtis:
i'm one of those that thinks this should be a cheap mod one does themselves. simpler and cheaper the better. course one is welcome to do what they darn please but------.
George,
I think the days of a cheap mod are gone. When this thread was started in 2008, SJS were $20 and the pot was only $20 maybe even $16. Today a CL sjs is $20 and the pot is $30, not including the extra grates. I was hoping to get this built for about $50. But by the time you add paint, thermometer, two 7440 grates, you are up to around $100.
I think this smoker is good enough to compete with a WSM and even at $100 brand new retail its still a GREAT piece of cooking equipment.
The reason I built one is because I will need a portable smoker, that I can packup easily. This thing is much more air tight than my OTS (which I thought is all I needed).
Anyrate, I will say its worth doing because there is nothing else like it, and when its all said and done you built it yourself, which makes it that much better...
Jay
- Status
- Not open for further replies.