Removing brackets from old Performer to re-use


Kyle in Woodstock

TVWBB Guru
Has anyone ever removed the two side brackets from a Performer bowl and reused them to attach a standard kettle to a Performer table?
If so, how did you go about removing the bracket?

Also curious if/how you drilled the holes in the bowl to attach the bracket and the holes for the lid bale and the bigger hole for the propane tube for the gas assist.

I recently picked up a plastic table era Performer for cheap and it has a very very worn out bowl, multiple holes.
I know buying a new bowl is an option, but I'm not trying to spend that kind of money on this grill. Would prefer to try and adapt a standard kettle if possible.
 
I believe it can be done. Aren’t the brackets just held on with bolts? The trick is drilling holes in your “regular” kettle in exactly the right places and not shattering porcelain. Careful measurements and a good quality step drill bit would both help a lot in getting a good result.
 
I actually found some YouTube videos on this. I'll post here how I actually get it done so people can use for future reference.

Speaking of future reference....I found this video from the guys over at WKC on how to restore a plastic performer table. I'll likely need to do that to this grill too.


I'll try to get some "before" pictures of this monster up tomorrow

Video of how to drill holes

 
Last edited:
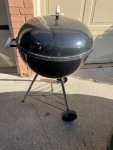
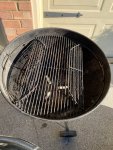
Here are some photos. Very dirty, and the bowl is a wreck. The lid isn't as bad as the bowl but it's not pretty. Missing the thermometer.
This bowl / lid seems like a good candidate to repurpose as a fire pit 🔥
I paid $25 for this grill and luckily only had to drive about 10 min away.

20200408_074042.jpg20200408_074052.jpg20200408_074110.jpg20200408_074127.jpg20200407_193443.jpg20200408_074226.jpg20200408_074241.jpg
 

Attachments

  • 20200408_074330.jpg
    20200408_074330.jpg
    94 KB · Views: 1
I looked closer at the bracket that mounts the bowl to the table. Appears to be welded. Not sure I will attempt to remove and reuse them...but might take another look unless you guys have suggestions.

I poked around over at WKC, and one guy posted about this. He drilled out the spot welds on each bracket. You can see the 3 circles on the left side of the bracket....he drilled those out and was able to excise the bracket. Unless there is a better way to remove then, I'll probably just breakdown and buy the brackets from Unknown BBQ for about $36


20200408_080007.jpg20200408_080026.jpg
 
Last edited:
I tried out the gas assist again today, and this thing sparks up on the first push of the ignitor and has a healthy solid flame. It actual puts out better flame than my two keeper Performers.

After testing that out again, I started the tear down process. Got everything all apart. The bolts that held the propane burner snapped in two, luckily. I plan on replacing all those anyways.
The ash catcher bucket and bracket came off pretty easy, I can clean that up and reuse no problems.
After getting everything removed from the bowl, I lightly cleaned it. Not doing a deep dive on this bowl. After getting some of the caked on stuff removed, the bowl is even worse than the pictures show. One of the circle brackets where one of the legs would go if this was a kettle is moving around. Feels like a loose tooth right before it falls out!

The plastic charcoal container got melted somehow, but it's nothing major....the top lip of the container is drooped down and sits pretty close to the propane tube where the line from the regulator connect with the tube.
I think I'm going to try and heat it up and reshape it rather than buy a new one. Put my mini torch to work.

So for now I'll just get everything cleaned up and wait for a good donor bowl / lid to come across FB or Craigslist.
It will also need a new set of grates. the charcoal and main top grate and really worn out.
 
Yhe brackets are spot welded to the bowl ,if you look at them the welds appear as a dimple. So you want to use a good cobalt type drill bit and drill in the center of the dimple, remember to use a meduim speed not real fast, as that will just over heat the bit .
 
Yhe brackets are spot welded to the bowl ,if you look at them the welds appear as a dimple. So you want to use a good cobalt type drill bit and drill in the center of the dimple, remember to use a meduim speed not real fast, as that will just over heat the bit .
Thanks, good to know. Assuming to start with a smaller bit and work my way up to larger?
Should I expect to end using a bit about the same size as the drill bit?
Would one of those step-bits work for this?
 
Yes so if the spot welds are say 1/4 inch I would start with a 1/8 finish with 3/16 . You don't have drill out completely just 90%then pop off with a chisel or pry off with flat blade screw driver. Now you can use the holes when you weld on to the next kettle or expand the holes for your size hardware
 
Yes so if the spot welds are say 1/4 inch I would start with a 1/8 finish with 3/16 . You don't have drill out completely just 90%then pop off with a chisel or pry off with flat blade screw driver. Now you can use the holes when you weld on to the next kettle or expand the holes for your size hardware

Awesome, thanks for the info. I'll give it a try. Just ordered a new set of cobalt bits. I've been needing a fresh set for a while now.
 
Great let me know how it goes , do you have s center punch or automatic center punch?
As when you first start to drill the bit will want to wonder sometimes.
The center punch gives the point a small starting point, this is the other reason to start the drill slower 100/300 Rpm that allows the bit to bite into the welded steel area. Once the bit has started get s good cutting action going you can increase you speed up to about 1000 Rpm.
 
That will work just fine . If while you are doing the center punch and the metal rebounds on you use something solid to back on the other side like and end of s 2 by 4 or the head of larger 48 oz hammer you may need a second pair of hands. Good luck
 
Picked up a decent donor bowl / lid candidate this morning for free. Found it on LetGo app. It's missing charcoal grate, but the main grate looks ok and has the flip sides.

Any of you guys know of a good way to remove the one touch cleaning blades? My old bowl had a decent set. I've soaked in Liquid Wrench, and it cleans up nice, just a little tricky to remove it.
 
Yes so if the spot welds are say 1/4 inch I would start with a 1/8 finish with 3/16 . You don't have drill out completely just 90%then pop off with a chisel or pry off with flat blade screw driver. Now you can use the holes when you weld on to the next kettle or expand the holes for your size hardware
I did this and it worked great. Ended up finishing with a 5/32" bit and it popped right off. Very important to stay in the center of the simple, like you mentioned.

20200415_133354.jpg


I also was able to get the one touch blades removed, but haven't cleaned them yet. Once I do I'll post pictures.

Now this bowl is stripped clean of any useful parts! Out to the backyard it goes to live it's life as a fire pit 🔥
 
Also, That free kettle I pictured up....the bowl is a little rusty and not in the best shape, so I won't be retro-fitting it with the Performer brackets. If I'm going to go through the trouble of drilling a kettle I want it to be in better shape so I can sell the complete performer for more.


Back
Top