Red Head Restoration


Patrick Nolan

New member
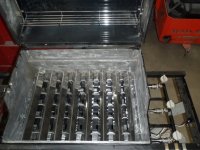
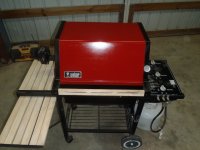
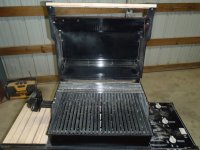
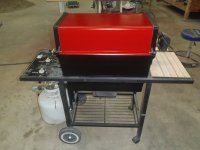
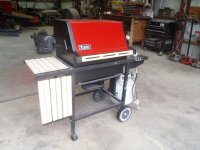
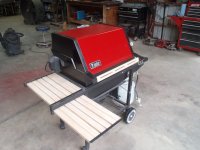
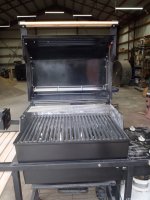
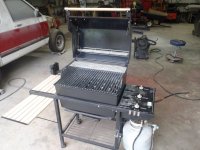
I am just about finished with my Genesis red head grill. I am the original owner. The restoration started with moving the grill into my workshop from the car port ahead of IDA. The front castors would not roll and one was broken. I replaced the castors and than I saw the rust on the lower grating shelf, rust on the wheel axles, rust on the frame, the sides of the fire box was all flakey, the flavorizer bars were rusted, the warming racks had no plating left, the wood slats looked like crap. I took the grill apart, repainted the frame, removed all the paint from the outside of the fire box, cleaned the inside of the box, replaced the flavorizer bars, the burners, the ignitor, the 2 warming racks, I fabricated new wood slats from rough cut cypress (2X6X10). I blasted the red ceramic off of the lid and repainted with HVT Red Caliper paint, All hardware is now stainless steel with the exception of the shroud bolts and the handle bolts. I had to replace the tube connectors in the 2 bottom crossmembers. P9110013 - Copy.JPGP9140017.JPGP9150001.JPGP9150002.JPGP9150005.JPGP9150008.JPGP9150009.JPGP9150010.JPG
 
Last edited:
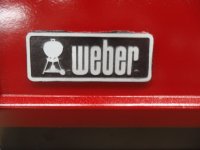
For the Weber emblem, I threaded the mounting studs to 8-32 threads and mounted the emblem with stainless Acorn nuts. The wood is Cypress, all the hardware is stainless. The flavorizer bars are stainless, the new burners are stainless. I got the push nuts for the axles from Tractor Supply store. I painted the outside of the grill with Rust-Oleum Ultra Grill paint. black paint. I blasted the lid to bare metal and painted the lid with Rusto-Oleum high temp. primer and top coated with HVT Red Caliper paint (Good for 900 Degrees) The tube connectors i got from Amazon and are made from stainless steel. I blasted and painted all the hardware for the wood tables, I blasted and painted the gas manifold. Blasted and painted the rotisserie bracket. I blasted and painted the tank scale housing. See the link below for the stainless tube connector from Amazon. The one question I am debating with myself is to leave the wood natural or should I apply a coating. I am open to suggestions.

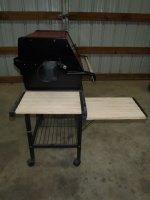
I did not like the way the first handle turned out so I made a 2nd one and butchered it so when I started the 3 handle I was very methodical and made the slots on my router table with a new bit. I practiced making slots on some scrap wood first. I ended up marking the beginning and ends of each slot. Than I practiced making a few plunge cuts. I also rounded over the 4 corners using a round over bit in my router table and once again I practiced on some scrap wood. The pics are the final product. I have a new cover on order along with some new grates.
P9160013.JPGP9160014.JPGP9160015.JPGP9160016.JPG

 
Last edited:
Not sure why someone would want to "blast off" the porcelain coating. That's one of the best features of these grills
 
Yeah I was thinking the same thing. Maybe really faded or badly scratched?

The paint job looks really good, but it won’t last like porcelain. In the long run when the paint fails he can get a donor hood. In the meantime, everything else also looks great and was done in a way that should go a good long time.
 
I knew I was going to take some heat but if and when if fails the coating fails I can always re-coat. The original hood was discolored and stained and would not buff out or sand out and at the time I did not know it was porcelain and once I stared down the rabbit hole of trying to sand or remove the paint I made it worse so I resorted to using my bucket blaster to take it down to bare metal prime and re-coat.
 
I agree. I think you will find that blasting the ceramic coating off the lid was a mistake. The paint will not last. But, no worries. Just about any 3 burner Genesis grill from 1985 to 2005 should fit your grill. There are hundreds of thousands of them out there and they get discarded or sold real cheap all the time. Just find one and grab the lid and clean it up the right way. Other than getting dirty, they are typically very durable.

Otherwise, I think you did a wonderful job on the restore.
Thanks, I will keep an eye out for a donor grill. I bought this grill brand new on sale at K Mart. When I went to check out it rang up over a $100 off of the sale price. I mentioned it to the cashier and the cashier called a manager and his comment was that whatever it rings up that is what it is. I got a killer deal on the original purchase.
 
I knew I was going to take some heat but if and when if fails the coating fails I can always re-coat. The original hood was discolored and stained and would not buff out or sand out and at the time I did not know it was porcelain and once I stared down the rabbit hole of trying to sand or remove the paint I made it worse so I resorted to using my bucket blaster to take it down to bare metal prime and re-coat.
What's a bucket blaster? I had something that sounds like that eons ago, and with a small compressor it takes forever to get anything done.
 
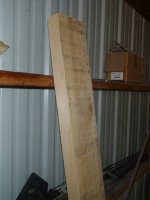
One other thing...that beam you show in the first picture leaning against the side of the workshop looks bigger than 2x6x10. Did you cut your slats from that?

EDIT: Maybe it's just me, but it looks like a 4x10 or 4x12. :unsure:
 
Last edited:
One other thing...that beam you show in the first picture leaning against the side of the workshop looks bigger than 2x6x10. Did you cut your slats from that?

EDIT: Maybe it's just me, but it looks like a 4x10 or 4x12. :unsure:
That was a 2X6X10' rough cut Cypress that a local lumber yard sourced for me. I ended using initially about 4 linear foot to make all the slats and the first handle.
One other thing...that beam you show in the first picture leaning against the side of the workshop looks bigger than 2x6x10. Did you cut your slats from that?

EDIT: Maybe it's just me, but it looks like a 4x10 or 4x12. :unsure:
What's a bucket blaster? I had something that sounds like that eons ago, and with a small compressor it takes forever to get anything done.
It is just a 5 gallon bucket filled with blast media and a siphon tube attached a blast gun and connected to an air line. I blasted in driveway and once the bucket is empty I sweep the blast medial up and screen the media back into the bucket. The siphon tube came out of my HF bla cabinet. I upgraded my HF blast cabinet with an upgrade kit from TP tools.
 
One other thing...that beam you show in the first picture leaning against the side of the workshop looks bigger than 2x6x10. Did you cut your slats from that?

EDIT: Maybe it's just me, but it looks like a 4x10 or 4x12. :unsure:
Rough cut lumber is dimensional meaning 2 X 6 actually 2" X 6"
 
That was a 2X6X10' rough cut Cypress that a local lumber yard sourced for me. I ended using initially about 4 linear foot to make all the slats and the first handle.


It is just a 5 gallon bucket filled with blast media and a siphon tube attached a blast gun and connected to an air line. I blasted in driveway and once the bucket is empty I sweep the blast medial up and screen the media back into the bucket. The siphon tube came out of my HF bla cabinet. I upgraded my HF blast cabinet with an upgrade kit from TP tools.
I have a DIY 4x4x4 cabinet with a DIY 10-gallon bucket but I wasn't sure what a bucket blaster was. I did a rear axle out of a '70 C-10 in my backyard like that but I used sand as the media.
 
I am aware, I have an external filter on the input port, a vacuum connected to a turbo separator with container that is connected to the output port in the cabinet this causes a slight negative pressure in the cabinet hat captures all the dust. I do not have any media leakage. My vacuum collects whatever does not separate into the container.


Back
Top