Older Genesis Hood End Cap Removal


John-NY

TVWBB Pro
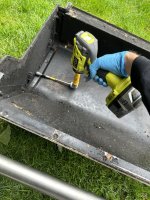
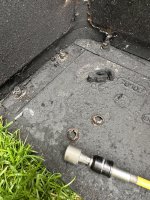
I’ve always been too intimidated to try to remove end caps but always see others post pictures of theirs ready for painting and I think to myself how did they get the bolts off?

There’s hardly any space to fit something in there to remove them.

I just concocted my own solution and it seems to work great.

Impact driver
Right Angle Attachment
Extension
7/16 Socket

Low speed and it pulls the little twist nuts right off
Hopefully this can help someone else.
IMG_0162.jpegIMG_0164.jpeg
 
I’ve always been too intimidated to try to remove end caps but always see others post pictures of theirs ready for painting and I think to myself how did they get the bolts off?

There’s hardly any space to fit something in there to remove them.

I just concocted my own solution and it seems to work great.

Impact driver
Right Angle Attachment
Extension
7/16 Socket

Low speed and it pulls the little twist nuts right off
Hopefully this can help someone else.
View attachment 77291View attachment 77292
I use a 7/16 deep socket and a 6 inch extention. The keys are length and angle
 
If I had the choice, I would go with BPratt's method. Power doesn't seem necessary for those little nuts. A longer extension and a 1/4" drive socket might be even better.
 
Even earlier Genesis hood end caps had both the flange nut access problem and the difficulty in keeping the round headed bolts from spinning.
I wedged a really sharp small screwdriver between the bolt head and the end cap to keep it from turning as I removed the dirty rusted nuts.
Bruce's recommendation to replace both bolts and nuts with socket head bolts and regular nuts is the right idea for these.
 
For removing them, I just use an extension on my drill driver/impact. That gives a good enough angle to grab the nuts. Either regular nuts or the self cutting kind. I have done a few hundred end caps that way.
 
For removing them, I just use an extension on my drill driver/impact. That gives a good enough angle to grab the nuts. Either regular nuts or the self cutting kind. I have done a few hundred end caps that way.
Quick question, the hood in my photo is a Genesis Gold. When I took the end caps off I can see how the hood liner separates from the outer hood itself.

Can the whole liner be removed, in order to clean between it and the outer hood, or is the liner somehow welded to the outer hood?

I can easily separate one corner but the rest seems connected and I don’t want to force it if they’re not meant to separate.
 
I think the two pieces are just pressed together but I don't think I would try and separate them. I just picture it not quite going back together the right way.
 
They are welded. It is a kind of pressure weld that many times is easily broken. Bottom line though, if the welds are still strong and not rusted out, then just leave it in. If they are broken or corroded to where you can easily separate the pieces, then just pull it out (maybe have to do a little cutting) and throw it away. Eventually, it is just going to rust and corrode to the point that pieces begin falling into the cooking area. Your grill lid might still be under warranty. If it is bad enough, and under warranty, Weber will replace it provided you are the original owner.
 
Quick question, the hood in my photo is a Genesis Gold. When I took the end caps off I can see how the hood liner separates from the outer hood itself.

Can the whole liner be removed, in order to clean between it and the outer hood, or is the liner somehow welded to the outer hood?

I can easily separate one corner but the rest seems connected and I don’t want to force it if they’re not meant to separate.
Hi John,

The liner is spot welded in. You could remove it but replacing it would be hard.

Yours looks good for it’s age. I would gently remove the loose stuff and get it back into service. Getting it to shine is probably futile.

If the liner is rotted you may be able to get another lid from Weber if you are the registered owner. Take pictures to document any rot before ripping out the liner.
 
I have done a few hundred end caps that way.
Thanks. What's your tried and true method to prep the end caps for painting?
Wire wheel? Wire cup brush? Pressure washing? Paint stripper?

I definitely won't be paying for sandblasting so wondering if there's a next best method, and how intense I need to go with removing the "old" paint.
 
I have mine blasted now. But I used to wire wheel them with the angle grinder and 4" wire cup brush. Then clean then off good with a good cleaner and then paint them. I use Rustoleum High heat ultra black.

As far as the existing paint goes: Basically, if it is intact, leave it alone and paint over it, but if there are chips and peeling going on, then you need to strip it to bare metal for it to look good.
 
Yah, I am totally willing to pay someone to do my sand blasting. I wouldn't personally mind doing it, but the start up cost to be able to do something the size of a cook box would be significant and I just don't want to have to deal with trying to store the unit and drag it out when I need it and then deal with the blasting media and all that. For what I pay to have it done, I am satisfied to let someone else do it.
 
I’ve always been too intimidated to try to remove end caps but always see others post pictures of theirs ready for painting and I think to myself how did they get the bolts off?

There’s hardly any space to fit something in there to remove them.

I just concocted my own solution and it seems to work great.

Impact driver
Right Angle Attachment
Extension
7/16 Socket

Low speed and it pulls the little twist nuts right off
Hopefully this can help someone else.

View attachment 77291View attachment 77292
That right angle accessory looks like a nice addition for that job - and others as well.


Back
Top