Looking to build HM but have some questions


Steve Conway

New member
Hello,

I have a Large BGE and have been looking for an automatic temperature control system for awhile. I have been looking at the DigiQ DX2 but then ran across HM and have been reading the Wiki and these forums for a few weeks! Very impressed that this DIY project exists. Plus I have a rPI B+WiFi adapter lying around collecting dust. I am looking to pull the switch and start ordering stuff, but I was hoping to get a few questions answered from the community here.

1. I have very little experience soldering. I do have a solder pencil from Radio Shack. A very cheap one. Will this work or should I purchase/borrow something a little better? Also, do I need flux when I solder this or if I use the Rosin Core Solder I'll be ok?

2. I'm not sure if I should go with just the 4 probes or with the thermocouple option. I understand that the TC will allow me to go high on temperatures, but why would I even use this bad boy when I'm cooking pizza? I would just open the top and bottom of the egg and let her get as hot as possible. Or if I'm grilling at 450, do I really need the HM? I was assuming that I would use the HM on only low and slow sessions. Do people use it for higher temp cooks? Any advice here would be helpful. I don't want to spend the extra money on the TC option if it won't help me. If you do tell me to go TC, is the build more complex? I do plan on buying the kit.

3. I'm still a bit confused about the Servo/Damper. Especially regarding the configuration. Does the fan blow into a tube that has a servo motor controlling airflow and then this is connected to the bottom of my egg? Is this really required or can I just go with the fan? What are really the problems if I do go with just the fan? Can I add the servo / damper later or is it better to do it now? I don't really see a standard build for the blower/servo anyway. Looks like more people figure that out themselves.

Anyway, sorry for the basic questions. Thank you for your help!
 
You've certainly covered your bases question wise....

First off, I did the same, looked at all the commercial units, then looked at the total price, which can get steep... Then I found the HM and studied up like you. Initially I was trying to get the controller on the cheap DIY style, but as it turns out the HM is actually far superior in a lot of ways than the more expensive commercial units as well. So your research time was well spent.

1) Soldering can be done with most cheap soldering irons and rosin core solder, finer tip is better. I dont know what a "pencil" soldering iron is but I have build HM's with both 25 and 40 watt Radios Shack soldering irons and standard solder. Flux can be helpful in getting solder to flow, but only really NEEDED when doing the SMD (surface mount) soldering. The only SMD work on the HM is the Thermocouple (TC), if you buy the kit you can order the board with the SMD stuff already soldered to the board so you dont have to worry about that. If you have little experience with soldering I would tell you to avoid the SMD work but dont worry about the through hole soldering, pretty easy stuff and lots of first time solderer have done it...

2) TC's in general are a bit more rugged than standard probes (which tend to die easily if exposed to water or over heated the slightest bit). There is a huge variety of TC's available, for cheaper and more expensive than standard probes. I bought a Thermoworks TC for over $30, but it is completely water/steam proof and can handle over 2000F! I've left it outside through summer and now most of a midwest winter and it still going strong, that would have killed a handful of standard probes.... So price/availability/durability are also factors.
Beyond that, yah, high temps are the main selling point of TC's. Standard probes from Thermoworks max out somewhere over 500F, Maverick about the same and their high heat version can handle a bit over 700F. I do use my HM for high heat cooks, pizza, steaks etc and it is the reason I went TC, in addition to durability which weighed in about equal for me. I guess you can do pizza without a controller, but when you build heat up in the grill really high and then lift the lid to insert food the pit can tend to rage out of control with temps going ballistic when you close the lid. If you decide to try and use the HM to run a high heat cook at 500F with a standard probe that can handle 700F, when you close that lid you can easily get a spike of temp that will kill that probe, even if its just momentarily. Trust me, I've killed more than my share of probes..... I do like to use my HM on high heat cooks, not only because I built it and want to use it, but I want my grill to be regulated like an oven (better than really) when I cook my pizza. Your call on the high heat cooks, if you do them now on the BGE and have it down and don't want/need the HM to assist thats up to you...

3) The servo damper is optional, the initial reason for its existence is because the HM fan does't have any way to stop air flow when it stops blowing, so it leaves an opening for air to freely flow onto a fire that has just been stoked up by a blowing fan... So often times the HM would stoke the grill to temp and the blower turns off but air keeps flowing by convection and the target temp can be either overshot by a fair margin or sometimes it may overshoot a bit and remain elevated for the duration, meanwhile the HM (originally) had no way to tamp down the flame. The servo damper is there to close off or reduce the convection flow (there are many options in the settings for how the servo will function) so the HM can lower the temp in the pit rather than just raising it. This is more useful at low and slow temps where a very small fire can overshoot the target temp. I have designed quite a few dampers, from the passive "ping pong ball" valve to my most successful design the 3D printed Roto Damper. The roto damper is basically a valve that sits between the blower and the grill that is fully variable and capable of completely closing off the air flow from the bottom vent, to the point where you can actually use it to shut down your grill and put out the fire (saving remaining coals for another cook). The Roto Damper has both the servo damper and the fan, so you can run it many ways. For low and slow I like to set the blower to "On at Max only", this way the blower will stoke the pit until it hits the target temp, then when the HM backs down from 100% to 99% the blower turns off and the servo damper will adjust the vent opening to control the fire much like you would do manually by hand, only you don't have to sit there for 15 hours watching your brisket! What I like about this mode is it has lower air flow than when the fan is blowing, so food stays moist, less coals burned, you can run the top vent very wide open to let stale smoke escape rather than closing it down to choke down the fire. For high heat cooks I flip the scenario and let the fan run all the time and set the servo damper to Open/Closed only. This way after you open/close the lid and get that spike of temp the damper will close down and get the pit temp back down to were it should be and the open back up and let the fan run the show. Others let the fan and servo both work all the while, to each their own, many different configs for many different grills and cooks....

Here is a short video of one of my original Roto Dampers in action to give you a better visualization:

The blower is in the bottom, air flows in the direction of the arrow, as the roto damper turns to the right the valve opens larger. You can see the full evolution of the roto damper in the thread titled "INTRODUCING the Roto Damper"
I've babbled on good enough I think, hope I've helped to answer some of your questions....
 
Last edited:
Oh, btw, just remembered you posted you already have a "rPI B+WiFi"... I hope that is a rPi Model B plus a WIFI adapter, because the HMV4.2 doesn't mate with the rPi Model B+ properly, so rPi B+ will NOT work, but rPi B, A or A+ will....
 
The type of solder you have also matters, using smaller 0.5mm diameter solder will help in ensuring the solder melts quick enough and you don't end up with gobs of it everywhere. That said, don't be stingy on the solder. Make sure you heat the pad + component and get enough solder on to cover the whole pad.
 
Awesome! Thank you both for the great information. This is really helpful. I have decided I'm going to go through with the HM build as a result. I'm also going to go with the TC option. I have had probes fail in the past and if I can avoid it by going with the TC option, that makes more sense to me vs the ability to control a high heat cook.

I'm going to go fan only for now. At least initially and I'lll see how well it controls the temps. As you mention, I can add the servo later. I absolutely love the Roto Damper design! I'm sure I'll be posting more questions, but thanks so far. I'll also be PM'ing Tom for a case soon! :)

BTW, I do have the Raspberry PI Model B, not the B+. Thanks for checking!
 
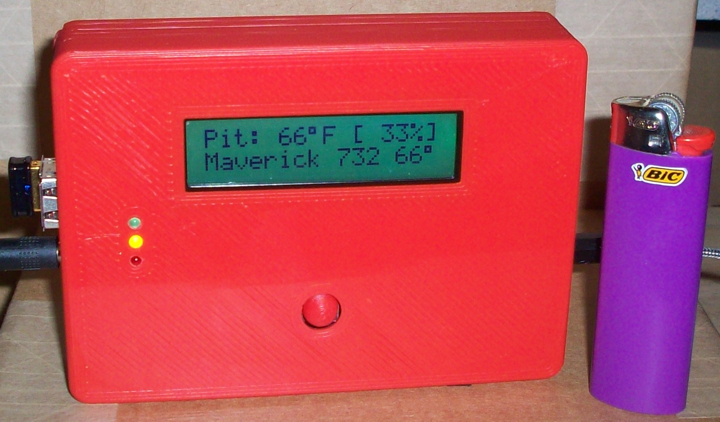
Just FYI, I also designed my own version of a case for the HMv4.2. It has a one piece body with a back plate that will slide on and off instead of using the four allen screws to secure it together. I find it much easier to get the boards in and out of the case and my thumbs love me for ditching the allen screws! I also made a 3D printed button nub that kinda gives the look of one of those laptop eraser head pointer devices. Here's a pic and a short video showing how easy it is to install the boards into the case. Let me know if you are interested.
HMv4.2.3CaseBic.jpg

 
I like that case design. You planning to do a similar one for the 4-line LCD case using the the Pi A+? I gotta get me a 3d printer. The creativity I see and what you can do with them amazes me!
 
Well, I could do a case for that but I would have to buy the display to make a test fit or work closely with someone that has one. Right now my case is focused on the stock board set with the display mounted to the HM board... I could make the case a bit bigger and create an opening for any number of displays that would mount to the case and connect with a ribbon cable (or wires) pretty easily . Or if you have the 4-line display mounted directly to the HM board and a caliper you could provide me some dimensions and I can get a case made for that board set.... I've already got the A+ version of the case together and tested....
 
I think Tom Kole already has the 4-line LCD case published? He printed two for me. I was figuring you could take that case design and just tweak it for a sliding back (potentially). The 4-line LCD's can't be directly mounted to the HM, so the only option is ribbon cable at this time. I have an extra damaged 4-line LCD I could send sometime if I consider making more units. I also have a caliper if accurate dimensions are needed.
 
I build my own cases from scratch, it's my own design made by measuring the board set with a caliper etc. Toms case is a totally different concept, its split down the middle into two pieces which are secured together with allen bolts. Mine has a one piece body with a slide in back plate, so not that easy to go from one to the other, nor would I want to go about it that way. Given the dimensions it's plenty easy for me to modify my case to work with other displays, and I'm willing to do it if you prefer the no screw sliding back style case. Of coarse, as you stated, Tom already has cases put together for quite a variety of displays, so if you like that design that's another way to go...

EDIT:
PS I have one 4 line display somewhere on my HMv4.0... I will have dig it up and crack the case open to see what model display that is... Otherwise, what I would need is measurements of:

The overall length and width of the display circuit board
The location of the mounting holes (how far from board edges to center of hole)
The overall length/width of the display (actual glass part)
The length/width of the visible area of the display
The location of the display on the board if it is not centered
The distance from the visible face of the display to the circuit board

And come to think of it, if you give me the display model number I guess I could get all that from the datasheets...

From this I could build a pocket the display can sit in and screw down to....
 
Last edited:
Just FYI, I also designed my own version of a case for the HMv4.2. It has a one piece body with a back plate that will slide on and off instead of using the four allen screws to secure it together. I find it much easier to get the boards in and out of the case and my thumbs love me for ditching the allen screws! I also made a 3D printed button nub that kinda gives the look of one of those laptop eraser head pointer devices. Here's a pic and a short video showing how easy it is to install the boards into the case. Let me know if you are interested.
HMv4.2.3CaseBic.jpg

Hi Ralph,

Have you posted the .STL files for your case?
 
I don't have an "official" thread for my case, but email me at rotodamper AT hotmail.com and let me know which version you need (TC, No Tc, rPi A B or A+) and I will send them to you.....


Back
Top