Kettle pizza oven


Originally posted by AJ S.:
I think a bit of smoke would "Adhere" to the pizza, even if cooking it for just a couple minutes. Just my opinion..

Yes it does. I've tried it with 4 chunks of oak and definitely did the trick.
 
I think the wood is to add some authentic wood oven flavor, the charcoal heat does the cooking.

The inventor (Al) states twice in his demo video with the Weber Performer and the KettlePizza accessory that hardwood is needed to get the kettle to the proper temp for pizza, that you can't get there with charcoal alone:

Performer + Kettle Pizza

That said, I'm sure that if you added a ton of charcoal, you might get close, but it'd be more expensive that way.

Tony
 
Interesting,
I would think that you would have too much air getting to the wood. Seems like it would just be flaming. I guess that blows my theory out of the water!
 
In Yet Another PIZZA Thread from George he says that we can prop the lid up a 1/4 inch and get good results. I plan to get a couple shims or sticks and raise the lid a little to keep the fire high and lift the stone up a little higher towards the lid as Brian states. Now to make some dough for it.
icon_smile.gif
 
I would think that you would have too much air getting to the wood. Seems like it would just be flaming. I guess that blows my theory out of the water!
Yep. It is flaming and it does seem to raise the air temp inside quite a bit. I have seen a similar effect when my masonry heater is burning down - the coals produce a lot of heat but not much radiant energy - even a tiny flame puts off much more heat from a distance than the big pile of coals.

Somewhat OT but I tried cooking a pizza directly on a stone for the first time. The house was cool and bugs were bad outside so I wussed out and used the oven.

I used the shiny pan that came with the oven kit as a peel, not having the real thing. Probably used too much flour but I found that stretching the dough out embedded some flour in the bottom of the pizza and more was needed to keep the pizza moving freely. That suggests I should be "pulling the dough out" with thumb and fingers rather than "pushing it out" with fingers maybe.

Anyways, I managed to get it onto the stone with a vaguely pizza-like shape and most of the toppings. Cook time was roughly the same as with a pan at 550F but the crust was much crispier. This suggests that using a stone with the oven and pre-heating for a while should be a pretty good technique. I will try +stone -oven as well for completeness.

This kind of testing involves eating a lot of pizza (it's too good to let it go to waste and reheating doesn't help if you're already making the next pizza) so I have cut the amount of cheese down by 50%
icon_wink.gif


Geez, I only have one dough ball in the fridge, time to make more. Bye.
 
This kind of testing involves eating a lot of pizza (it's too good to let it go to waste and reheating doesn't help if you're already making the next pizza) so I have cut the amount of cheese down by 50%
icon_wink.gif

Ah yes, the trials and tribulations of scientific investigation.

(in my best W.C. Fields imitation...)

icon_smile.gif
 
Would any of you folks divulge your dough recipe? Also, what kind of flour do you use and if its special, whaere you buy it from, etc.
Please and thanks.
 
I normally use something like :

2 cups flour (anything from 100% unbleached all purpose to 100% whole wheat, usually 50/50)
3/4 teaspoon kosher salt (maybe use a bit less if regular salt)
3/4 teaspoon Fleischmanns Quick Rise instant yeast
roughly 7/8 cup water (3/4 cup is too little, 1 cup is too much)

I picked up a kitchen scale recently and really should start using it for baking (main use so far has been determining moisture content in firewood and figuring out how much the frozen hunk of meat weighed so I could defrost properly in the microwave). I usually start with too little water (say 3/4 cup) and add water as needed, which is probably the worst way to do it based on current thinking about mixing techniques.

EDIT - out of curiosity I weighed most of the ingredients used in the last batch. I used the last of the unbleached flour so this is for 100% whole wheat flour :

flour - 305g (100%)
water - 190g (63%)
salt - 4g (1.3%)
yeast - 3g (1%)

Looks like I use less salt than many folks, but I could reduce the yeast significantly as long as all of the dough was going to ferment in the fridge for a while before using it. Anyways, end of edit and back to original post :

Kneading is by hand, usually until the dough "relaxes" then another 30 sec to 1 minute. I figure it's going to sit in the fridge for a couple of days so I can get away with not a lot of kneading, but need to do more testing before I can say that for sure. Usually makes two pizzas.

Just finished making a double batch with 2-2/3 cups of unbleached all purpose flour and 1-1/3 cups of whole wheat flour. I find the small square containers fit better in my fridge and partially flattening the dough ball should mean a bit less handling once it comes out of the fridge - most people use round containers and I did as well until all of mine broke or disappeared somehow.

DSCN3169.jpg


The four balls made from the double batch are on the right. Middle column is (top to bottom) the last ball from a 100% unbleached batch made yesterday, home-made sauerkraut and home-made kimchi. The anchovies are for salad dressing. Still can't stand them on pizza.
 
OK, picked up a cheap wood peel last night and tried a couple more pizzas. Didn't go as badly as I feared.

Used a chimney of briquettes this time, along with some kindling-sized firewood (a bit bigger than my thumb, ~16" long, 3 of them). Due to a brain fart I made up the pizza too soon *and* put the hardwood on sooner than planned, so decided that I would "evaluate the impact of rising stone temperature on the top-to-bottom cooking balance" and put the first pizza on while the flames were going and the stone had only heated for a few minutes.

Woo hoo - my first char !!

I had the coals and firewood off to the left of the opening, maybe from 8-o-clock to 1-o-clock. Stone was close to the front and off to the right a bit (ie other side of the kettle). Some of the firewood rolled down the coals and burned under the stone so I worried about a hot spot there, but in fact it worked out the other way.

The pizza cooked quite quickly - after maybe 3 minutes the crust on the side side *away* from the flames (right hand side near the opening) cooked first and looked almost done. I rotated the pizza something like 180 degrees (it's not as easy as it looks, particularly when the left side of the pizza is still soft) and let it cook for a few more minutes, then pulled it out.

Wish I had taken pictures, but it got eaten too quickly. Top was cooked perfectly, nice char on the crust, but the bottom was "only just" cooked enough, ie no char and only a hint of brown on the bottom. This makes sense since the stone was almost cold. Total cook time was maybe 6 minutes but I was tired and it was all happening pretty quickly so no exact timing and no pics.

By the time I got the second pie on (~16 minutes after the first pie went on) the hardwood flames had died down and the oven temp reading was down to about 600F and continuing to drop. Absent a big whack of heat storage it looks like I either need to use bigger chunks of wood (so it will burn long enough for multiple pies) or plan to top up the wood after each pie (pretty easy since you can just lift the kettle lid and drop the wood in as long as you leave a flip-up grate section open over the coals).

Second pie was kind of boring - evenly cooked and slightly crispy crust but the stone wasn't hot enough yet and there wasn't the rush of hot air on top from the hardwood, so it was a slower cook and my main observation was that I used too much flour on the peel.

I'm wondering about putting a couple of firebricks on the stone on edge to provide a bit more heat storage, maybe using them as a bit of a divider between flames and pizza. That's kind of what I do when smoking on the kettle (firebricks between coals and that-which-is-being-smoked) but not sure how that will work for pizza.

I guess the next step is to experiment with the wood I use, maybe bigger chunks, and a longer warmup time for the stone. If I can get that figured out then will try the same approach but with just the kettle (ie without the oven kit) to compare the results. That said, it sure is handy being able to peer in and see how things are progressing without having to lift the lid every couple of minutes.
 
I like the posts about the oven John. I did a similar pizza test a few years back. I ate a lot of pizza, but I also learned a lot. It seems like it's hard to duplicate the same one twice. I have come up with a couple new ideas I will be trying since reading your posts. Thanks again.
 
Hi guys. I just got a kettle pizza insert and wanted to share my experience with you all, since this board was the reason that I decided to give it a try.

My kettle pizza arrived today, and I put it together in about 10 minutes. It is very easy to assemble, and pretty much anyone can do it without issue. My setup came with the insert ring, handles, a thermometer, a wooden pizza peel, and a pizza stone.

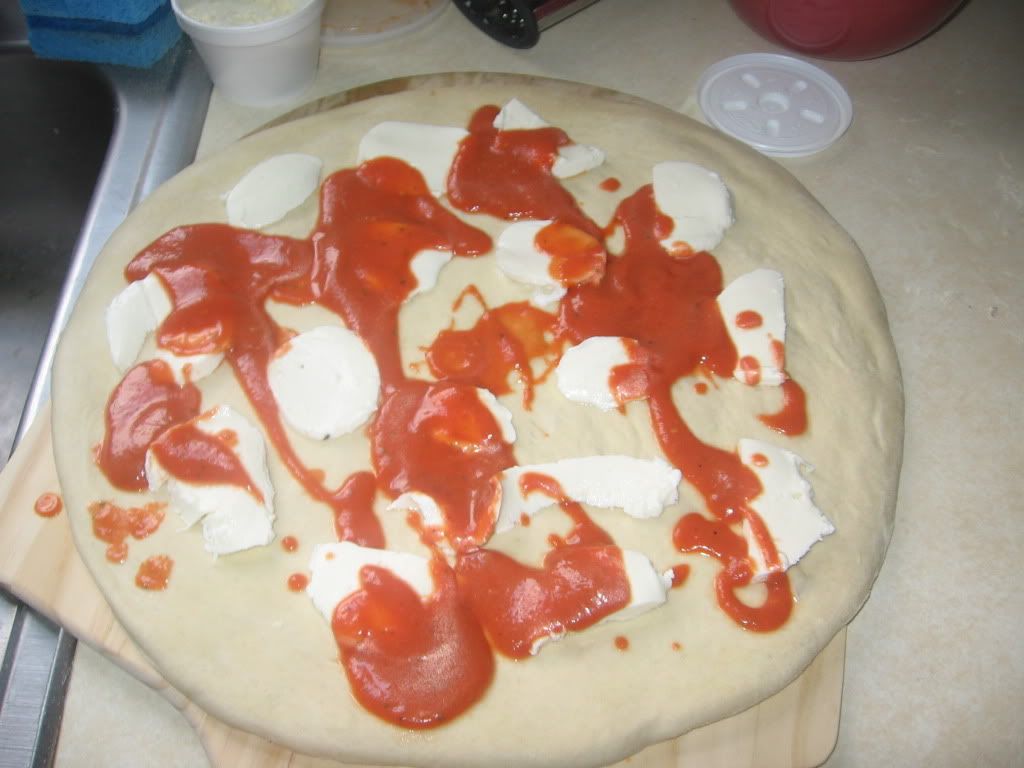
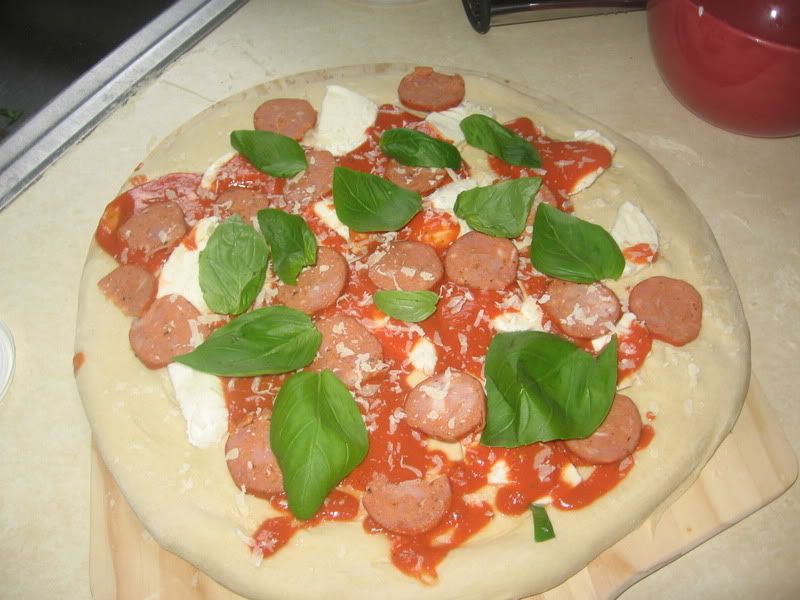
Due to time constraints, and my not wanting a bad recipe to ruin my test of my kettle pizza, I bought the dough from my local pizzeria. I used Cento sauce from a can, fresh sliced mozzarella, and Hormel pepperoni from a bag.

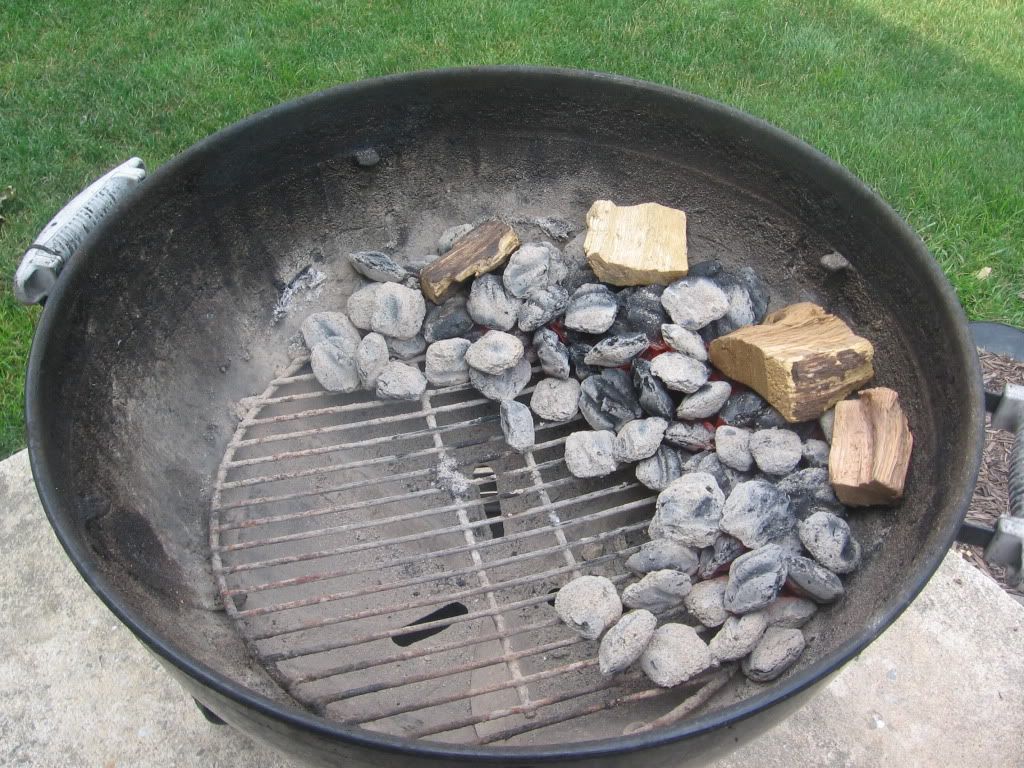
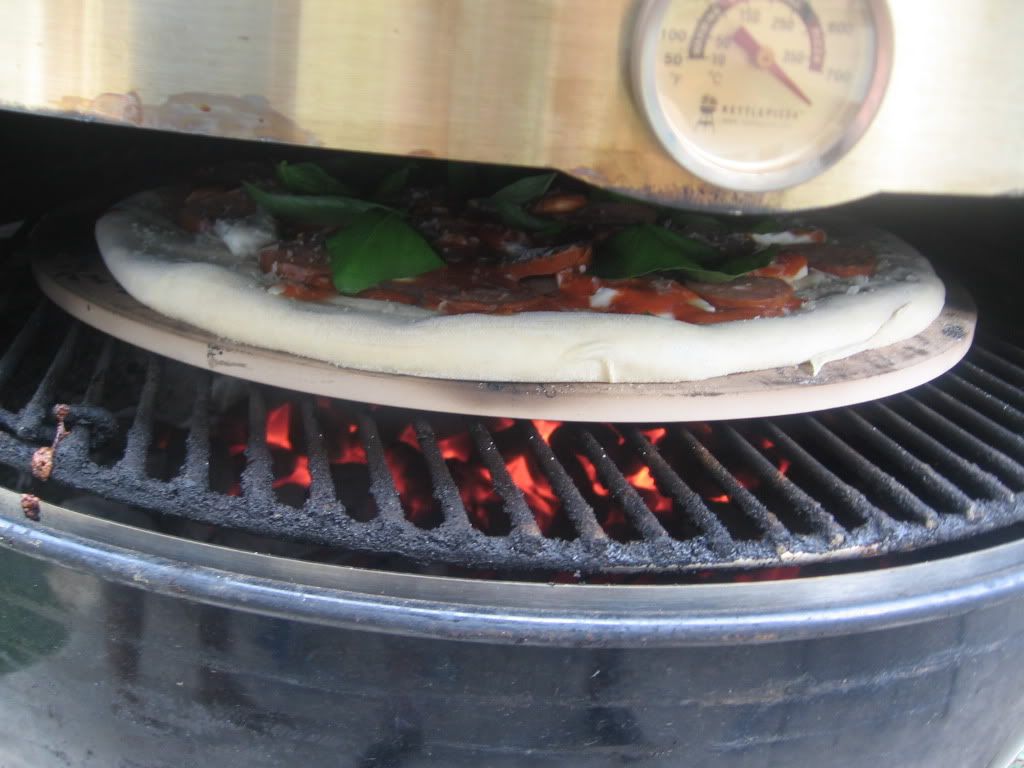
I started the pizza kettle using the manufacturer's directions. A full chimney of Kingsford, and poured them in a C shape around my stone. I then placed 5-6 good sized chunks of hickory on top, of the lit coals. I inserted my kettle pizza with my grate, then my stone, and then covered it with the top vents closed. While my stone heated up, I went to assemble my pizza. I assembled the pizza using this method. http://vimeo.com/12139660. dough, fresh mozzarella, sauce, fresh parmesan cheese, pepperoni, fresh basil.

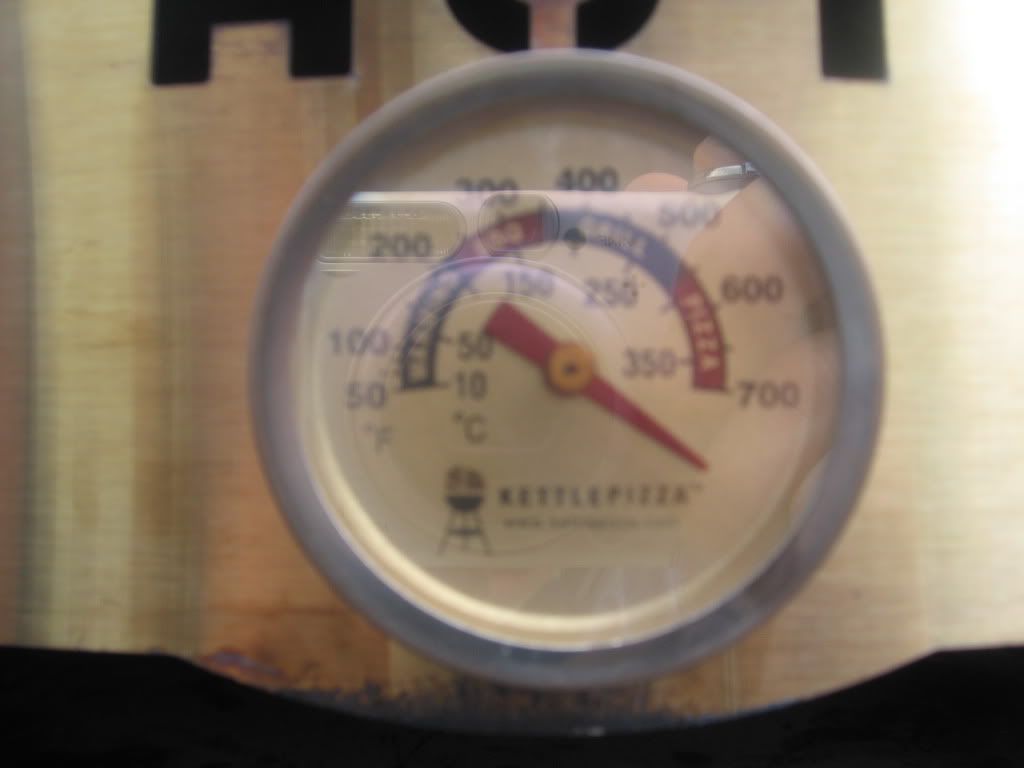
My kettle temps climbed very quickly, and within 10 minutes, the needle on my thermometer was pegged past the 700 degree mark. When my stone turned a bit brownish, I figured that it was hot enough to cook pizza on. I placed my first pie in my kettle.

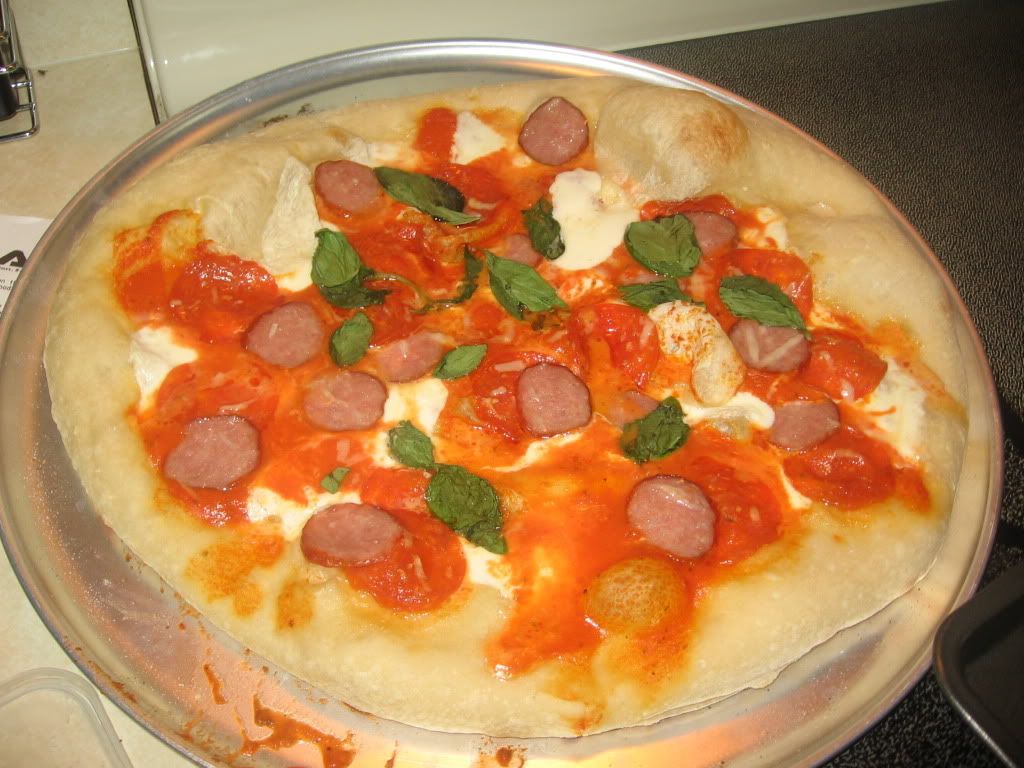
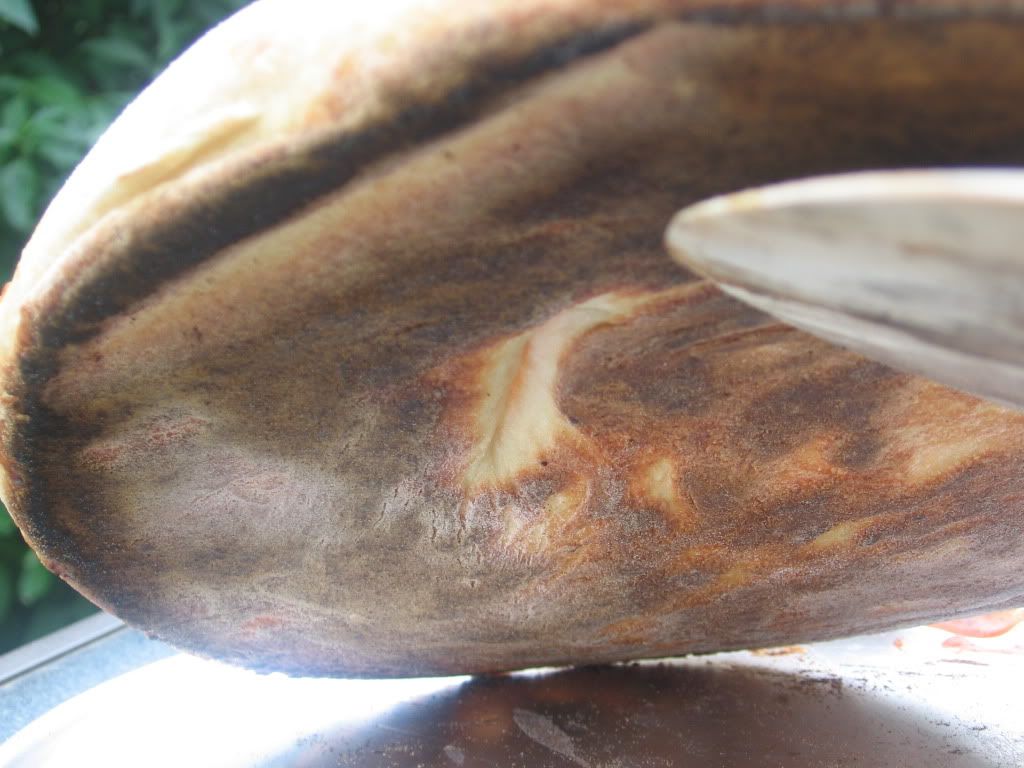
My reason for wanting the kettle pizza was because of the claims that a traditional oven will not get hot enough to cook pizza. I also wanted to mimic the classic brick oven approach without having to modify my actual oven. The pizza kettle delivers in this area. In fact I burned my first pie due to overcooking it. It did have a nice char on it, but more than what I am looking for. My second pizza came out great. Both were easy enough to manage, but the temps were right at 700 or so for my second pie. Both turned out delicious, and my wife and 13 year old son enjoyed both pizzas. They were nice and crispy on the bottom, and the toppings were cooked nicely as well.

Overall, I am very happy with my Kettle pizza, and I believe that this product does what it claims. I stopped cooking about an hour ago and my temps are still up around 500 degrees. Once I learn to make my own dough, and when I add my own pizza sauce, I feel that my pizzas will be as good as any out there. I hope this review helps those who are on the fence about purchasing this product. I also have the EZ-Q rotisserie, and I feel that this is on par with that as being a quality aftermarket product for the Weber kettle.
 
Thanks Shaun! I still have 1 dough ball left, so this weekend I will make my sauce and buy some nice high end ingredients. I will take and post some pics.
 
I tried a couple of additional cooks with the coals and wood at the side rather than at the back, thinking it might keep the hot air inside longer. I think I'm going to go back to having the coals at the back of the kettle... seems like that gives the most even cooking.

When I posted dough recipe using weight rather than volume a few days ago I realized I was using more yeast than needed. Tonight's cook will be the first with 1/2 the yeast I used before.
 
I may have missed it in this thread, but one thing that has been a huge help for me in cooking pizza on the kettle is an infra-red thermometer to measure stone temps.

I rescued on old 22.5" from going to the dump and converted it to a dedicated pizza cooker that is gas fired.

With a stone temp reading you learn how long the stone takes to warm up, and with a bit of practice you can figure out the temp you need to get the crust and toppings cooking together at the proper rate.

Before this thermometer I tried cooking by guessing. One night I had one good, and the next was badly burned on the crust. Good thing it was my wife's pizza !
icon_eek.gif
 
Harbor freight had a good deal on laser thermometers this past week. The deals come and go, so you can either wait, or use a 20% off coupon. I think this weeks deal was nearly 50% off.

My KettlePizza should be here on Monday the 13th, which will give me a few days to play before using it for the family on Father's Day.
 
IMG_0547.jpg


Some pictures of my latest work. The dough was not mine, but from my local pizzeria. These pies came out great! Great crust, and nice toppings. The pictures make it look like the toppings were runny. That was not the case at all. These were very nicely cooked!


Back
Top