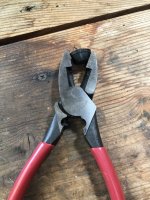
How to remove wheels....technique?


JimV

TVWBB All-Star
Ok I'm Back!!!! The grilling world has really slowed down here in VA. Craigslist and Facebook have been slowwwwww. I know this is probably the most basic of basic questions......BUT
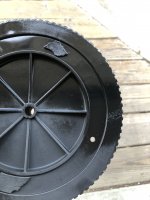
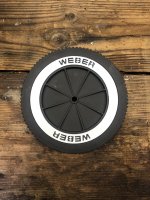
I am restoring an old schooler....blue top.... and I want to replace the rusted axel and deep clean the wheels while I am at it. In my short Weber career I have only removed one wheel and it just seemed like an odd design to me. Is there a better technique then just wedging a claw or a large flat head behind the wheel at 50 different angles until the wheel finally gives up? Whats the pro...slicky boy method? I inserted a pic because pics are mandatory :)20200703_100755.jpg
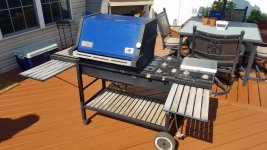
 
I use a heat gun to heat up the plastic cap on the push nut just enough to make it pliable enough to gently pop it off, then gradually pry off the push nut ring itself. You can then insert the ring back in the plastic cap and reuse it.
 
I keep a supply of Weber wheel caps so I don't care how it comes off. With the older thru frame axels you can get away with removing only one cap.

The other trick is leave the wheel on and remove the white ring. You can clean and paint the black part of the wheel while it is on the frame.

I clean and paint the white ring and re-install once the black part is finished.
 
I lube the push nut ring then alternate between banging it out using a 2x4 against the back of the wheel and prying the ring off. Takes time but works for me.
 
I do what you do, just pry around the push nut until it finally comes off. You can buy replacements at the hardware store if you wind up trashing them.
 
Huh......who'da thunk that would have been a good question :) Ya those push nuts just seem like an odd design to me. My wife got to me before I could start on the grill so I will have to tackle the grill this evening. She knows now when she sees that look in my eye that I will be in the garage for a few hours scraping carbon.
Thanks for the replies.
 
I keep a supply of Weber wheel caps so I don't care how it comes off. With the older thru frame axels you can get away with removing only one cap.

The other trick is leave the wheel on and remove the white ring. You can clean and paint the black part of the wheel while it is on the frame.

I clean and paint the white ring and re-install once the black part is finished.
I follow the same procedure. I have a stash of the nuts and I always remove and thoroughly clean - and repaint - both the wheel and the white sidewall.

If you don't it's like putting on a tailored black tux then slipping into brown shoes. :george: ;)
 
Ha! Yep good point. A restored grill with dirty wheels and a rusty axle just doesnt sound right.
 
I think they are 1/2". You buy the push nut with the cap....not sure if you can buy them separate, but you might be able to.
 
I would imagine you use more of a matte paint for the white sidewall?
Dan for the wheel black I use Rustoleum All in One Primer/Paint in Satin. just two three light coats. Caution it is sort of hard to spray in between the wheel's "spokes." Several light coats eventually get me to where I like it. 4 the white I use Rustoleum 2X Primer/Paint in Semi Gloss, which when applied looks pretty flat to me, regardless, it makes the wheel/whitewall look really sharp. Obviously spray paint not brush on. Before that I would armor all the plastic but it didn't impress.
 
Bruce - what size are the replacement push nuts at the hardware store? Have a picture of one?
 
Bruce - what size are the replacement push nuts at the hardware store? Have a picture of one?

They are 3/8" Push Nuts.

Two options here...
Option one:
Go to the hardware store and purchase new 3/8" Push Nut's, one problem, they are only sold in White at least at all the Hardware stores I've seen. See my pic in Ed's post above.

Option two:
Fastenal as well as others sells the black 3/8" Push Nuts

If shopping at Fastenal you can also pick up the Stainless 3/8" axle rod. It comes in 6ft lengths so enough to cover several grills.

Jeff
 
Last edited:
Hey thanks for the ebay link.....boom done!!!!

Fyi......I ordered a 304ss axle rod from Grainger 6ft crazy cheap....sorry no link
 
Here is my order from Grainger........under 10 bucks!!!
U19G69g6XVcdgG2qe5MnwVq_zBw1RYolKCHzmB-5sgDT3rJYIJ1Ml74-gCBfF_tuRG_Wp8vuFcSe0-3WhpoGbhHIImqb_-Up5oywKBki645OW6kJk4iwoG25My4lz5EV3sQTblN_0r60BOBX7GXWLWW5qI1XlnMfZhtFynii-4rBvsNB86-dCs9zYY4uVRgBX-aF3L-BKFZPM7hIHJUkLyPnsMKn=s0-d-e1-ft
MY PURCHASED PRODUCTS
U19G69g6XVcdgG2qe5MnwVq_zBw1RYolKCHzmB-5sgDT3rJYIJ1Ml74-gCBfF_tuRG_Wp8vuFcSe0-3WhpoGbhHIImqb_-Up5oywKBki645OW6kJk4iwoG25My4lz5EV3sQTblN_0r60BOBX7GXWLWW5qI1XlnMfZhtFynii-4rBvsNB86-dCs9zYY4uVRgBX-aF3L-BKFZPM7hIHJUkLyPnsMKn=s0-d-e1-ft
GRAINGER APPROVED
U19G69g6XVcdgG2qe5MnwVq_zBw1RYolKCHzmB-5sgDT3rJYIJ1Ml74-gCBfF_tuRG_Wp8vuFcSe0-3WhpoGbhHIImqb_-Up5oywKBki645OW6kJk4iwoG25My4lz5EV3sQTblN_0r60BOBX7GXWLWW5qI1XlnMfZhtFynii-4rBvsNB86-dCs9zYY4uVRgBX-aF3L-BKFZPM7hIHJUkLyPnsMKn=s0-d-e1-ft
Rod, Ss, 304, 3/8 In Dia X 6 Ft L
U19G69g6XVcdgG2qe5MnwVq_zBw1RYolKCHzmB-5sgDT3rJYIJ1Ml74-gCBfF_tuRG_Wp8vuFcSe0-3WhpoGbhHIImqb_-Up5oywKBki645OW6kJk4iwoG25My4lz5EV3sQTblN_0r60BOBX7GXWLWW5qI1XlnMfZhtFynii-4rBvsNB86-dCs9zYY4uVRgBX-aF3L-BKFZPM7hIHJUkLyPnsMKn=s0-d-e1-ft
Item # 2EXJ5
U19G69g6XVcdgG2qe5MnwVq_zBw1RYolKCHzmB-5sgDT3rJYIJ1Ml74-gCBfF_tuRG_Wp8vuFcSe0-3WhpoGbhHIImqb_-Up5oywKBki645OW6kJk4iwoG25My4lz5EV3sQTblN_0r60BOBX7GXWLWW5qI1XlnMfZhtFynii-4rBvsNB86-dCs9zYY4uVRgBX-aF3L-BKFZPM7hIHJUkLyPnsMKn=s0-d-e1-ft
Price $8.18 / each
U19G69g6XVcdgG2qe5MnwVq_zBw1RYolKCHzmB-5sgDT3rJYIJ1Ml74-gCBfF_tuRG_Wp8vuFcSe0-3WhpoGbhHIImqb_-Up5oywKBki645OW6kJk4iwoG25My4lz5EV3sQTblN_0r60BOBX7GXWLWW5qI1XlnMfZhtFynii-4rBvsNB86-dCs9zYY4uVRgBX-aF3L-BKFZPM7hIHJUkLyPnsMKn=s0-d-e1-ft
STATUS
U19G69g6XVcdgG2qe5MnwVq_zBw1RYolKCHzmB-5sgDT3rJYIJ1Ml74-gCBfF_tuRG_Wp8vuFcSe0-3WhpoGbhHIImqb_-Up5oywKBki645OW6kJk4iwoG25My4lz5EV3sQTblN_0r60BOBX7GXWLWW5qI1XlnMfZhtFynii-4rBvsNB86-dCs9zYY4uVRgBX-aF3L-BKFZPM7hIHJUkLyPnsMKn=s0-d-e1-ft
Preparing for Pickup
U19G69g6XVcdgG2qe5MnwVq_zBw1RYolKCHzmB-5sgDT3rJYIJ1Ml74-gCBfF_tuRG_Wp8vuFcSe0-3WhpoGbhHIImqb_-Up5oywKBki645OW6kJk4iwoG25My4lz5EV3sQTblN_0r60BOBX7GXWLWW5qI1XlnMfZhtFynii-4rBvsNB86-dCs9zYY4uVRgBX-aF3L-BKFZPM7hIHJUkLyPnsMKn=s0-d-e1-ft
Expected to Arrive on Wed Sep 23*
U19G69g6XVcdgG2qe5MnwVq_zBw1RYolKCHzmB-5sgDT3rJYIJ1Ml74-gCBfF_tuRG_Wp8vuFcSe0-3WhpoGbhHIImqb_-Up5oywKBki645OW6kJk4iwoG25My4lz5EV3sQTblN_0r60BOBX7GXWLWW5qI1XlnMfZhtFynii-4rBvsNB86-dCs9zYY4uVRgBX-aF3L-BKFZPM7hIHJUkLyPnsMKn=s0-d-e1-ft
Pickup estimated after 8 AM ET
U19G69g6XVcdgG2qe5MnwVq_zBw1RYolKCHzmB-5sgDT3rJYIJ1Ml74-gCBfF_tuRG_Wp8vuFcSe0-3WhpoGbhHIImqb_-Up5oywKBki645OW6kJk4iwoG25My4lz5EV3sQTblN_0r60BOBX7GXWLWW5qI1XlnMfZhtFynii-4rBvsNB86-dCs9zYY4uVRgBX-aF3L-BKFZPM7hIHJUkLyPnsMKn=s0-d-e1-ft
TOTAL $8.18
U19G69g6XVcdgG2qe5MnwVq_zBw1RYolKCHzmB-5sgDT3rJYIJ1Ml74-gCBfF_tuRG_Wp8vuFcSe0-3WhpoGbhHIImqb_-Up5oywKBki645OW6kJk4iwoG25My4lz5EV3sQTblN_0r60BOBX7GXWLWW5qI1XlnMfZhtFynii-4rBvsNB86-dCs9zYY4uVRgBX-aF3L-BKFZPM7hIHJUkLyPnsMKn=s0-d-e1-ft
QTY 1
 
Working on wheels too!

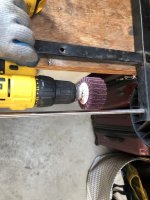
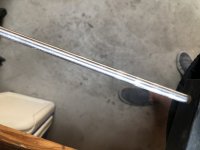
Axle was rusted and corroded. Here’s what I did:
28FC49A5-8C64-444C-A833-88995489235F.jpeg

Turned out pretty nice:
12B4073F-244E-4E9E-BD58-8FD93480031C.jpeg
 
Last edited:
Tried the rustoleum satin on wheels, but too glossy for me — highlighted imperfections. Preferred the somewhat grey rustoleum flat.

Test wheel:
AFBDCCB7-93E9-4DC3-94C0-46E5342B71D7.jpeg

Used flat white on inserts. Very white!

Final result:
CBED5025-14D1-4B02-A20E-D749AD493F25.jpeg

I think the original wheel is a bit darker black, and the insert is light gray. Might try Rustoleum light gray and Stove Bright flat black on another wheel.

As for taking off hubcaps, this ended up being very easy:

55E6C066-6BCB-4E7A-A048-B08D207C54A6.jpeg
 
Last edited:
Question: Does the Whitewall on the wheels just snap off or is it glued? Do they usually break when you take them off?


Back
Top