Help! Feedback requested. DIY system.


MarkN

New member
Hello everyone,
I just built a fun DIY temperature control system and would love your feedback to improve it. It's usable, but I'm wondering what other features I should add? Here are my capabilities so far. What would you add/change that would make a noticeable difference in results? I like the current simple design so hopefully I'm not missing anything major.

1. Supports WiFi.
2. Supports pit temp and 3 meat probes (4 total).
3. Has a web server that can be accessed via computer or smartphone. Can only access if you have IP reachability (like within your home or if you have a VPN). Cannot access over the Internet (unless you VPN) however you can view the live temp graphs over the Internet (see #7).
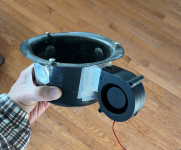
4. Automatically controls a blower fan based on temp setting. Using a 11CFM 5V blower fan. On/off, not variable speed.
5. Can change desired temp using buttons or via website.
6. Can set alarm temps for each of the probes.
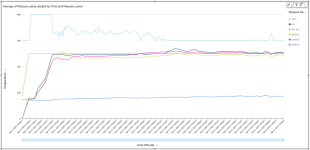
7. Is Cloud connected. All data is sent via MQTT to AWS IoT Core to a Timestream database. Allows me to graph all cooks. Can compare cooks. Can have multiple units sending data at the same time to the database (in case I want to have multiple cookers at the same time). Data is stored in the cloud for 10years.
8. Has a button to turn on/off WiFi.
9. Has a button to turn on/off the blower.
10. Has an audible alarm and a button to silence the alarm.
11. Low power consumption. At peak, with WiFi and blower going, consumes about 3W. I can power this all night using a USB battery pack (10,000mAh). Connects using a micro-USB connection and operates at 5V.
12. Low cost. About $20 to make one not including probes or blower. The probes are $13.20 for a pair on Amazon if you don't already have your own. The blower I bought was $5.30 on Amazon. AWS IoT Core is $0.08 per million minutes of connection and $1 per million messages. AWS Timestream is $0.50 for 1 million writes. Basically each cook cost about $0.01 to send the data and $0.01 each time I want to download the data.
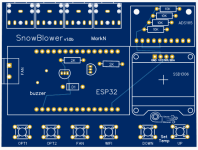
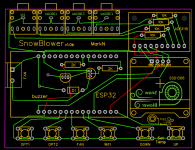
13. Compact design. The PCB is 85mm x 80mm.
14. Uses an ESP32 micro-controller (built-in WiFi and Bluetooth and lots of GPIOs) which you can get on Amazon (3 for $18 shipped). Very impressed with thing.

Feedback welcomed. Thanks!
 
I just looked up the price of a Raspberry Pi. Wow, didn't know they went up so much. I have 5 of them collecting dust. I decided to go with the ESP32 due to its lower power consumption.
 
First cook was today and it turned out successful. My temps were not as tight as I had hoped, and I also added variable fan speed control, but I need to tune my algorithm a bit. Probe 1 is a brisket point, probe 2 is a brisket flat, and probe 3 is a pork shoulder. I pulled it at the stall and finished in the oven.
Attached is a pic my prototype that I used for today's cook (same width but slightly shorter than an RPi). I ordered some PCBs that should arrive later this week.

IMG_3023.jpgFirstCook 2023-03-26 190418.png
 
I am a software engineer and used to work in a company where we made HVAC controllers so I knew some of the tech terms you mentioned.
Overall it is very impressive that you can rig up a system in all those aspects. It is literally a Thermalworks signal+billows, but at a fragment of their price(of course not including your engineering effort). I do have some thoughts:
1. Signal does not use a variable speed blower and its uses on/off control which I think is the correct choice because variable speed makes the control complex and overshot is almost going to happen.
2. In your chart page, you can add a y-series of the fan status, ie ON for solid line, pulsing for dotted line, and OFF is none(the idea came from the signal)
3. One thing I think would be a blast for this type of product is to have some kind of camera so you can check out the bark color without opening the lid.
4. Also you might want to have an open-lid mode to prevent disaster overblowing when you wrap the meat.(which happened to me)
 
Before you get too far down that path, @HuangFeng, you might want to take a closer look at the HeaterMeter subforum here. Uses both a variable speed fan as well as a server controlled damper. He's got it figured out such that overshoots damp themselves out pretty well.

This is not to diminish in any way what @MarkN has done. It's quite impressive on it's own.
 
Thanks for your feedback @HuangFeng.
1. The variable speed control was actually easier than I expected using PWM (pulse width modulation). Fancy name but it's a capability built-into the ESP32. My algorithm was simple: subtract the pit_temp from the desired_temp. Then multiply this value by 10% fan speed. For example, if the difference is 5 degrees, then the fan blows at 50%. If the difference is 1 degree, the fan blows at 10%. I realize though that the fan should still be running at a low speed at my desired temp. So I'll adjust the algorithm to try 20% speed at the desired_temp instead of 0%. The fan would be at 0% speed if the temp goes 2 degrees over. This will be a series of trial and error to dial in it. Makes it fun and good excuse to invite friends over for BBQ :).
2. I can certainly add this metric. I have the fan speed percentage displayed on the OLED. I can just send that data to the Cloud as well.
3. That would be cool to see a time lapse of a cook but doing a quick search I don't see any oven cams under $1000 :).
4. I have a manual fan enable/disable button that can be used when opening the lid.
 
Looks cool Mark.

What smoker were you cooking on?
Thanks. I used a Cusinart COS-118. I had a WSM18 years ago that I gave to my cousin. I recently got interested in smoking again (thus my long absence from this forum). Picked up the Cuisinart for $55.66 shipped and have not looked back. Food taste the same as cooking on a WSM (athough the COS-118 takes more effort to control airflow - which is where the fan controller comes in handy).
Mounting the blower was easy (see pic). Taped up the other holes and used a fabric gasket (not shown) to seal where the air intake pan attaches to the bottom of the smoker.
 

Attachments

  • Screenshot 2023-03-29 103515.png
    Screenshot 2023-03-29 103515.png
    597.8 KB · Views: 7
Last edited:
Before you get too far down that path, @HuangFeng, you might want to take a closer look at the HeaterMeter subforum here. Uses both a variable speed fan as well as a server controlled damper. He's got it figured out such that overshoots damp themselves out pretty well.

This is not to diminish in any way what @MarkN has done. It's quite impressive on it's own.
Interesting. I'm curious how often overshoots are a problem? Is this happening because the fan is still on when the lid is open?

I have servo motors and a 3D printer, but was not planning on dusting that off for this project. I guess I could if I run into an overshoot issue.
 
The HeaterMeter's PID calculations do pretty well at adapting to the pit, and adjusting the fan & damper. Initially, yeah, it's an overshoot, but the cycles pretty well come back to a flat line. It does sense pit opening (turns fan off completely) and ramp-ups pretty well. On about the 2nd opening, the pit temp will rise up to the set point with only a degree or two of overshoot.
 
Can you explain the logic behind the algorithm used to maintain temps? I assume the fan speed varies with temperature. How often are temps measured and how often does it adjust the fan & damper? How precise is the flat line (plus/minus 5 degrees?)? How variable are the fan speeds adjusted? How well does it work without the damper?

SnowBlower (that is the name of mine) is measuring every 2.5s and adjusting the fan accordingly each time.

I think I also made the mistake of having my pit probe dangling at the top of my vent. I think measuring temps near the vent may cause fluctuations in my temp readings. I could not affix the pit probe once I had my cooker going (too hot). Next time I mount it securely where the built-in lid thermometer sits (I'll remove the lid thermometer).
 
PCB layout. Can't wait for my order to arrive so I can assemble :).
 

Attachments

  • Screenshot 2023-03-29 202745.png
    Screenshot 2023-03-29 202745.png
    61.7 KB · Views: 13
  • Screenshot 2023-03-29 202716.png
    Screenshot 2023-03-29 202716.png
    120.2 KB · Views: 13
Can you explain the logic behind the algorithm used to maintain temps? I assume the fan speed varies with temperature. How often are temps measured and how often does it adjust the fan & damper? How precise is the flat line (plus/minus 5 degrees?)? How variable are the fan speeds adjusted? How well does it work without the damper?
Can't answer most of those, except maybe observationally. I think temps are recorded at least every second, and fan & damper adjusted as such. It does work pretty well on a lot of pits without a damper. On my gravity fed charcoal smoker, it'll dial in to about +/- 1 F. Brian Mayland (developer) has published the PID stuff (it is all open sourced,)
 
This is my 2nd cook using SnowBlower after some adjustments:
- placed the pit temp probe at the top of the lid (where the handle screws in). The placement last time was dumb as I just stuck it through the vent hole and there was too much fluctuation.
- variable fan speed adjusted so it doesn't stop completely at the desired pit temp.
- as suggested by @HuangFeng, my line graph also includes the fan. It's not just on and off though, the chart shows the fan speed in percentage. This is the light blue line between 300 and 400. This represents 0% and 100%, respectively.

Results were quite good. I put the lid on at 2:15pm UTC. You can see the temps starting to rise.
1. Orange is the pit_set. This is the desired temp which was 250.
2. Green is probe1. This was at the top grate. The top grate is consistently about 10 degrees cooler than the bottom grate.
3. Purple is probe2. This was at the bottom grate.
4. Blue is probe3. This was measuring the ambient temperature. It was 70 degrees outside when I started. The daytime temp got up to mid-80s.
5. Navy blue was the pit probe.

Observations.
A. Fan was running at 100% until I got close to the desired temp. Then the fan speed automatically adjusted itself to maintain a relatively consistent pit temp. Nice!
B. Now I know the the bottom grate is hotter than the top grate. I'll make sure to put larger cuts of meat at the bottom.
C. At around 4:10pm, my fan lost it's attachment to the cooker. I need to adjust how I attach the fan. I didn't realize it until about 5pm, at which point I put it back on and added more tape. As you can see, the temp went above my desired temp. The fan went to 0% as expected. My cooker maintain around 260 without the fan. When the pit temp went lower, the fan kicked in slightly as needed.

Future:
- Adding code to allow SnowBlower to be its own AP so that the user can press and hold a button set the WiFi credentials (don't want users to have to program it via serial port :) ).

I also found that I could get the price down to about $15 (without temp probes) by ordering parts from AliExpress. Takes about 3-4 weeks for shipping though. I ordered enough parts to make 5 of these to give away to my friends/family.
 

Attachments

  • 2nd-cook.png
    2nd-cook.png
    113.1 KB · Views: 10
Looks great with fan cmd in the graph! I see the variable speed control does better in maintaining the pit temp than on/off pulsing control!
Is the temperate on the graph instant readings, or it has a moving average?
Another thought is to test out your controller with a higher set temp, e.g. 350F for smoking chicken. I know WSM has a problem getting that high temp because of the restricted vent sizes designed for smoking 225F. But if you can supply enough fresh air by blowing them with a fan, it should be achievable.
By the way, if your source code is hosted publicly or if you planning to do that, I am interested to take a look at them.
 
I had variable speed control before. This time I adjusted the algorithm a little in terms of not stopping the fan completely when it hit the desired temp. The reason my temps fluctuated more before was due to the poor placement of the temp probe.
The graph is a moving average of temps collected every 30seconds. The fan adjust temps every 2.5s, but I only collect data every 30s.
I don't think I can go to 350F (the highest I usually do is 275) because the fan I used only supports 11CFM.
I plan to share the source code once I test the WiFi changing code and have my brother test a cook (and get his feedback).
 
I was wondering if you have any updates to this?

I have run a heatermeter for years with great success, but have been implementing several ESP32 based devices for other things around the house (pool controller, weather monitor, etc). The esp32 platform is smaller, lightweight, low power, and very flexible. I've actually been using the ESP Home tie-in to home assistant for all these other devices, which opens up graphing and monitoring remotely.

I would love to do an updated device like what you have going while adding the ability to monitor and track more probes, ambient air temp, humidity, etc. It only occurs a few times a year, but I have occasion to smoke 5 to 6 briskets at a time, sometimes at a competition, and relative to doing just one brisket or pork shoulder with multiple probes, it feels like I am flying blind. :)


Back
Top