I have two reasons for posting this thread. First, I want to give a big thanks to Bryan and Ralph. Bryan, this is a heck of a device you've designed and it is awesome that you are putting it out there for us to enjoy. Ralph, the RD3 is a really clever gizmo and I really appreciate your patience in helping me figure it out.
The other reason for this thread is to give a starting point for others that might want to pair the HM with a Primo Oval (I have the XL model). I did a lot of searching to see what settings work with the Primo and wasn't able to find much of anything. Maybe some other Primo owners can chime in with what works for them.
My initial HM setup was a basic one using a mounting plate for a Stoker WiFi kit. From their pictures it looked like their mount had a nice rectangular duct that I could mate to the HM blower. That ended up being a complete waste of money because the mount ended up being just a flat plate of metal with a rectangular hole. So I made this to hold the blower

I did two cooks with the blower-only setup; a brisket and a pair of pork butts. There were some cool moments (lighting the fire as I was running out the door and coming back 3 hours later to find the grill right at 225-230 was pretty awesome), but I wasn't really happy with the blower control. It was really hard to get the top damper closed down enough that the blower actually had to do anything and there was too fine of a line separating "control" and "killing the fire". As a result the temp was constantly bouncing between my set point and +5-10 degrees. Also, my fuel consumption went up (still small, but noticeable). And it may have just been me, but I thought the butts came out a little drier than usual.
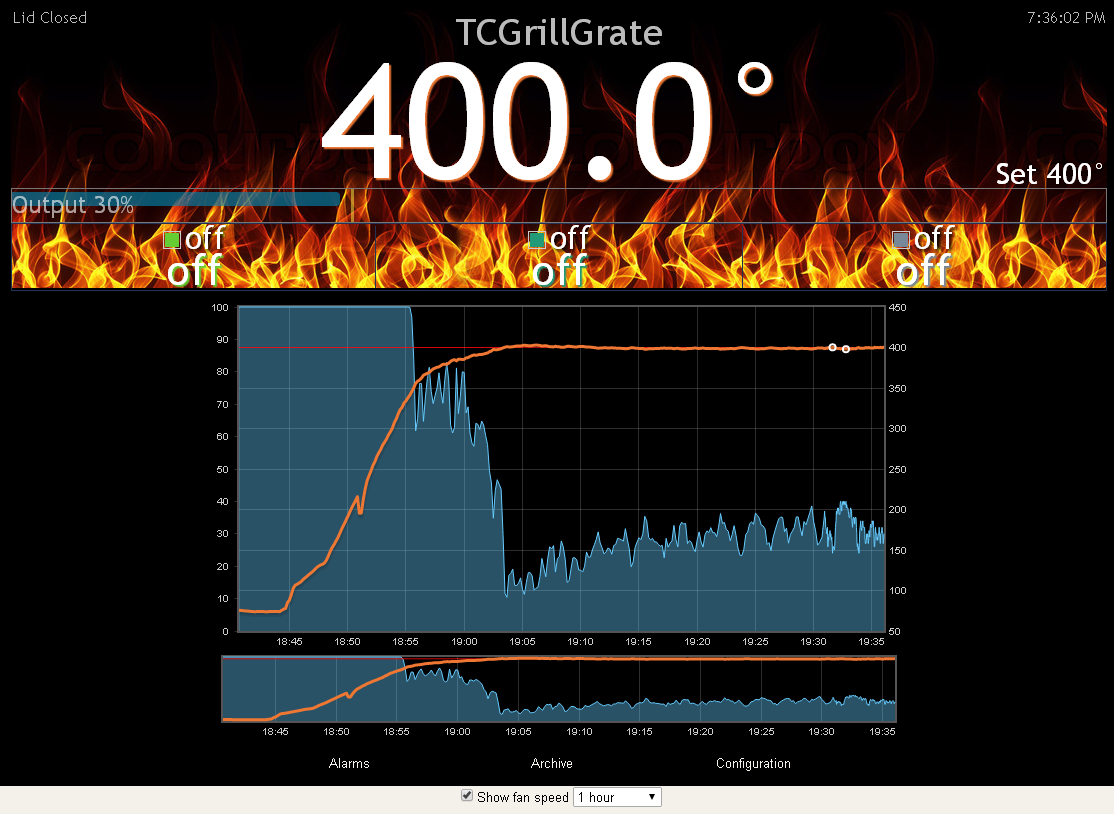
At this point, if I had dropped $400+ on a commercial temperature controller I would have been pretty peeved, but all those problems had already been addressed by the good people here. So, I contacted Ralph he sent me one of his RD3's (which I thought was a pretty cool device even before I realized it would allow me to leave my HMpi indoors during cooks). My hope was that the RD3 would do all the temperature control with the damper only so that I'd be able to regain the advantages of the kamado (fuel efficiency, humidity retention, temperature stability). My question was: just how high of a temperature could I cook at without the blower kicking in. Realistically, the highest temp I'd want to run without a blower would be 325-350 for a poultry cook. I planned to do a couple of chickens last weekend, but we ended up eating out or with friends every night. But, I was planning to bring my baked beans to our friends house, so I took the beans as an excuse to test out the Primo/RD3 combo. It did quite nicely

The red arrow is where I tried to close the top damper down about halfway (with the daisy wheel still fully open). That clearly didn't work, so I opened the top all the way up and it settled onto the set point of 325 with the RD3 open about 60-70%. Based on that, I'm guessing the highest I can go with passive airflow is maybe 350 or a cool weather cook (i.e. Thanksgiving) at 325.

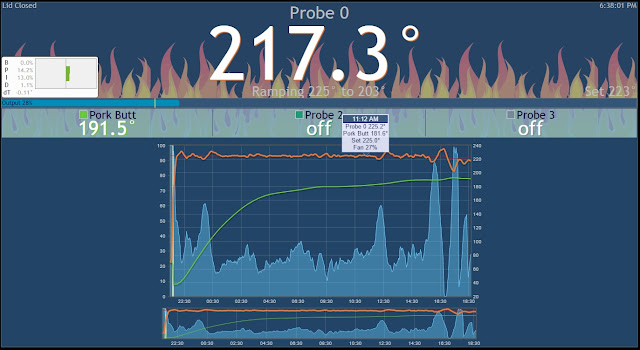
Today I finally got a chance to try out the RD3 on a slow and low. Here is a 6 hour cook on a couple racks of spare ribs.

There is a lot going on in that graph. After an initial (minor) overshoot, the HM slowly locked on to the set point of 225 (blower at 50% on startup, and 10% max only during cook). I started off with the top damper fully closed but the daisy wheel fully open. At the red arrow I realized that the RD3 was having to open up to 90% or so to maintain temperatures, so I cracked the top damper open by about half an inch (leaving the daisy wheel open). That seemed to work great for about an hour but then, for no apparent reason, the temperature started oscillating pretty dramatically. I started messing with the PID settings at the first green arrow, and at the second green arrow I settled on the BGE setting in the Wiki (P 2.5, I 0.0035, D 6). At that point I left for the afternoon, but when I got back I found that the oscillation amplitude was pretty much unchanged, but the period had gotten much longer. So I've still got some work to go, but at least the damper is spending less time at 100% and 0% so I'd call that an improvement. I'll update this thread as I get a chance to do more testing.
Jeremy
The other reason for this thread is to give a starting point for others that might want to pair the HM with a Primo Oval (I have the XL model). I did a lot of searching to see what settings work with the Primo and wasn't able to find much of anything. Maybe some other Primo owners can chime in with what works for them.
My initial HM setup was a basic one using a mounting plate for a Stoker WiFi kit. From their pictures it looked like their mount had a nice rectangular duct that I could mate to the HM blower. That ended up being a complete waste of money because the mount ended up being just a flat plate of metal with a rectangular hole. So I made this to hold the blower
I did two cooks with the blower-only setup; a brisket and a pair of pork butts. There were some cool moments (lighting the fire as I was running out the door and coming back 3 hours later to find the grill right at 225-230 was pretty awesome), but I wasn't really happy with the blower control. It was really hard to get the top damper closed down enough that the blower actually had to do anything and there was too fine of a line separating "control" and "killing the fire". As a result the temp was constantly bouncing between my set point and +5-10 degrees. Also, my fuel consumption went up (still small, but noticeable). And it may have just been me, but I thought the butts came out a little drier than usual.
At this point, if I had dropped $400+ on a commercial temperature controller I would have been pretty peeved, but all those problems had already been addressed by the good people here. So, I contacted Ralph he sent me one of his RD3's (which I thought was a pretty cool device even before I realized it would allow me to leave my HMpi indoors during cooks). My hope was that the RD3 would do all the temperature control with the damper only so that I'd be able to regain the advantages of the kamado (fuel efficiency, humidity retention, temperature stability). My question was: just how high of a temperature could I cook at without the blower kicking in. Realistically, the highest temp I'd want to run without a blower would be 325-350 for a poultry cook. I planned to do a couple of chickens last weekend, but we ended up eating out or with friends every night. But, I was planning to bring my baked beans to our friends house, so I took the beans as an excuse to test out the Primo/RD3 combo. It did quite nicely
The red arrow is where I tried to close the top damper down about halfway (with the daisy wheel still fully open). That clearly didn't work, so I opened the top all the way up and it settled onto the set point of 325 with the RD3 open about 60-70%. Based on that, I'm guessing the highest I can go with passive airflow is maybe 350 or a cool weather cook (i.e. Thanksgiving) at 325.
Today I finally got a chance to try out the RD3 on a slow and low. Here is a 6 hour cook on a couple racks of spare ribs.
There is a lot going on in that graph. After an initial (minor) overshoot, the HM slowly locked on to the set point of 225 (blower at 50% on startup, and 10% max only during cook). I started off with the top damper fully closed but the daisy wheel fully open. At the red arrow I realized that the RD3 was having to open up to 90% or so to maintain temperatures, so I cracked the top damper open by about half an inch (leaving the daisy wheel open). That seemed to work great for about an hour but then, for no apparent reason, the temperature started oscillating pretty dramatically. I started messing with the PID settings at the first green arrow, and at the second green arrow I settled on the BGE setting in the Wiki (P 2.5, I 0.0035, D 6). At that point I left for the afternoon, but when I got back I found that the oscillation amplitude was pretty much unchanged, but the period had gotten much longer. So I've still got some work to go, but at least the damper is spending less time at 100% and 0% so I'd call that an improvement. I'll update this thread as I get a chance to do more testing.
Jeremy
Last edited: