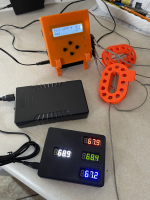
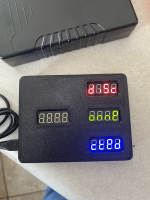
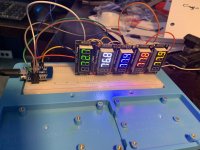
I made my HM static on the router so it gets the same IP, so if you haven't done that I'd recommend that. Next, declare the IP in the Wemos code and reflash. See if that helps.I think I have done everything correctly, but because I have no temps being displayed I must have screwed something up.
Here is what I can verify
1. The Wemos is showing up on my router as connected to wifi
2. The power light on the LED panel is lit
Is there a way to check that the wemos is finding the Heatermeter and getting the information?
You are using an out of date browser. It may not display this or other websites correctly.
You should upgrade or use an alternative browser.
You should upgrade or use an alternative browser.
HeaterMeter Monitor and ESP8266/ESP32 Streaming Library
- Thread starter Bryan Mayland
- Start date
Andrew F
TVWBB Super Fan
Tried that. Same problem.
Flashed the second board and breadboarded it up. Same problem.
I am only using one LED display for right now, But that shouldn't matter?
-edit- added a few more displays, same problem. Something tells me i'm not programing the wemos correctly.
Flashed the second board and breadboarded it up. Same problem.
I am only using one LED display for right now, But that shouldn't matter?
-edit- added a few more displays, same problem. Something tells me i'm not programing the wemos correctly.
Last edited:
Bryan Mayland
TVWBB Hall of Fame
If you check the serial log you should see what's happening on startup. It should say
If it gets an error you'll see "Socket Error XXX" with a number that might tell you something. Usually all I see is -13 which is timeout or connection refused. If you see the above, make sure you have a probe plugged in to that port because otherwise it displays nothing.
Code:
$UCID,MeterMonitor,[some date/tiime]
onWifiConnect
onConnect
If it gets an error you'll see "Socket Error XXX" with a number that might tell you something. Usually all I see is -13 which is timeout or connection refused. If you see the above, make sure you have a probe plugged in to that port because otherwise it displays nothing.
Andrew F
TVWBB Super Fan
Tried that. Same problem.
Flashed the second board and breadboarded it up. Same problem.
I am only using one LED display for right now, But that shouldn't matter?
-edit- added a few more displays, same problem. Something tells me i'm not programing the wemos correctly.
Basically I copied and pasted the text from the first post (adding in my network information between the quotes)into the arduino programer, compiled and kept adding what it was missing to the library and then when it quit having issues, it uploaded to the board. I then removed the board from the computer and hooked it to a power supply and it shows on the router home page so....it should work?
Bryan Mayland
TVWBB Hall of Fame
Well the code from the first post doesn't have any display code apart from to the serial port, so that would make sense why you don't see any modules doing anything. You need to upload the MeterMonitor demo and not the code from the first post.
Andrew F
TVWBB Super Fan
Wait! what? Crud.Well the code from the first post doesn't have any display code apart from to the serial port, so that would make sense why you don't see any modules doing anything. You need to upload the MeterMonitor demo and not the code from the first post.
Ok, so how do I do that?
Bryan Mayland
TVWBB Hall of Fame
Giant smash of the Like button, it looks great!
If you have the whole github repository downloaded, just copy the HeaterMeterClient library folder into Documents/Arduino/Libraries, along with the prerequisite libraries (ArduinoJson and ESPAsyncTCP) downloaded separately. Then load MeterMonitor.ino in the Arduino IDE and Upload.Wait! what? Crud.
Ok, so how do I do that?
Does anyone know if there is there a way to easily flash a compiled binary from the Arduino IDE? I could do builds but having to use the esptool command line or NodeMCU Flasher to flash them seems like a non-starter idea.
Possibly Lua? http://benlo.com/esp8266/index.html#LuaLoaderGiant smash of the Like button, it looks great!
If you have the whole github repository downloaded, just copy the HeaterMeterClient library folder into Documents/Arduino/Libraries, along with the prerequisite libraries (ArduinoJson and ESPAsyncTCP) downloaded separately. Then load MeterMonitor.ino in the Arduino IDE and Upload.
Does anyone know if there is there a way to easily flash a compiled binary from the Arduino IDE? I could do builds but having to use the esptool command line or NodeMCU Flasher to flash them seems like a non-starter idea.
Otherwise, I'm not sure short of writing your own upload utility of some sort. It would be neat to see something like you have for the HM install, input your network info, click build blob, use upload utility to D1 board... But I'm sure there's plenty of other thing... SQUIRREL!!!!
Bryan Mayland
TVWBB Hall of Fame
I believe that would be ideal, just an app that you enter the info and hit UPLOAD. Converting the INO file into a binary is non-trivial though, requiring like the 250MB esp8266 core be downloaded and then also deal with compiling and all that. Making a SPIFFS image could work with mkspiffs and then I could make the sketch just look for configuration in SPIFFS. That still leaves the issue of how to upload it though, and the LuaLoader only loads the LUA engine and can upload scripts... haha actually I just ran it and it doesn't even include the flasher, you have to get esp8266_flasher.exe separately. I'd also be concerned about the legality of distributing all of those in one distribution, especially considering I'd need parts from multiple projects with unclear licensing.
Bryan Mayland
TVWBB Hall of Fame
There we go! Good work getting through it. I'll admit it isn't an easy set of steps but I really didn't think anyone would actually build one of these things. I'll use your pain as motivation to try to figure out a way to make it easier on everyone.SUCCUSS!!!!
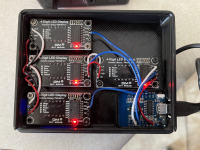
I also had one module that had some dead LEDs and was pretty disappointed until I looked at the back and saw that all the pins going to the LED part hadn't been soldered. Check those 12 pins coming through the board and see if any have some dodgy solder joints and touch them up.
LOL, I'm just a huge fan of the HM project in general & glad you're still with us on it. I was getting frustrated after 2 days of struggling but mine was something really dumb I think. I thought the Lua tool had a firmware loader built into initially & wasn't thinking licensing but good point.There we go! Good work getting through it. I'll admit it isn't an easy set of steps but I really didn't think anyone would actually build one of these things. I'll use your pain as motivation to try to figure out a way to make it easier on everyone.
I also had one module that had some dead LEDs and was pretty disappointed until I looked at the back and saw that all the pins going to the LED part hadn't been soldered. Check those 12 pins coming through the board and see if any have some dodgy solder joints and touch them up.
Andrew F
TVWBB Super Fan
Thanks for the encouragement. I know ZERO about adrounio or wemos as of 8am this morning. I had a slight knowledge of raspberry pi.
Honestly, a drag and drop/ or one click install shouldn't be needed, but a step by step of what to download and how to upload would be all that i needed.
EDIT - Re-flowing the pins solved the dead segments.
Honestly, a drag and drop/ or one click install shouldn't be needed, but a step by step of what to download and how to upload would be all that i needed.
EDIT - Re-flowing the pins solved the dead segments.
Last edited:
I sent you a PMWould someone be willing to print me off a case for the small led segments? I will pay for material/ time/ shipping. Paypal or venmo.
Marc Strickland
TVWBB Member
I wonder if Matrix displays like these would work.....
Ebay Matrix Display
Ebay Matrix Display
so, in the interest of making things easier for idiots like me, I got an idea to have a captive page that asks for wifi credentials instead of hard coding in the off chance someone would like to take these on the road & use with a different network without having to reprogram.
this works but not perfect, it needs some tweaks, BUT it does function & helps connect the MeterMonitor without hard coding the info! again, I'm an idiot, so review this code & make corrections as needed. Disclaimer: No warranty from me if it messes up the device.
So, on first startup, if your wifi settings aren't already set or it can't find the network, you'll see an open wifi network called ESP_X12345, which is unique to each Wemos. Select the network & wait for the page to open. If it doesn't open, use a web browser to open 192.168.4.1 or captive.apple.com or whatever the shortcut is on Droid/windows. Tap Configure Wifi, tap the network name you wish to connect to & put in the password. Tap Save & wait a few moments until the meter connects!
Uses the library & code https://github.com/tzapu/WiFiManager
Known issues: No Wifi shows at times when it should say Disconnected. Display is also blank until the wifi is setup, so would like it to say No wifi instead.
Code:
#include <HeaterMeterClient.h>
#include <TM1637Display.h>
#include "segment_chars.h"
#include <WiFiManager.h> // https://github.com/tzapu/WiFiManager

//#define WIFI_SSID       ""
//#define WIFI_PASSWORD   ""
#define HEATERMEATER_IP "" // IP or leave blank to use discovery
#define LED_BRIGHTNESS  7  // 1 (low) - 7 (high)

static HeaterMeterClient hm(HEATERMEATER_IP);

#define DPIN_LED_CLK D1
static TM1637Display led0(DPIN_LED_CLK, D2, 90);
static TM1637Display led1(DPIN_LED_CLK, D7, 90);
static TM1637Display led2(DPIN_LED_CLK, D6, 90);
static TM1637Display led3(DPIN_LED_CLK, D5, 90);
static TM1637Display* leds[TEMP_COUNT];

static float g_LastTemps[TEMP_COUNT];
static uint8_t g_HmTempsChanged;
static err_t g_LastClientError;

static void displayTemps(void)
{
  --g_HmTempsChanged;

  bool isLid = hm.state.LidCountdown > 0;
  for (uint8_t i = 0; i < TEMP_COUNT; ++i)
  {
    //if (i == 1) { leds[1]->showNumberDec(ESP.getFreeHeap() / 10); continue; }
    if (g_HmTempsChanged == 0)
      g_LastTemps[i] = hm.state.Probes[i].Temperature;

    // If Lid mode, show "Lid Mode" in LED[1,2] and the countdown in LED[3]
    if (isLid && i == 1)
      leds[1]->setSegments(new uint8_t[4]{ TM1637_L, TM1637_I, TM1637_D, 0 });
    else if (isLid && i == 2)
      leds[2]->setSegments(new uint8_t[4]{ TM1637_O, TM1637_P, TM1637_E, TM1637_N });
    else if (isLid && i == 3)
      leds[3]->showNumberDecEx(hm.state.LidCountdown, 0);

    else if (hm.state.Probes[i].HasTemperature)
    {
      // LERP from the last temperature just to make it seem like there's more going on here
      float t = g_LastTemps[i] + ((4 - g_HmTempsChanged) / 4.0f) * (hm.state.Probes[i].Temperature - g_LastTemps[i]);
      leds[i]->showNumberDecEx(int32_t(t * 10.0f), 0b00100000);
    }
    else
      leds[i]->clear();

    yield();
  }
}

static void proxy_onHmStatus(void)
{
  // Update over the next 4x loops
  g_HmTempsChanged = 4;
}

static void ledsShowIp(void)
{
  uint32_t ip = (uint32_t)hm.getRemoteIP();
  leds[0]->showNumberDec(ip & 0xff, false, 4, 0);
  leds[1]->showNumberDec((ip >> 8) & 0xff, false, 4, 0);
  leds[2]->showNumberDec((ip >> 16) & 0xff, false, 4, 0);
  leds[3]->showNumberDec(ip >> 24, false, 4, 0);
}

static void ledsShowDisconnected(void)
{
  // Display DISCONNECTED
  if (g_LastClientError != 0)
    leds[0]->showNumberDec(g_LastClientError);
  else
    leds[0]->clear();
  leds[1]->setSegments(new uint8_t[4]{ TM1637_D, TM1637_I, TM1637_S, TM1637_C });
  leds[2]->setSegments(new uint8_t[4]{ TM1637_O, TM1637_N, TM1637_N, TM1637_E });
  leds[3]->setSegments(new uint8_t[4]{ TM1637_C, TM1637_T, TM1637_E, TM1637_D });
}

static void ledsShowNoWifi(void)
{
  // Display No Wifi
  //if (g_LastClientError != 0)
  //  leds[0]->showNumberDec(g_LastClientError);
  //else
  leds[0]->clear();
  leds[1]->setSegments(new uint8_t[4]{ 0, TM1637_N, TM1637_O, 0 });
  leds[2]->setSegments(new uint8_t[4]{ TM1637_W, TM1637_I, TM1637_F, TM1637_I });
  leds[3]->clear();
}

static void proxy_onConnect(void)
{
  Serial.println(F("onConnect"));
  ledsShowIp();
  g_LastClientError = 0;
}

static void proxy_onDisconnect(void)
{
  Serial.println(F("onDisconnect"));
  ledsShowDisconnected();
}

static void proxy_onError(err_t err)
{
  Serial.print(F("Socket Error ")); Serial.println(err);
  g_LastClientError = err;
}

static void proxy_onWifiConnect(void)
{
  Serial.println(F("onWifiConnect"));
  ledsShowDisconnected();
}

static void proxy_onWifiDisconnect(void)
{
  Serial.println(F("onWifiDisconnect"));
  ledsShowNoWifi();
}

static void setupLeds(void)
{
  leds[0] = &led0;
  leds[1] = &led1;
  leds[2] = &led2;
  leds[3] = &led3;
  for (uint8_t i = 0; i < TEMP_COUNT; ++i)
  {
    leds[i]->setBrightness(LED_BRIGHTNESS);
    leds[i]->clear();
    yield();
  }
  ledsShowNoWifi();
}

//for LED status
#include <Ticker.h>
Ticker ticker;

#ifndef LED_BUILTIN
#define LED_BUILTIN 13 // ESP32 DOES NOT DEFINE LED_BUILTIN
#endif

int LED = LED_BUILTIN;

void tick()
{
  //toggle state
  digitalWrite(LED, !digitalRead(LED));     // set pin to the opposite state
}

//gets called when WiFiManager enters configuration mode
void configModeCallback (WiFiManager *myWiFiManager) {
  Serial.println("Entered config mode");
  Serial.println(WiFi.softAPIP());
  //if you used auto generated SSID, print it
  Serial.println(myWiFiManager->getConfigPortalSSID());
  //entered config mode, make led toggle faster
  ticker.attach(0.2, tick);
}

void setup()
{
  if (WiFi.status() != WL_CONNECTED)
  {
  WiFi.mode(WIFI_STA); // explicitly set mode, esp defaults to STA+AP
  // put your setup code here, to run once:
  Serial.begin(115200);

  //set led pin as output
  pinMode(LED, OUTPUT);
  // start ticker with 0.5 because we start in AP mode and try to connect
  ticker.attach(0.6, tick);

  //WiFiManager
  //Local intialization. Once its business is done, there is no need to keep it around
  WiFiManager wm;
  //reset settings - for testing
  //wm.resetSettings();

  //set callback that gets called when connecting to previous WiFi fails, and enters Access Point mode
  wm.setAPCallback(configModeCallback);

  //fetches ssid and pass and tries to connect
  //if it does not connect it starts an access point with the specified name
  //here  "AutoConnectAP"
  //and goes into a blocking loop awaiting configuration
  if (!wm.autoConnect()) {
    Serial.println("failed to connect and hit timeout");
    //reset and try again, or maybe put it to deep sleep
    ESP.restart();
    delay(1000);
  }

  //if you get here you have connected to the WiFi
  Serial.println("connected...yeey :)");
  ticker.detach();
  //keep LED on
  digitalWrite(LED, LOW);
}

  delay(100);
  Serial.begin(115200);
  Serial.print(F("$UCID,MeterMonitor," __DATE__ " " __TIME__ "\n"));

  hm.onHmStatus = &proxy_onHmStatus;
  hm.onWifiConnect = &proxy_onWifiConnect;
  hm.onWifiDisconnect = &proxy_onWifiDisconnect;
  hm.onConnect = &proxy_onConnect;
  hm.onDisconnect = &proxy_onDisconnect;
  hm.onError = &proxy_onError;

  setupLeds();
}

void loop()
{
  hm.update();
  // Updating each LED takes ~22ms with 100uS delay
  if (g_HmTempsChanged > 0)
    displayTemps();
  delay(100);
}
Last edited:
Bryan Mayland
TVWBB Hall of Fame
I'm aware of wifimanager, but I didn't use it because that's how HeaterMeter's wifi used to be and a vocal majority seemed to not understand the concept of connecting to an AP to configure it. It wasn't helped by Android silently switching off the wifi if it determined that there was no Internet access, but at least now they show a message and let you use it. Does newer WifiManager emulate the webpage google tries to pull to test Internet connectivity now to fake it out or anything? We need to add a camera to HeaterMeter Monitor so it can scan the wifi sharing QR code!


