• Enter the TVWB 27th Anniversary Prize Drawing for a chance to win a Weber Traveler Portable Gas Grill! Click here to enter!

Genesis Silver B Restoration


Peter Park

New member
Hi everyone. It’s been a while posting but I was waiting to post about my next restoration - here is my second ever fully restored Weber gas grill.

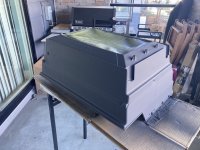
Photos of the end product first: this has been a 1.5year+ long project balancing between busy work life and whatever spare time I had outside of just life stuff. Only recently got into a groove as the grill looked more and more complete.
IMG_1628.jpeg
IMG_1635.jpeg
IMG_1643.jpeg
IMG_1645.jpeg
IMG_1649.jpeg
IMG_1676.jpeg
IMG_1640.jpeg
IMG_1654.jpeg


Now, some background and progress photos. Wish I had taken more “before” photos.

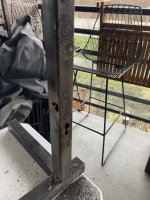
This is a product of two Silver B grills, mainly due to the rust on the first grill’s frame that would have required too much labour and time to salvage. The first grill was a curbside freebie that was otherwise in fair condition.

IMG_7309.png
Photo 2023-11-19, 3 55 52 PM.jpeg
Photo 2023-11-19, 4 07 17 PM.jpeg

I actually did try to salvage the first frame - took as much of the rust off as I could then thought I could somehow cover it with a step flashing then paint everything black. I had no access to welding equipment nor did I have the expertise. With every restored grill comes failed attempts in some steps.
IMG_7191.jpeg
IMG_7320.jpeg
IMG_7747.jpeg
IMG_7882.jpeg
IMG_7883.jpeg

At this point I gave up and managed to find another freebie Silver B with a much less rust-damaged frame. While the first grill was LP and came with all the tank scale and other LP-related parts, it was also from the post-2002 generation of Silver B while the second grill was pre-2002 and NG. I decided to go NG for the final product.

Got all the lid sides and cookbox sandblasted at a local sandblasting service then went to work with the paint. The grates, flavorizer bars, burner tubes, igniter and drip tray were all new from Amazon aftermarket but the rest were restored including the bottom basket, manifold and the thermoset tables.

IMG_7825.jpeg

(I hit the photo limit, see first comment for continuation of my post)
 

Attachments

  • Photo 2024-03-29, 5 28 58 PM.jpeg
    Photo 2024-03-29, 5 28 58 PM.jpeg
    156.8 KB · Views: 8
  • IMG_1681.jpeg
    IMG_1681.jpeg
    201.6 KB · Views: 8
  • IMG_7288.jpeg
    IMG_7288.jpeg
    177.4 KB · Views: 9
IMG_8864.jpeg
IMG_1581.jpeg
IMG_1595.jpeg
IMG_7823.jpeg


Overall, I’m very pleased with the fruits of my labour, and in case none of these photos had accidentally shown them, I have about 3-4 more Genesis grills worth of dismantled parts that I am going to restore next. Definitely not the last restoration post from me!

Thanks for reading.
 
Last edited:
You sure got nothing to apologize for there. It's a winner in my book. Right up there with the best of the old timers and (some new timers) here
That is a huge compliment coming from one of the big time members, I really appreciate it!

Peter, I forgot to give you bonus points for the manifold. A lot of people just ignore those since they can't be seen.
Thank you. I completely redid the manifold of my first grill as well. Although this time the screws holding the valve were rusted and I ended up rounding them. I had to Dremel slits just to get a flat screw to fit in and get the screws moving. Thankfully it did not appear to compromise the function of the manifold.

Looks great! I was webbing if you’d address the parts lurking in the background… can’t wait to see more restorations
The rest are pretty much all Genesis x000s: at least 3 1000s then I have another 3000 taking up space in my storage locker that I wish to restore and replace my current grill so it will be a keepsie. Whenever I had time in between restoring the Silver B I already started to restore the smaller parts for these. A sneak peek below…

IMG_7090.jpeg
92331F90-D3B4-44A7-A9A9-F7995C21C95E.jpeg
0437C284-68E7-4DB7-B6E1-7F41B9E03808.jpeg
 
Nice job - I have two of the same exact model grill. The first a present in 1995 from my wife. In 2020 it was ready for a rehab. After joining the forum and reading a lot and getting lots of advice I replaced the bars, burners, drip pan and holder, castors and grates from tips here on sourcing parts and what to do. I was so excited the grill worked better than when it was new.

My second one came from a neighbor. Need the same rehab - also came out very well and is now at my mom's.

These Genesis Silver B's are the ideal grill for me. I've used lots of newer models but still prefer it.

Questions:

1. What paint are you using for the frame
2. What paint are you using for the cookbox.
3. What did you use to clean up the controls plate?
 
Looks great. Care to share what it cost to have the cook box sandblasted? Also did you use a semigloss on the frame?

Thank you,
Frank
 
Nice job - I have two of the same exact model grill. The first a present in 1995 from my wife. In 2020 it was ready for a rehab. After joining the forum and reading a lot and getting lots of advice I replaced the bars, burners, drip pan and holder, castors and grates from tips here on sourcing parts and what to do. I was so excited the grill worked better than when it was new.

My second one came from a neighbor. Need the same rehab - also came out very well and is now at my mom's.

These Genesis Silver B's are the ideal grill for me. I've used lots of newer models but still prefer it.

Questions:

1. What paint are you using for the frame
2. What paint are you using for the cookbox.
3. What did you use to clean up the controls plate?

Nice! I’m an older Genesis x000 guy myself over the Silvers because I like the wood aesthetic better than the thermoset plastic but parts can be more difficult to find for the older models.

1. For the parts of the frame that is not adjacent to the firebox I use Rustoleum 2x paint+primer gloss black, which is recommended frequently in this forum. For the parts of the frame adjacent to the firebox I use the Rustoleum Tremclad High Heat Paint in gloss black, which is available in Canada but across the border you can find the original Rustoleum High Heat cans.

2. For the firebox exterior I use Rustoleum Tremclad High Heat in Matte Black.

3. I cleaned the control panel with a #0000 ultrafine steel wool and a degreaser like Simple Green, then wash everything out thoroughly with water. You can use the same method for the lid.


IMG_1786.pngIMG_1787.jpeg
 
Looks great. Care to share what it cost to have the cook box sandblasted? Also did you use a semigloss on the frame?

Thank you,
Frank
Thanks. The local sandblasting service charges me $40 CAD per set of end caps + firebox. Really lucked out on that one. For the frame I used gloss paint, see above reply for the details.


Back
Top