Adapt-a-Damper and HM in one?


AndrewB

New member
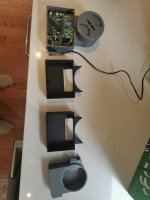
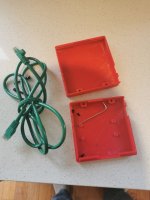
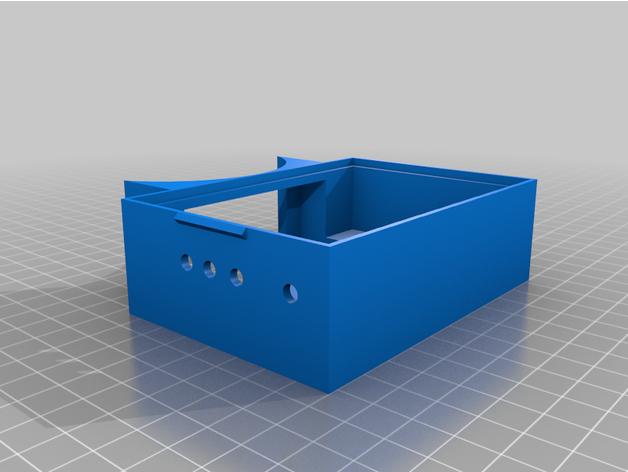
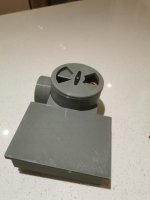
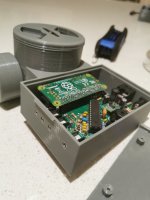
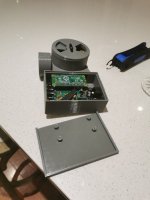
I attempting to make an all in one HM-adapt-a-damper design using a pi zero w. I would like to integrate the boards into the adapt-a-damper design but wanted to ask if anyone has done something similar or has any suggestions. I am a mechanical designer and have my own 3d printer so I am willing to prototype but why make a wheel three times when your friends can help you make it once!

I have ordered everything to make a headless HM and an adapt-a-damper (base board, pi zero, mgs90s servo and 5020 fan) and I am very excited to put this on my grill. I have been lurking the forms for the past few weeks and could find anything using the stock components.

best,

Andrew
 
I've never seen one posted, and I'm pretty sure if someone went through the effort to make one they'd at least want to show it off :D
 
I recieved my HM a week ago and it's great! I printed the original adapt-a-damper and headless case to get me started.
I am now starting to prototype an all in one unit and had some good success with my first prototype!
Please give me some feedback if you have any input or ideas. Collaboration makes things so much better!

Note: there is a back to this case which a pi zero w will attach to.
I will be removing the rj45 jack and replacing with a pigtail to route the wires internally in the box
I have made allowances for o-rings but so far untested, hoping to make this case water resistant

IMG_20201007_075114.jpgIMG_20201007_075144.jpg
 
Coming along nicely! If you want to avoid having to remove the RJ45 jack, it might be easier to tap into the connections at some through holes:
Output Taps.png

The blower output can be tapped from the lower leg of the inductor and the GND pad for the LCD riser.
The servo output can be tapped from that 1k resistor. 5V is the end of the resistor closest to the edge, servo signal on the inside closer to the diode, and GND you can get from the input barrel jack (two of the three pins are GND.
 
Thank you for the suggestion. good call because i may want to put this back into a standard case one day and this makes it compatible with what people already have done no removing parts. Will most likely go this route!

Would you just solder pigtails to the underside of the board?
 
Would you just solder pigtails to the underside of the board?
Yup just right onto the side you did the soldering on. Tin the stripped end of the wire then just smoosh it against the leg where it needs to be attached with a soldering iron. You can solder directly to the wires for the servo / blower, but it might get a little hard to work with (i.e. flip the board back over and such) once you do that. If you have any sort of connectors you can use to make pigtails, that would probably help out, or I guess use some WAGO connectors.
 
Interesting idea. One thing you will need to be aware of is thermal drift of the heatermeter. I built my original pi3 HM and it worked great. But I did notice that it had lots of thermal drift with the temps. I switched to the latest Pi3+ and it drifts less, but the thermocouple temp still drifts. An example would be my cook the other day. The temp that day got up to 80 and in the middle of the cook I noticed I forgot to plug my usb case cooling fan in. When I did plug it into the HM, the TC temp dropped by 2 degree in about 10 minutes and the control still worked but the lower temp had to wait for the controls to integrate out the temp adjustment. So keep in mind that as the HM enclosure get hotter, the displayed temp also rises.
 
Thank you for the insight. there is a small hole leading from the fan/damper area to the electronics enclosure left from the original design. If I make it larger it may allow the incoming cool air to mix with the hot air in the case. I am not an expert in fluid dynamics but hopefully it would pull some air from the case and not just through the damper hole.
Thoughts?
 
It's alive!!!

Thanks again to Bryan for the wiring solution

On a side note I have a heatermeter headless case I don't need anymore.
IMG_20201008_151827.jpgIMG_20201008_151813.jpgIMG_20201008_184114.jpg
 

Attachments

  • 16021849469185819828030398164789.jpg
    16021849469185819828030398164789.jpg
    122.5 KB · Views: 31
  • 16021849782897024780024567781165.jpg
    16021849782897024780024567781165.jpg
    117.1 KB · Views: 31
Last edited:
Looks great man!

Since your build is 4 thermistors it isn't as affected by the case temperature. The thermocouple needs to know the ambient temperature to calculate the tip temperature.

Thermistors would only be affected by the change in the reference resistors, which I have selected to have a low temperature coefficient. Each 1C change in temperature only changes their value by 0.01%, or just one ohm. It would take an 18C change in case temperature to move the temperature one 1 ADC "tick" at 225F, which would change the Pit temperature by just 0.27F. If the case was 50C from where you started, the temperature would still just be off by 2 ticks or ~0.6F, but I doubt the case would still be in one piece at 50C over reference temperature.
 
Very informative Bryan.
Just a thought on the thermistor vs thermocouple debate. My maverick probes are good up to 700 degrees according to the packaging which in my opinion is far beyond any temp the average person would smoke at. So with the thermocouple being more complicated and not a huge difference in functionality is there any real advantage to the average user in going with a thermocouple. Full disclosure I agonized on which to go with before ordering
 
Thermocouples made a lot more sense when the standard Maverick probe was only rated to 410F, and you could easily destroy one trying to do a spatchock chicken at 400F if the grill got a little too hot. The newer probes I've seen rated to 700F maximum, 570F max working temperature although I'm not sure what the difference is practically. I do know that at 550F they're only about 600 ohms so each ADC tick is 3F so at least for HeaterMeter it is difficult to get a stable temperature reading at all.

Thermocouples tend to last longer and can be left in the grill because they're pretty much immune to the moisture that slowly kills thermistor probes. They also come in a lot more shapes that let you get the best fit for your setup, compared to thermistor probes which come in "long and thin" (food probe) and "stubby" (air probe). Thermocouples from Auber are also cheaper than most thermistor probes. They have a more consistent response across the entire temperature range (~0.36F below 420F or ~1.16F above), as opposed to thermistors which have varying resolution from ~0.3F to ~3.0F depending on temperature).

So there are tradeoffs either way. If you're doing the build yourself and not buying Thermoworks thermocouples, the cost works out close to the same between the two so I'd lean toward the thermocouple just because of the convenience of it not degrading over time. The difference isn't as great as when we first started doing them though, when thermistor probes were pretty awful comparatively.
 
Continuing with the off-topicness: Without thermocouples, how would one keep their smoker at 700F +/-5F to clean it?
20201018_161251.png

It was working pretty well until it ran out of fuel. Man you can really go through some lump at 700F! Microdamper by the way, using my regular smoking PIDs (5, 0.03, 7).

FLIR0202.jpgFLIR0205.jpg
 
Last edited:
I love doing a high burn every once in a while.

The thermometer on my grill goes to 700f and I have brought it back around to 300. Having the ability to sear a piece of meat at these temperatures is something I now take for granted. When using my friends Nat gas grill I have to lower my expectations.
I wasn't convinced about charcoal until my dad used it for 3 years without turning on his gas grill, which he gave to my brother. Now I can't imagine using a gas grill again.
The HM and damper further differentiates the two styles and solidifies charcoal as the better choice.
I do good BBQ for me, and my friends realize the benefits (try eating a brisket by yourself)
 
Just wanted to post an update to this project. I have designed a screwless case making it even easier to assemble. Check out the attached video!

Really excited about this update as it makes the overall design much simpler and easier to print.

Don't hesitate to reach out of you need STL's

Also offering the case for sale on my Etsy page


Edit 1: Added to thingiverse
 

Attachments

  • IMG_20210102_192241.jpg
    IMG_20210102_192241.jpg
    69.5 KB · Views: 11
  • IMG_20210102_192221.jpg
    IMG_20210102_192221.jpg
    98 KB · Views: 13
  • IMG_20210102_192218.jpg
    IMG_20210102_192218.jpg
    99 KB · Views: 13
Last edited:


Back
Top