I have received interest in the valve and control damper so I thought I'd start a thread with some instructions. I have placed an order for 8 of the valve (used all my credit at shapeways). I should get them in a couple weeks. I have some extra brass rod and would be willing the cut a length of it for people so that they don't have to go find it themselves. The cost is going to be ~$7 for the valve and rod plus shipping.
Here is how to put it together:
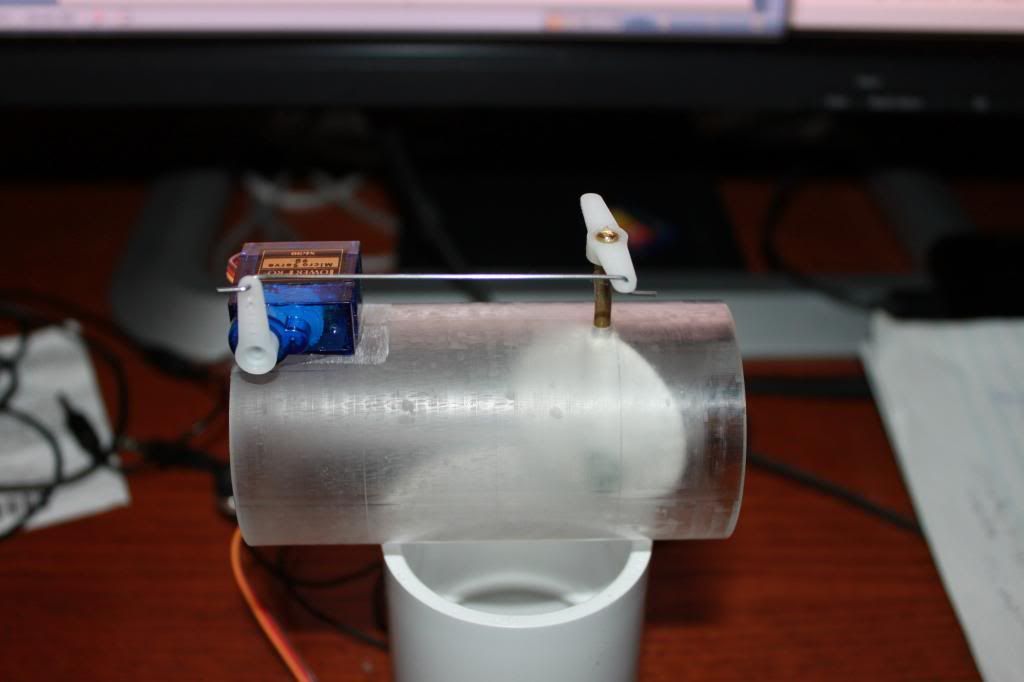
1. Drill a hole, centered, through the pipe, to insert the rod. This is the hardest part. To find where on the pipe to drill the hole, I slide the valve into the pipe and slowly rotated it around. Because the pipe isn’t perfect it fit more snuggly in some orientations than others. I found the orientation where the valve slid most easily into the pipe, marked it and this is where I drilled. I don’t know if this is actually required, but it is what I did. I drilled the hole using a drill press and a piece of aluminum channel as a v-block. Here is a picture of a v-block: http://littlemachineshop.com/products/product_view.php?ProductID=2186. The idea is that if you use a v-block, you can put the drill bit in the drill, and center the bit in the v-block. After doing this, when you place the pipe on the v-block it will also be centered. I started with a 1/8" bit I then made the hole a little bigger to provide a little slop which helped line up the valve better. The hole doesn’t have to be perfect because while the valve is perfectly round, the inside of the PVC pipe isn’t. Having the holes a little larger than 1/8” lets the valve fit better and turns more easily.
2. Put the valve inside the pipe and insert the brass rod through both the pipe and valve together. Check for alignment and clearance on the valve. The valve, when closed, should show little gap all the way around. If you are off center this is when you will see it. You can put the valve on a drill press and using a sanding block or file make it a little smaller if that helps. There is a hole in the center of the valve. Thread a 4-40 machine screw though it and put the screw in a drill press chuck. It will spin the valve nicely for you. Adjusting the valve size may help you get a better fit. Just be careful to not make it too small, as you can’t make it bigger later. You want the valve to be close all the way around and touch the sides evenly. You can't get it perfect because PVC pipe isn't perfect. I would blow through the pipe when doing this to see how well the valve sealed.
3. Create the linkage from the servo to the valve. The length doesn't matter too much just make sure that it is long enough for the servo to operate through the full 90 degrees. To do this, set the servo at the 90 degree position, halfway through rotation and placed the horn on it vertically. Next, hook the horn on the valve such that it was pointed perpendicular (crossways) to the pipe. The valve doesn't need to be on the rod at this time you will adjust that later. We are just going measure how long the linkage needs to be. Measure the distance between the horn on the servo and the horn on the rod. This is the length of the linkage that you need to make. I make mine a couple different lengths both work anywhere from 1” to 2.5” will work. The diameter of the linkage will be determined by the size of the holes in the horn. I use a guitar string “A” string (0.032”). There isn’t really any stress on these rods so even smaller would work well.
4. Optionally, sand a flat spot on the pipe to mount the servo. I mounted the servo with some 100% silicone; it holds nicely and can be removed if necessary later for further adjustment.
5. With the linkage attached ensure that the servo horn vertical, and the rod horn perpendicular then adjust the damper so that it is 50% open, and tighten the machine screw to clamp it to the rod.
6. In the linkmeter options plage set the min/max pulse width so that the servo travel left and right equally from the vertical position. This means you will get about a +- 45 degree rotation for a total rotaion of 90 degrees. This will allow the valve to fully open/close.
Parts:
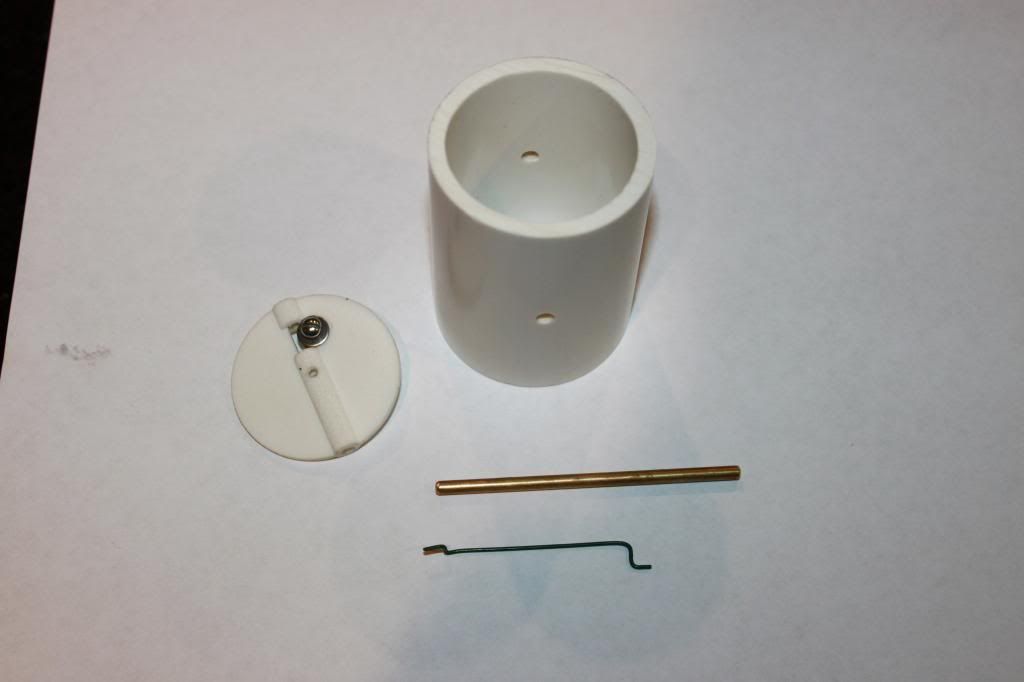
1. Valve
2. ~2.75” x 1/8” brass rod
3. 1 micro servo - http://www.amazon.com/gp/product/B006RCLJPA/?tag=TVWB-20
4. 3-4” piece of 0.032” guitar string
5. 2.5” – 3.5” piece of 1-1/2” PVC pipe.
6. ~1 hour of time to assemble
I'll add some pictures later today.
dave
Here is how to put it together:
1. Drill a hole, centered, through the pipe, to insert the rod. This is the hardest part. To find where on the pipe to drill the hole, I slide the valve into the pipe and slowly rotated it around. Because the pipe isn’t perfect it fit more snuggly in some orientations than others. I found the orientation where the valve slid most easily into the pipe, marked it and this is where I drilled. I don’t know if this is actually required, but it is what I did. I drilled the hole using a drill press and a piece of aluminum channel as a v-block. Here is a picture of a v-block: http://littlemachineshop.com/products/product_view.php?ProductID=2186. The idea is that if you use a v-block, you can put the drill bit in the drill, and center the bit in the v-block. After doing this, when you place the pipe on the v-block it will also be centered. I started with a 1/8" bit I then made the hole a little bigger to provide a little slop which helped line up the valve better. The hole doesn’t have to be perfect because while the valve is perfectly round, the inside of the PVC pipe isn’t. Having the holes a little larger than 1/8” lets the valve fit better and turns more easily.
2. Put the valve inside the pipe and insert the brass rod through both the pipe and valve together. Check for alignment and clearance on the valve. The valve, when closed, should show little gap all the way around. If you are off center this is when you will see it. You can put the valve on a drill press and using a sanding block or file make it a little smaller if that helps. There is a hole in the center of the valve. Thread a 4-40 machine screw though it and put the screw in a drill press chuck. It will spin the valve nicely for you. Adjusting the valve size may help you get a better fit. Just be careful to not make it too small, as you can’t make it bigger later. You want the valve to be close all the way around and touch the sides evenly. You can't get it perfect because PVC pipe isn't perfect. I would blow through the pipe when doing this to see how well the valve sealed.
3. Create the linkage from the servo to the valve. The length doesn't matter too much just make sure that it is long enough for the servo to operate through the full 90 degrees. To do this, set the servo at the 90 degree position, halfway through rotation and placed the horn on it vertically. Next, hook the horn on the valve such that it was pointed perpendicular (crossways) to the pipe. The valve doesn't need to be on the rod at this time you will adjust that later. We are just going measure how long the linkage needs to be. Measure the distance between the horn on the servo and the horn on the rod. This is the length of the linkage that you need to make. I make mine a couple different lengths both work anywhere from 1” to 2.5” will work. The diameter of the linkage will be determined by the size of the holes in the horn. I use a guitar string “A” string (0.032”). There isn’t really any stress on these rods so even smaller would work well.
4. Optionally, sand a flat spot on the pipe to mount the servo. I mounted the servo with some 100% silicone; it holds nicely and can be removed if necessary later for further adjustment.
5. With the linkage attached ensure that the servo horn vertical, and the rod horn perpendicular then adjust the damper so that it is 50% open, and tighten the machine screw to clamp it to the rod.
6. In the linkmeter options plage set the min/max pulse width so that the servo travel left and right equally from the vertical position. This means you will get about a +- 45 degree rotation for a total rotaion of 90 degrees. This will allow the valve to fully open/close.
Parts:
1. Valve
2. ~2.75” x 1/8” brass rod
3. 1 micro servo - http://www.amazon.com/gp/product/B006RCLJPA/?tag=TVWB-20
4. 3-4” piece of 0.032” guitar string
5. 2.5” – 3.5” piece of 1-1/2” PVC pipe.
6. ~1 hour of time to assemble
I'll add some pictures later today.
dave
") I thought I had seen a thread a couple of weeks ago that discussed it but can't remember now where it was.
I thought I had seen a thread a couple of weeks ago that discussed it but can't remember now where it was.