Fan/Cooker thread


Tom Kole

TVWBB Pro
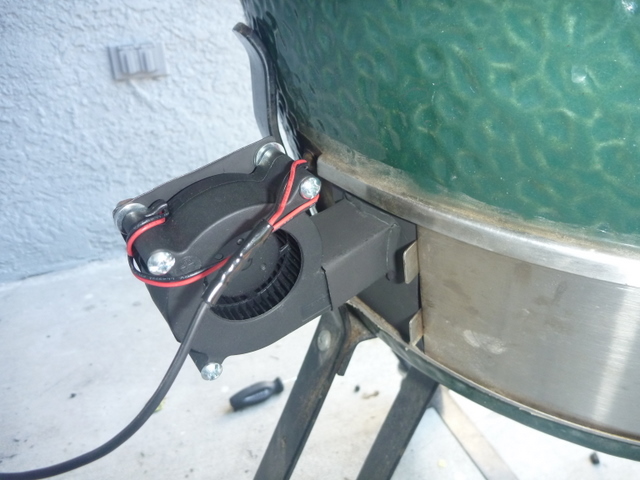
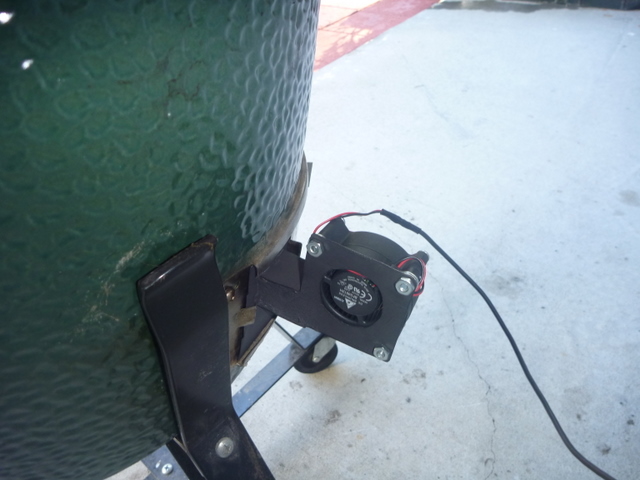
I thought it might be a good idea to start a thread for the different fan/cooker setups people have been using with temperature ranges that have been attained. I have a large BGE and am using the auber 6.5 cfm fan.
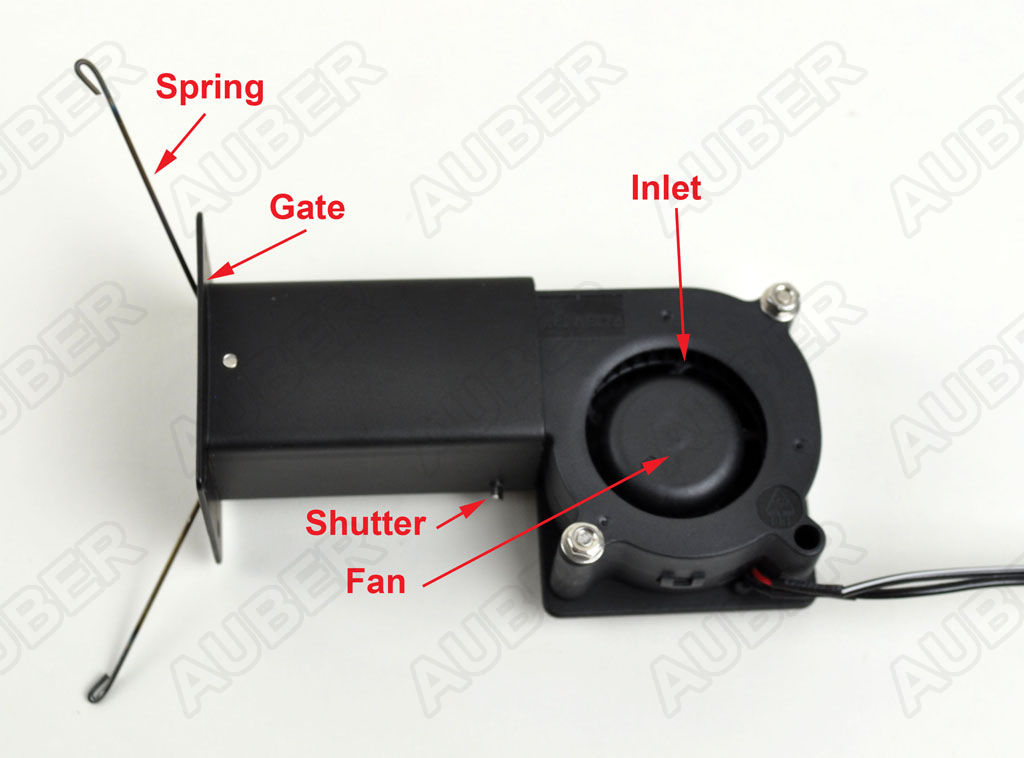
Blower.jpg


Specifications:
Power source 12 VDC, 3W
Cable length 4.5 ft (1.5 M)
Electric power connector 5.5 mm OD, 2.5 mm ID
Blower maximum flow rating 6.5 CFM*
Blower opening 0.8x1.0" (20x27 mm)
Maximum venting hole size for snap-on mounting 1.2" (32 mm)
Flange outer dimension 1.6 x2.0" (40x 50 mm)
Flange mounting hole distance 25 x 41 mm
Flange mounting hole size 3mm in diameter
Silicone foam gasket 4.5 mm (0.18") thick. Same outer and inner dimension as the flange

I have used it successfully for a couple 12-15 hr cooks at 225F with temp variations at steady state +/- 0.8F. I plan on doing some whole birds at higher temp soon and will post my results for control.
 
My fan:

Model: BFB0712HH-AF00
Price: $17.18 at Digikey.
Flow: ~15.3 CFM
Voltage: 7v-13.8v
Power: 4.08W
Features: RPM Feedback Pin (unused in heatermeter)
Datasheet: Here

Measured RPM vs Duty Cycle @ 12v:
BFB0712HH-AF00.png

*(5% is unstable and will not continually run the fan).
**CFM is interpolated using the datasheet's CFM number for an unrestricted fan running at 12v. CFM is assumed linear to RPM.

Smoker:
Type: "Offset Dry Smoker" (Like this)

More Info to come when I get my first controlled heatermeter fire going.
 
Last edited:
I use the fan specified in the parts list in my Big Green Egg (Large)

Model: Delta BFB0612H
Price: $13.16 (Digikey)
Flow: 6.7 CFM
Static Pressure: 0.428 in H2O
Noise: 34 dB
Voltage: 5 ~ 13.8VDC
Power: 2.16W

For 2 years I used a cardboard mockup cut from this housing pattern with the addition of an extra hole for the back. I also created a less-enclosed metal version for my Dad"
fanmetal-1.jpg

fanmetal-2.jpg


I'm planning on building another metal version with an integrated shutter/damper as well.
 
Thats what im trying to figure out how to build, a damper, light enough to open but strong enough to close completely
I don't know if it is possible to do that using gravity/spring alone. I did a bunch of tests with homemade springs made from guitar strings or some homemade hinges, and found that I couldn't really build anything that completely blocked the airflow because to make the damper close completely you needed a decent amount of force and then the fan would use most of its power just to fight that.

The simplest I came up with was using a nylon hobby hinge glued inside the tunnel with some light material on it that flopped down into place when the fan is off. Ideally there should be a gate that is closed and opened by external power, or even remove the fan completely and directly control the position of the slide on the intake!
 
Hobby servos are cheap and should have enough power... control from AVR is easy, but they take one output pin and PWM.
 
I could take apart my auger fan and see what they did. I'll post pics when I do.


yeah, I know stoker has something too, to block air when the fan is not on. I do use my ball valve to limit the air.


Anyways I use Delta BFB1012HH

Rated Current: 1.10 Amp. Rated Input Power: 13.20 Watt. Speed: 4000 RPM.
Max Air Flow: 28.25 CFM. Max Air Pressure: 1.299 H2O.
Noise: 55.0 dB-A. Size: 97 x 94 x 33 mm.
 
Does anyone have an example on how to do a fan mount for a Weber Smokey Mountain (Bullet)? I bought the same fan as Bryan (the one in the parts list) but have yet to mount it. I feel like I've seen an example with this somewhere, but I'm having trouble finding it at the moment. Thanks.
 
No example here, I've yet to design my mount.... I'd start with some thin cardboard (maybe a toilet paper roll) and work out a good mount, then cut it out of an old cookie sheet and bend something up. Not sure what others are doing, but I'm not planning to get too fancy with mine.
 
Does anyone have an example on how to do a fan mount for a Weber Smokey Mountain (Bullet)? I bought the same fan as Bryan (the one in the parts list) but have yet to mount it. I feel like I've seen an example with this somewhere, but I'm having trouble finding it at the moment. Thanks.

I would look at how these guys designed their mount for ideas.

http://pitmasteriq.com/

Obviously this is a completely different setup but I think that using the idea of a cup that could be attached to the smoker and then make a cutout for the fan that mounts to the cup would be a decent approach. You could use some metal dry wall expandable toggle bolts to fit inside the vent holes and then secure the cup to the smoker. I'm sure a metal measuring cup would work. Then just cut a hole in the bottom and mount the fan using an L-bracket and some sealant around the edges.

Here are the bolts

toggle1.jpg
 
Last edited:
Just to add to the discussion... I had similar thoughts about how whether to include a damper.

I have a Big Green Egg and like Bryan started off with a Cardboard version... but I also wanted to use my blower as a way of speeding up higher temperature start-ups. After a few tries I found the cardboard version:
1. Allowed a little too much air to flow when the fan was not on and I had difficulty maintaining a low temperature
2. Started to 'char' when using to speed-up high temp start-ups.

So, I started to think about crafting something a little more 'robust'. I ended up using some 0.5mm Stainless Steel sheet which was pretty easy to cut out, shape and join. My first version is a little 'rough around the edges' but works perfectly.

In designing, I also thought about how to connect to the Linkmeter and the use in 'standalone' mode. So I added an RCA socket and a Barrel jack to directly power the fan.

I also wanted to reduce any natural airflow... looking at the images of Guru fans I settled on a pretty easy 'flap' version of a damper. It uses a paperclip to provide a hinge within the blower tunnel. The power of the fan is enough to raise the flap when powered.

Here are some photos:
IMAG0024.jpg

IMAG0021.jpg

IMAG0031.jpg
 
Very nice.

If my grill was more standard I'd cad these up and have some waterjetted, but I don't think mine is air tight enough to really benefit from a damper on the fan.
 
In between compiles this weekend I started to work on a metal bracket to replace my cardboard version. Not content to just have a normal bracket, I came up with the idea to make the plate that goes in the Big Green Egg's... hole.. two pieces which expand via springs. The idea being that you squeeze it and it pops into place in the channel rather than trying to wedge a plate of 26 gauge stainless into a hole slightly smaller than it is. What I ended up with is this steampunk mess


Unfortunately, with or without the springs, with or without washers, the whole thing binds up and prevents the two pieces from sliding, making the whole thing virtually useless. Unless anyone has some better ideas I think I'm going to scrap the whole concept.


Back
Top