LinkMeter v2 Homebrew BBQ Controller - Part 1


Status
Not open for further replies.
Originally posted by Dave S (GeoDave):
avrdude: Version 5.8, compiled on Jan 5 2012 at 12:06:07
...
According to Ladyada, this particular issue is almost impossible to debug.
Try out this test program, hmdude. I'd been considering rewriting avrdude with support for just working with optiboot and a more robust upload method which doesn't try once every 7 seconds. This is the start of that but can maybe tell what is going wrong. SSH into your router and
<pre class="ip-ubbcode-code-pre">
cd /tmp
wget http://home.capnbry.net:22674/hmdude
chmod +x hmdude
/etc/init.d/lucid stop
./hmdude -P/dev/ttyS1
</pre>

You should get a "Syncing: OK" hopefully at some point. If you don't well, I guess add 5 '-v's on the end and let's go from there. `./hmdude -P/dev/ttyS1 -v -v -v -v -v`

Glad you like the config page! It is about time I got to that, right?
 
Originally posted by Dave S (GeoDave):
I tried a couple times to add another wireless radio but I can't seem to get the settings right.
You want the Linksys to be a wifi client to your home network router? Yeah it is a pain in the butt, and it doesn't help that OpenWrt changed some constraints along the way that disabled the old way I did it.

Next time I reflah my router to scratch for testing I'll make some nice images, but here's the steps I follow:
-- Go to Network -> Wifi
-- Hit the "Scan" button
-- ++ If you get a blank list or the web browser complains about malformed xml, just go back and hit scan again
-- Click the "Join Network" next to what you want
-- In the "Join Network: Settings" you want to have the checkbox checked that says create a new network, enter your wifi password, name of new network = wwan. Submit.
-- You should be taken to the WiFi settings page for the radio0, this page may take a minute or two to load completely because it is poorly written. When it does, click the "Unsaved Changes: (number)" on the top right.
-- Click "Save and Apply". It will probably put up a little animated gif you think will go away at some point but never does.
-- Wait about 20 seconds and pull the power on the router and then plug it back in.

The worst part is where the radio0 page is loading the router might decide to run out of memory and lock up or reboot without saving your config. It is annoying as crap. Once you get it set and working I recommend backing up your router config to just restore it if you need to configure the wifi again. I think this is the only config changes it makes though:
<pre class="ip-ubbcode-code-pre">
# /etc/config/network
config 'interface' 'wwan'
option 'proto' 'dhcp'

# /etc/config/wireless
config 'wifi-device' 'radio0'
option 'type' 'mac80211'
option 'channel' '11'
option 'macaddr' '00:25:9c:52:44:5e'
option 'hwmode' '11g'
option 'disabled' '0'

config 'wifi-iface'
option 'ssid' 'capnbry24'
option 'encryption' 'psk2'
option 'device' 'radio0'
option 'mode' 'sta'
option 'network' 'wwan'
option 'key' '1234'
</pre>
 
I didn't have to go through any of that to get my linkmeter to join my existing wifi network as a client..

I just went in to the configuration page -> Network -> Wifi, setup the appropriate info for my network under Advanced for Wlan0, set it as a client, and then added an interface (in my case named LINKMETER) using that wireless stuff I just setup.

I don't recall the exact steps as I have only done it the one time, but it took me all of 5 minutes to get my router using one of my home's wifi networks as a client.
 
Originally posted by Jay Bremner:
Had a couple of questions. In the parts list for the v3.1 board, you have the RFMB12. So you only need 1 of these on the board? How many wireless temp. probes can you connect at once? Where do I find the probes themselves?

Also, for someone just starting from scratch on this project, do you have any advice for where to start at? Do I goto the original LinkMeter thread or the HeaterMeter thread? Just looking for a process to follow.
1) Yes you only need one RFM12B on the receiver, but you also need one for each lmremote (wireless temp transmitter device). Each lmremote can have up to 6 probes plugged into it. HeaterMeter is still limited to displaying only 4 probes though, so even if you have 3 transmitters with 6 probes each, you'll still only be able to map 4 of them to display.

1A) There's no schematic for the lmremote board yet. My version is still on breadboard. I've been wrestling with the question of how to power it. I use a single AA and a JeeLabs AA power board, or just using 3 AA batteries (which seems like overkill considering 1 AA lasts like a month running continuously). It is a pretty basic design other than that-- just a digital line connected via resistor to an analog in and then from there the probe goes to ground. Iiiiii'll get to it soon!

2) The HeaterMeter wiki should be the best place to start and maybe the first post of this thread. If you have any specific questions you can ask and I can try to fill out the wiki with the answers. As for where to start, I'm really not sure! I'd probably jump right in with getting parts and a LinkMeter v3.1 board, an FTDI cable, and either a pre-bootloaded ATmega chip or an USBtinyISP. While you're waiting for that to arrive, you might want to play with the HeaterMeter build process using the Arduino IDE. Even though that shouldn't be necessary, it seems to be working out that just installing the prebuilt binaries don't work. You definitely want to keep your eyes open for a WRT54GL router to put it all in on eBay / Craigslist.
 
Thanks Bryan. I picked up a WRT54G v1 last week on Ebay for $12.50. Was just curious on the wireless probe issues. I bought a 3.1 board off of Duston and just ordered the rest of my parts today. Can't wait to get started!
 
If I want to update HM and LM to the latest/greatest, do I need to also update the Arduino environment to the latest? Do I need a new optiboot version?

I'd like to enjoy the new configuration page, but don't know if it will work with the older HM code.

dave
 
Originally posted by Bryan Mayland:
Glad you like the config page! It is about time I got to that, right?

It is the greatest thing since sliced brisket! It certainly makes it more usable. You act like you do this for a living!!!

If someone needs a WRT54GL...there is a guy on craigslist Seattle that is selling his for $20 or 25. I see a couple a week on there.
 
Originally posted by Bryan Mayland:
Try out this test program, hmdude. I'd been considering rewriting avrdude with support for just working with optiboot and a more robust upload method which doesn't try once every 7 seconds. This is the start of that but can maybe tell what is going wrong. SSH into your router and
<pre class="ip-ubbcode-code-pre">
cd /tmp
wget http://home.capnbry.net:22674/hmdude
chmod +x hmdude
/etc/init.d/lucid stop
./hmdude -P/dev/ttyS1
</pre>

You should get a "Syncing: OK" hopefully at some point. If you don't well, I guess add 5 '-v's on the end and let's go from there. `./hmdude -P/dev/ttyS1 -v -v -v -v -v`

I do see a Syncing OK...so I hope this helps. It is driving me nuts! I did test this on three separate 328 chips. Flashed bootloader using Duemilanove, USBTinyISP, and Arduino 1.0, uploaded sketch via same Duemilanove, put chips into v3.1, and followed your instructions. This is the output:


root@OpenWrt:/tmp# ./hmdude -P/dev/ttyS1 -v -v -v -v -v
Using Port: /dev/ttyS1
hmdude: Send: . [0a] / [2f] r [72] e [65] b [62] o [6f] o [6f] t [74] . [0a]
hmdude: Send: 0 [30] [20]
drain>00 <drain
hmdude: Send: 0 [30] [20]
drain><drain
hmdude: Send: 0 [30] [20]
hmdude: ser_recv(): programmer is not responding
Syncing: ERROR
hmdude: Send: 0 [30] [20]
drain><drain
hmdude: Send: 0 [30] [20]
drain><drain
hmdude: Send: 0 [30] [20]
hmdude: Recv: . [00]
hmdude: stk500_getsync(): not in sync: resp=0x00
Syncing: OK
hmdude: Send: A [41] . [81] [20]
hmdude: Recv: . [0a]

hmdude: stk500_getparm(): (a) protocol error, expect=0x14, resp=0x0a
Optiboot version: (failed)
 
Originally posted by Bryan Mayland:
-- In the "Join Network: Settings" you want to have the checkbox checked that says create a new network, enter your wifi password, name of new network = wwan. Submit.

No check box...just says: "The hardware is not multi-SSID capable and existing configuration will be replaced if you proceed." Maybe this is why I was having trouble doing this when I tried originally.

-- You should be taken to the WiFi settings page for the radio0, this page may take a minute or two to load completely because it is poorly written. When it does, click the "Unsaved Changes: (number)" on the top right.

Yeah...I noticed your pages run much more quickly than any of the stock OpenWRT. I can see you are a master at your craft. I only dreamt about the features you are implementing when I saw Bobs post three years ago. We are lucky to have you for sure.
 
Originally posted by D Peart:
If I want to update HM and LM to the latest/greatest, do I need to also update the Arduino environment to the latest? Do I need a new optiboot version?
You can use the old Arduino code, but you'll be missing a lot of the configuration data. Up until last week, HeaterMeter only exposed maybe a quarter of its config via the /config command. All of those should be in commit d0375c78e4c7f3ea3736d938c7df5015af466803 if you're looking to just merge.
 
Dumb question. I have this Arduino laying around, and I compiled the latest HM sketch and it seems to work. I can just toss my HM's Atmega in there and flash it and then move it back to my HM board, right? I don't have to do anything fancy?

I'm still waiting on parts to come in and some free time before I actually hook my HM board up to my router, so I figured if I had the Atmega flashed ahead of time I could rule that out of things that could go wrong.

Edit: Apparently I need to bootload it first... guess I'll just wait for my parts to arrive, since I don't really have that much use for a USBtinyISP.
 
Originally posted by Dave S (GeoDave):
I do see a Syncing OK...so I hope this helps. It is driving me nuts! I did test this on three separate 328 chips. Flashed bootloader using Duemilanove, USBTinyISP, and Arduino 1.0, uploaded sketch via same Duemilanove, put chips into v3.1, and followed your instructions. This is the output:
It does help tremendously actually. I think I may be able to make this work. It looks like your HeaterMeter, like mine does occasionally, spits out some extra 00 values when booting and it screws up avrdude which is easy to confuse.

I'll have another version for you to try out hopefully this evening. I've cleaned up the sync code a little and added the ihex file loader / uploader. However, I've managed to upload only 128 bytes of an hm.hex due to a bonehead mistake on my part, which of course means I need to press the reset button. I'm doing this during lunch so it will have to wait until I get home. Check back this evening for exciting new code action!
 
Originally posted by Kyle Christensen:
Edit: Apparently I need to bootload it first... guess I'll just wait for my parts to arrive, since I don't really have that much use for a USBtinyISP.
You can actually install the bootloader from your standard Arduino using the Arduino-as-ISP method.

Hook up 5V/GND and D10-D13, upload the ArduinoISP sketch to your Arduino, then select Programmer -> Arduino as ISP, select Tools -> Board = Uno, flash bootloader.


EDIT: You may also need to fix these two files in Arduino (and restart the IDE) before it works:
https://github.com/arduino/Ard...5ef6ff9eb889363c73ca
 
Originally posted by Bryan Mayland:
OK, Dave S, I've got something new for you to try.
<pre class="ip-ubbcode-code-pre">
cd /tmp
wget http://capnbry.net/linkmeter/snapshots/trunk/hm.hex
wget http://home.capnbry.net:22674/hmdude
chmod +x hmdude
/etc/init.d/lucid stop
./hmdude -P/dev/ttyS1 -U/tmp/hm.hex
</pre>

You know the drill, if it works HOORAY if not run it again with five -v's.


I am thinking it didn't work. I had an old version of HM on my chip (201110310) and that does change to the new version after doing the above procedure. It could have worked and I just don't understand what I am actually doing. It is all very interesting to me. Here is the output which is consistent over about 15 attempts:

root@OpenWrt:/tmp# ./hmdude -P/dev/ttyS1 -U/tmp/hm.hex -v -v -v -v -v
hmdude: compiled on Jan 24 2012 at 19:08:51
Using port: /dev/ttyS1
Loading ihex file: "/tmp/hm.hex" (22014 bytes)
Starting sync (release RESET now)...
hmdude: Send: . [0a] / [2f] r [72] e [65] b [62] o [6f] o [6f] t [74] . [0a]
hmdude: Send: 0 [30] [20]
drain><drain
hmdude: Send: 0 [30] [20]
hmdude: ser_recv(): programmer is not responding
Sync: ERROR
hmdude: Send: 0 [30] [20]
drain><drain
hmdude: Send: 0 [30] [20]
hmdude: Recv: . [00]
hmdude: stk500_getsync(): not in sync: resp=0x00
drain><drain
Sync: ERROR
hmdude: Send: 0 [30] [20]
drain><drain
hmdude: Send: 0 [30] [20]
hmdude: ser_recv(): programmer is not responding
Sync: ERROR
hmdude: Send: 0 [30] [20]
drain><drain
hmdude: Send: 0 [30] [20]
hmdude: ser_recv(): programmer is not responding
Sync: ERROR
hmdude: Send: 0 [30] [20]
drain>00 24 55 43 49 44 2c 48 65 61 74 65 72 4d 65 74 65 72 2c 32 30 31 31 31 30 33 31 30 0a <drain
hmdude: Send: 0 [30] [20]
hmdude: Recv: $ [24]
hmdude: stk500_getsync(): not in sync: resp=0x24
drain>48 4d 53 55 2c 32 32 35 2c 55 2c 55 2c 55 2c 55 2c 30 2c 30 2c 30 0a <drain
Sync: HeaterMeter
hmdude: Send: . [0a] / [2f] r [72] e [65] b [62] o [6f] o [6f] t [74] . [0a]
 
Originally posted by Dave S (GeoDave):
I am thinking it didn't work. I had an old version of HM on my chip (201110310) and that does change to the new version after doing the above procedure. It could have worked and I just don't understand what I am actually doing. It is all very interesting to me. Here is the output which is consistent over about 15 attempts:
Wow that is crazy. Normally when you press and release the RESET button, how long is it before your LCD backlight lights up (release -> light come on)? Is it about 1s, or about 4-5s? From the log you just posted it looks like it takes the HeaterMeter at least 3s to come up and it should be 1s or less.

When you're loading the bootloader, are you selecting Arduino Uno? Even if you have a Duemilanove, you should be selecting Uno before you do the burn bootloader part. If you are, then maybe try running the fusebytes sketch and we can see if maybe I forgot to tell people to set a fuse.
https://github.com/WestfW/fusebytes

Note the baud rate for fusebytes is 19200. We will get to the bottom of this!
 
Ugh, I have been banging my head against my desk tonight trying to get this chip bootstrapped. I keep running into this error when I try on my Mac:

(kyle@violane) ../bin/avrdude -C ./avrdude.conf -p m328p -P /dev/tty.usbserial-A9007Wrk -c avrisp -b 9600 -F|grep 328
avrdude: stk500_getsync(): not in sync: resp=0x15

http://www.arduino.cc/playgrou...etOnSerialConnection

Says I need to either put 120ohms worth of resistors between 5v and reset, or a 10uF cap between reset and ground, but I don't have either laying around.

Moved over to my PC to try to flash, and while I could upload the ArduinoISP sketch successfully to my arduino (just to verify I had com settings right), I kept getting a different yet equally frustrating error when trying to burn the bootloader.

I tried both the method Brian suggested (with the chip on the HM board and via the breadboard method that's floating around. Guess I'll have to fiddle around with it some more tomorrow, or see if I can wrangle appropriate resistors.
 
Originally posted by Bryan Mayland
When you're loading the bootloader, are you selecting Arduino Uno?

Nope...I must have read over that part. I am smoking a chicken right now but just as soon as it is free I will flash the bootloader with the Uno board selected and report back. What is the difference?

UPDATE: Is this what you are looking for?:

root@OpenWrt:/tmp# ./hmdude -P/dev/ttyS1 -U/tmp/hm.hex
hmdude: compiled on Jan 24 2012 at 19:08:51
Using port: /dev/ttyS1
Loading ihex file: "/tmp/hm.hex" (22014 bytes)
Starting sync (release RESET now)...
Sync: OK
Device signature: 0x1e950f
Optiboot version: 4.4
100% |##################################################| 22014 (3.3s)
root@OpenWrt:/tmp#


So yeah it works GREAT now. NOTE TO EVERYONE: Burn the bootloader correctly!!! Did I miss this somewhere in the wiki Bryan? Is this something that should be in bold on the wiki?
icon_smile.gif


Thanks for the education...the Linkmeter is my Raspberry PI.

Okay so suggestions on other improvements:
-mobile version of the linkmeter page or android app
- Put something on the main page that lets you turn off/on lidopen mode. I looked but couldn't find anything. I like the LED and button a lot but also like the idea of a bare minimum version.

I had some other ideas but I have forgotten...time for bed.
 
Originally posted by Kyle Christensen:
Ugh, I have been banging my head against my desk tonight trying to get this chip bootstrapped. I keep running into this error when I try on my Mac:

(kyle@violane) ../bin/avrdude -C ./avrdude.conf -p m328p -P /dev/tty.usbserial-A9007Wrk -c avrisp -b 9600 -F
Is your board hooked up as using the "Arduino as ISP" method here? If so, the -c option should be "-c stk500v1". If trying to disable the autoreset circuit, you may be able to use a 22u/6.3V electrolytic capacitor from the HeaterMeter parts list between RESET and GND and/or the 390ohm resistor from 5V to RESET.

Also, you made sure to edit the ArduinoISP sketch to say "Serial.begin(9600);" instead of 19200 and the arduino/hardware/arduino/programmers.txt to be 9600 as well, correct? I don't remember when they fixed that, if it was before the 1.0 release or not.
 
Originally posted by Dave S (GeoDave):
So yeah it works GREAT now. NOTE TO EVERYONE: Burn the bootloader correctly!!! Did I miss this somewhere in the wiki Bryan? Is this something that should be in bold on the wiki?
icon_smile.gif


Okay so suggestions on other improvements:
-mobile version of the linkmeter page or android app
- Put something on the main page that lets you turn off/on lidopen mode. I looked but couldn't find anything. I like the LED and button a lot but also like the idea of a bare minimum version.
GREAT NEWS! Yay I'm glad we figured this out, because taking the chip out of the router to flash it every time my whim changes the HeaterMeter code would be like torture. The next snapshot also adds the ability to get the firmware directly from the web too, although in a pretty craptastic way so far. I think the wiki needs a whole page on the bootloader, because it is a pretty important step I can't say enough about.

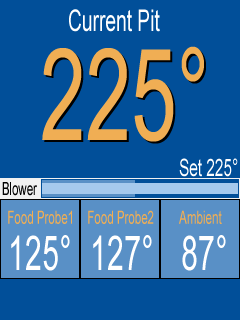
The LinkMeter Home page is designed to be usable on small screens, and readable on larger screens from a distance. When I put it together, I used 240x320 and 320x480 as the target screen dimensions:
mockup-v1-bestbuy.png

Everything you need to set while cooking is also 0 page navigations away, tap the setpoint to change it, tap the probe names to change them. I'd prefer if the setpoint came up with a select control on Android though like this (like the bottom half, not the white part):


I still think it works pretty well, especially turned sideways. I've considered an Android app too, but I can't think of a single thing you can do in an app that you can't do in a browser. If you've got some ideas for better usability of the web site on small screens I'm all ears, but I'm not for maintaining a more traditional mobile site where it is a few lines of text. If I could see a compelling mockup I might think otherwise though.
 
Status
Not open for further replies.


Back
Top