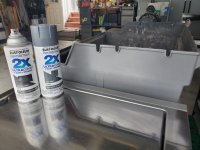
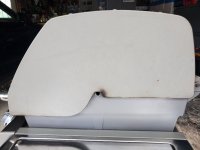
Hello all. I know we have all tried to find that perfect gray high heat color to restore the outside of cook boxes, end caps of hoods, and rusty floors. Well through lots of trial and error I have accidentally come across a really good mix. If any of you have found a high heat match please let me know. I saw the thread about 6 months a go regarding gray paint but no match was found in that thread. Well Bruce got me hooked on the 2X cover by Rustoleum many moons a go when I was resto'ing old school grills and painting frames. This paint really covers well.....like 2X well .....Most of the grills that I pick up have a real mess on the side of the cook box and this makes a high dollar flip tricky. The baked on grease cannot be cleaned and it looks horrible up against a spotless clean restored grill so I just cant leave it that way. Even though I am using a non high heat paint, if I were to buy a used grill for $400 I would prefer it looked clean and fresh vs all greased up and splotchy. Even if my paint eventually peels it could easily be touched up. Thats just my position on this....I might get some kick back from you pro's on this one. I take a medium grit sandpaper and sand the side of the cookbox to where the top layer of the gray paint and most of the dark brown grease stains are really faded and have a good scuff on them trying not to sand all the way down to aluminum. I leave the paint on because it gives me the correct texture once I spray over it. I then wipe with a microfiber towel and I do not use any prep liquid like acetone or Simple Green.....just scuffed and dry. Here comes the magic ") ..... I take the gloss dark gray and spray on a super light coat, only enough to barely cover and let that dry. After about 40 min or so I spray on a final coat with the Charcoal Gray in ( satin ). I stress both coats as light as you can. If you build coats of paint it will for sure peel quicker. The first color ( dark gray ) ironically is not a perfect match but will give you the base and some gloss in your base. The second color ( charcoal gray ) in the satin knocks down the gloss and is a darn near perfect color match when applied over the other color. This second color provides the warm rich tones. In the end the grill will look like new. I test run my grills to max temp before selling and none have peeled during a couple of heat cycles. Just sanding the side of the box already makes it look 70 percent better but after paint it looks awesome.
..... I take the gloss dark gray and spray on a super light coat, only enough to barely cover and let that dry. After about 40 min or so I spray on a final coat with the Charcoal Gray in ( satin ). I stress both coats as light as you can. If you build coats of paint it will for sure peel quicker. The first color ( dark gray ) ironically is not a perfect match but will give you the base and some gloss in your base. The second color ( charcoal gray ) in the satin knocks down the gloss and is a darn near perfect color match when applied over the other color. This second color provides the warm rich tones. In the end the grill will look like new. I test run my grills to max temp before selling and none have peeled during a couple of heat cycles. Just sanding the side of the box already makes it look 70 percent better but after paint it looks awesome.
I want to be very very clear......I am just sharing a really good color match here. I completely understand it is not high heat and that it might peel down the road. So just experiment with this good color match and use it if you have a situation that it will improve. See pic
..... I take the gloss dark gray and spray on a super light coat, only enough to barely cover and let that dry. After about 40 min or so I spray on a final coat with the Charcoal Gray in ( satin ). I stress both coats as light as you can. If you build coats of paint it will for sure peel quicker. The first color ( dark gray ) ironically is not a perfect match but will give you the base and some gloss in your base. The second color ( charcoal gray ) in the satin knocks down the gloss and is a darn near perfect color match when applied over the other color. This second color provides the warm rich tones. In the end the grill will look like new. I test run my grills to max temp before selling and none have peeled during a couple of heat cycles. Just sanding the side of the box already makes it look 70 percent better but after paint it looks awesome. I want to be very very clear......I am just sharing a really good color match here. I completely understand it is not high heat and that it might peel down the road. So just experiment with this good color match and use it if you have a situation that it will improve. See pic