RalphTrimble
TVWBB Diamond Member
Got all the parts in today to build my HeaterMeter v4 connected to a Raspberry Pi and so I built up the HM board...
First power up was rocky, was getting solid red and yellow LED's and nothing on the Display, if I cranked the contrast all the way one line of the Display would glow, which made me worry a bit. I thought perhaps since I have a blank Atmel chip in there this might be OK? (deep down I was not so confident) So I plug the HM into the Raspberry Pi and power up, same situation on the HM LED and Display, I wait a few minutes crossing fingers that it was flashing the Atmel, no such luck.
So I plug the rPi into a monitor, it seems to boot but halts at: mounted filesystem without journal I search the forum and find this thread, http://tvwbb.com/showthread.php?406...hing-HM4&highlight=mounted+filesystem+journal which tells me this is actually a normal boot for the rPi. So I power down, plug a keyboard to the rPi and boot as above, when I hit the ENTER key I get the console so the rPi seems to be working fine.
Handling the HM unit I noticed the LED's went off, and back on, I figured this must indicate bad solder joints somewhere. So I inspect the board (again) and find no bridging or shorts, but did notice that solder didn't flow well to the component side of the board on the IC chip and IC socket (I went kinda light on my initial solder cause I didn't want to over heat them). I figured the two sided board needs solder to flow to both sides so I re-soldered them both making sure the solder made it to the component side on every pin. This time the HM seems to power up different, can't remember LED status but there was nothing on the Display.
It seems the poor solder joints prevented the flash of the Atmel on first boot, and the rPi is no longer trying to flash it. Reading the thread I linked above I see the command to force the re-flash of the Atmel, avrupdate /lib/firmware/hm.hex , so I enter the console on the rPi and enter that command, it erases the chip, then flashes the chip, then verifies the flash and BINGO, I HAVE A WORKING HEATER METER!
So now I need to connect to the network, since the default settings for the LAN didn't suite my network I couldn't connect. So I search the forum and come up with this thread, http://tvwbb.com/showthread.php?38671-HOWTO-Configuring-LinkMeter-WiFi . Following instruction I connect a CAT5 cable from the rPi to my router, then connect another computer to the router and set the computer's IP address to 192.168.200.2, BINGO, I can now load the HM web page! From there I used the config to setup the WiFi on the rPi to connect to my network and have an address that works with my network configuration, save settings and power down. Now I unplug the CAT5 cable and reboot, using the IP I just assigned to the rPi I was able to load the HM home page over the WiFi, SWEET!
Finally, I need to access that webpage from outside the network, so I search the forum and find I need to forward ports 443 and 80 to the rPi IP in my wireless router. A quick entry in the "applications/port forwarding" section and I now can access the HM Home Page from any computer on the network....
After I got over the initial soldering issues things went quite well, everything seemed to be working!
In the meantime I have modified my little smoker a bit, used aluminum tape to close off two of three vent holes. My smoker has a coal pan with only a tiny 1" hole in the bottom, very poor design. I decided to use 3/4" copper pipe to make what kinda looks like burners on a gas grill which now sits at the bottom of my coal pan, flexible copper comes out of the coal pan and through the one vent hole I left open and the blower is connected to the end. I drilled holes all around the copper tubing in the coal pan to distribute the air evenly. (I will post pictures later when it cools down)
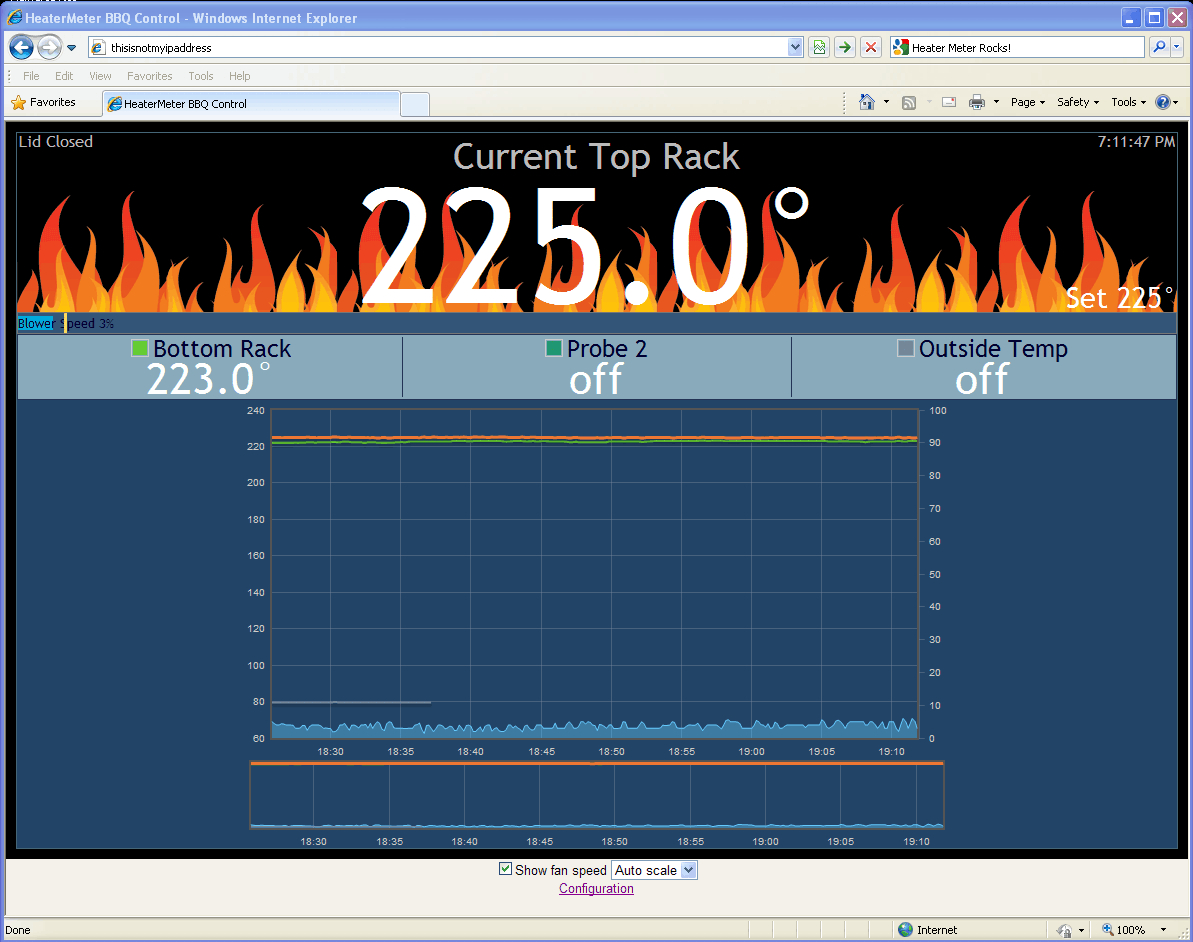
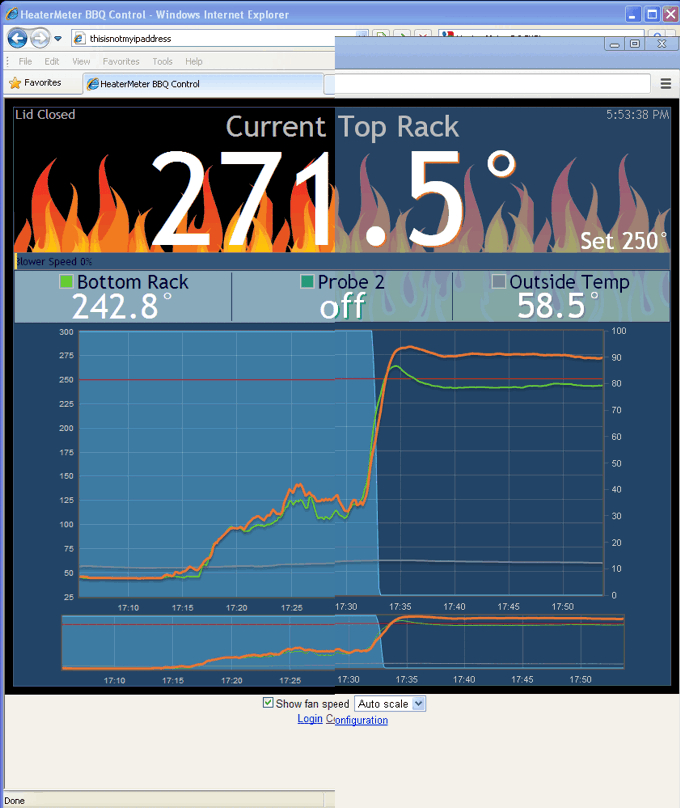
So I hook up the HM blower to the copper tubing, fill the pan with coals. hit the coals with the torch for a few... The HM fan is blowing away stoking them coals good, so I put the smoker body on the burn plate, and put the pit probe in place. In no time the fire is raging so I put the cover on the pit and she comes right up to temperature! As the pit temp rises rapidly the fan slows way down, the pit gracefully reached the target temperature of 250 degrees and holds it steady. I mean STEADY! WOW. For grins I jump the target temp up to 275, the fan kicks up and the temp rises to 275 rather rapidly and settles perfectly! NICE! I set it back to 250, the fan slowed down and the pit fell right back down to 250 and held it on the dime!
This thing just ROCKS! I couldn't have wished for greater success! It holds the temperature like an oven, probably better than my oven! I had already planned on building a bigger DIY smoker, probably a 55 gal drum smoker, but this thing works so well I'm starting to think a stone pizza/bread oven may be on my future project list as well...
MANY THANKS to you for developing this, and everyone who has shared info in the forum which has proven very helpful to me in figuring out how to make this all happen! Hats off to you all...
First power up was rocky, was getting solid red and yellow LED's and nothing on the Display, if I cranked the contrast all the way one line of the Display would glow, which made me worry a bit. I thought perhaps since I have a blank Atmel chip in there this might be OK? (deep down I was not so confident) So I plug the HM into the Raspberry Pi and power up, same situation on the HM LED and Display, I wait a few minutes crossing fingers that it was flashing the Atmel, no such luck.
So I plug the rPi into a monitor, it seems to boot but halts at: mounted filesystem without journal I search the forum and find this thread, http://tvwbb.com/showthread.php?406...hing-HM4&highlight=mounted+filesystem+journal which tells me this is actually a normal boot for the rPi. So I power down, plug a keyboard to the rPi and boot as above, when I hit the ENTER key I get the console so the rPi seems to be working fine.
Handling the HM unit I noticed the LED's went off, and back on, I figured this must indicate bad solder joints somewhere. So I inspect the board (again) and find no bridging or shorts, but did notice that solder didn't flow well to the component side of the board on the IC chip and IC socket (I went kinda light on my initial solder cause I didn't want to over heat them). I figured the two sided board needs solder to flow to both sides so I re-soldered them both making sure the solder made it to the component side on every pin. This time the HM seems to power up different, can't remember LED status but there was nothing on the Display.
It seems the poor solder joints prevented the flash of the Atmel on first boot, and the rPi is no longer trying to flash it. Reading the thread I linked above I see the command to force the re-flash of the Atmel, avrupdate /lib/firmware/hm.hex , so I enter the console on the rPi and enter that command, it erases the chip, then flashes the chip, then verifies the flash and BINGO, I HAVE A WORKING HEATER METER!
So now I need to connect to the network, since the default settings for the LAN didn't suite my network I couldn't connect. So I search the forum and come up with this thread, http://tvwbb.com/showthread.php?38671-HOWTO-Configuring-LinkMeter-WiFi . Following instruction I connect a CAT5 cable from the rPi to my router, then connect another computer to the router and set the computer's IP address to 192.168.200.2, BINGO, I can now load the HM web page! From there I used the config to setup the WiFi on the rPi to connect to my network and have an address that works with my network configuration, save settings and power down. Now I unplug the CAT5 cable and reboot, using the IP I just assigned to the rPi I was able to load the HM home page over the WiFi, SWEET!
Finally, I need to access that webpage from outside the network, so I search the forum and find I need to forward ports 443 and 80 to the rPi IP in my wireless router. A quick entry in the "applications/port forwarding" section and I now can access the HM Home Page from any computer on the network....
After I got over the initial soldering issues things went quite well, everything seemed to be working!
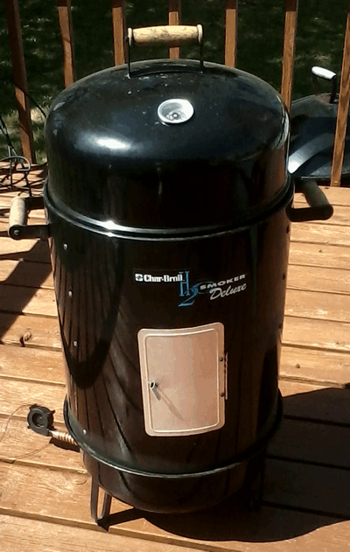
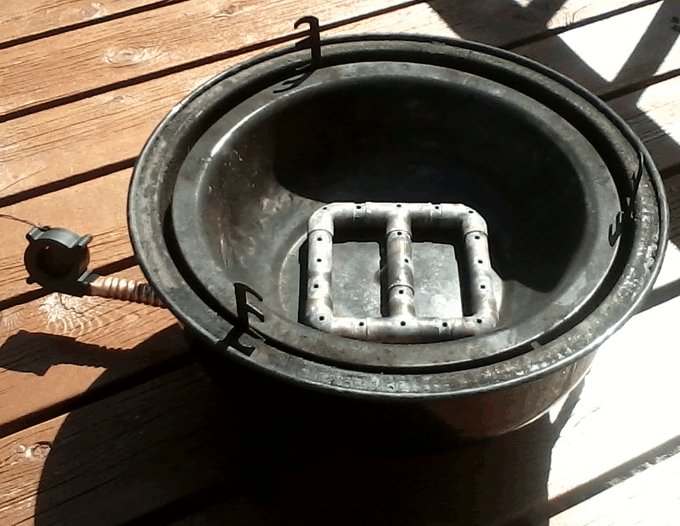
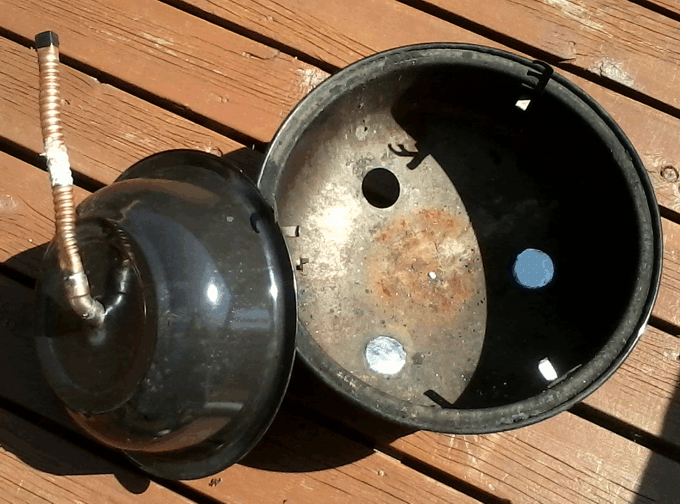
In the meantime I have modified my little smoker a bit, used aluminum tape to close off two of three vent holes. My smoker has a coal pan with only a tiny 1" hole in the bottom, very poor design. I decided to use 3/4" copper pipe to make what kinda looks like burners on a gas grill which now sits at the bottom of my coal pan, flexible copper comes out of the coal pan and through the one vent hole I left open and the blower is connected to the end. I drilled holes all around the copper tubing in the coal pan to distribute the air evenly. (I will post pictures later when it cools down)
So I hook up the HM blower to the copper tubing, fill the pan with coals. hit the coals with the torch for a few... The HM fan is blowing away stoking them coals good, so I put the smoker body on the burn plate, and put the pit probe in place. In no time the fire is raging so I put the cover on the pit and she comes right up to temperature! As the pit temp rises rapidly the fan slows way down, the pit gracefully reached the target temperature of 250 degrees and holds it steady. I mean STEADY! WOW. For grins I jump the target temp up to 275, the fan kicks up and the temp rises to 275 rather rapidly and settles perfectly! NICE! I set it back to 250, the fan slowed down and the pit fell right back down to 250 and held it on the dime!
This thing just ROCKS! I couldn't have wished for greater success! It holds the temperature like an oven, probably better than my oven! I had already planned on building a bigger DIY smoker, probably a 55 gal drum smoker, but this thing works so well I'm starting to think a stone pizza/bread oven may be on my future project list as well...
MANY THANKS to you for developing this, and everyone who has shared info in the forum which has proven very helpful to me in figuring out how to make this all happen! Hats off to you all...