You are using an out of date browser. It may not display this or other websites correctly.
You should upgrade or use an alternative browser.
You should upgrade or use an alternative browser.
Help me restore this 22.5 One Touch Gold Charcoal Grill
- Thread starter Andrew Luis
- Start date
Andrew Luis
TVWBB Fan
Chad, I asked earlier in this thread but it may have gotten lost.
Do you have the part number or link for both the Thermometer and housing so I can buy that soon?") I looked around the site you had linked earlier...but couldn't find the thermometer--just the housing.
I looked around the site you had linked earlier...but couldn't find the thermometer--just the housing.
Do you have the part number or link for both the Thermometer and housing so I can buy that soon?
I looked around the site you had linked earlier...but couldn't find the thermometer--just the housing.Andrew Luis
TVWBB Fan
Thanks dave! Unfortunately... that part # has been discontinued. 
http://www.ereplacementparts.com/search_result.php?q=weber thermometer
Which is the correct Thermometer from this list?
http://www.ereplacementparts.com/search_result.php?q=weber thermometer
Which is the correct Thermometer from this list?
Chad Bman
TVWBB All-Star
Do you have the part number or link for both the Thermometer and housing
[TABLE="class: five parts-listing, width: 364"]
[TR="class: parts-list, bgcolor: #F9F9F9"]
[TD]60540[/TD]
[TD]Thermometer, Q/Spirit/Charcoal
[/TD]
[/TR]
[/TABLE]
[TABLE="class: five parts-listing, width: 364"]
[TR="class: parts-list"]
[TD]63027[/TD]
[TD]Bezel for thermometer, Charcoal[/TD]
[/TR]
[/TABLE]
Source - http://help.weber.com/schematics/browse.aspx?model=1351001
But you go to eReplacement, they say 60540 & 2 others have been discontinued. After a further search, the 60540 was a replacement for the Q series grill. Now, that part number is 7581 and looks like the same exact thermometer. I'm thinking Weber is overhauling their part inventory numbers/lists. I'd order this thermometer
Thermometer - 7581 - $12.33 http://www.ereplacementparts.com/thermometer-universal-p-1478745.html
Bezel - 63027 - $5.95 http://www.ereplacementparts.com/bezel-for-thermometer-p-1475838.html
It was much easier when they sold the bezel & thermometer as a set.
AlWielgosz
TVWBB Super Fan
I use the Greased Lightning also ......and always seem to be humming the song from "Grease"This is the stuff at Home Depot (which I now have)

But in all honesty, this (from an auto parts store) seems to work better

Andrew Luis
TVWBB Fan
Thanks, Chad! I really appreciate it.
Tell me about it! I am having a b***h of problem trying to connect the dots!
Tried searching ereplacement, and couldn't find the grommet on the newer smokers. I got one myself, and I love that I can connect my maverick thermometer through it.
Is there a place I can get it besides here? Directly from Weber maybe?
Also what are your thoughts on the top vent? Is that rivet fully rusted through or can I get it back to 'new'?

Again, I really appreciate your insight as it seems you're the go-to guy on here and the main reason I signed on to here for.
If this restoration goes well, I plan on helping my best friend who just bought his first house with his GF like me (except we did it a year ago ), buy a nice weber that just needs some TLC as his first grill (probably gas). Can't wait for it to get warm so I can start working!
Tell me about it! I am having a b***h of problem trying to connect the dots!
Tried searching ereplacement, and couldn't find the grommet on the newer smokers. I got one myself, and I love that I can connect my maverick thermometer through it.
Is there a place I can get it besides here? Directly from Weber maybe?
Also what are your thoughts on the top vent? Is that rivet fully rusted through or can I get it back to 'new'?
Again, I really appreciate your insight as it seems you're the go-to guy on here and the main reason I signed on to here for.
If this restoration goes well, I plan on helping my best friend who just bought his first house with his GF like me (except we did it a year ago
), buy a nice weber that just needs some TLC as his first grill (probably gas). Can't wait for it to get warm so I can start working!
Last edited:
Chad Bman
TVWBB All-Star
Weber is famous for using parts over and over on different models. IE - The 22 WSM water pan is just a kettle lid, the 18" water pan is a bowl, the 14" water pan is from the Torch... The bezel part number pops up for a lot of models, so that's easy. The thermometers --- I wonder if they use different suppliers and/or make minor tweaks which is why the part numbers are all over the place. But they're all pretty much the same.
I'd be surprised if you could get the grommet from someplace other than Weber. But remember, as soon as you drill the hole, you void the warranty.
That vent rivet most likely won't shine like new. I'd rather have the OEM verses a nut/bolt, but that's just me. Not an issue with a newer DI kettle, but not something you want to do on a vintage kettle.
I've picked up a number of CL gassers and flipped/gave them to family members. It's a fun/cheap hobby.
Andrew Luis
TVWBB Fan
Cool man. I really appreciate your input!
I don't care about the warranty at this point....like you said I got it for free anyway.
If I drill out that rivet ,can I put in a new vent and all? Or is this vent riveted in for life? Is it not meant to ever be changed?
I saw on the newer ones, at least from the diagrams that it's just a nut that holds it in place? Is that right?
Andrew/Chad- thanks for the dialogue about restoring the kettle- I too just got an OTS (not for free) and want to clean it up and do a few mods- like the thermometer. Understanding once I drill it voids the warranty. Kinda thinking it's not that big of a deal so long as I reseal the drilled hole with some sort of enamel. Although it's the older copper color and I noticed the previous owner must t have done something because the edge of the lid has some significant scratch marks that took of the enamel. I assume it will eventually rust. Nonetheless, I'm thinking of using masking tape to protect the surrounding area as a drill for the thermometer- any thoughts on that technique or is there a safer/better way so not to chip the exterior enamel? I too bought the bezel and thermometer to give it a finished look.
Thanks again for the great thread!
Thanks again for the great thread!
Chad Bman
TVWBB All-Star
Welcoming another VA guy. 
I added a thermo to the first kettle I picked up also. I've drilled quite a few holes in the WSM & kettles and haven't 'sealed' one of them yet. Once you start cooking, it's a self correcting problem. Adding a layer (or 3) of blue painters tape (easy removal) is a great idea to get the drill bit started. And start with a tiny drill bit! I use 1/16" to get a pilot hole then increase. The sharper the bit - the better. Go slow with the drill otherwise you risk chipping the porcelain.
Here's the notch I cut in my WSM for the probe wires. Do you see this rusting any time soon? lol
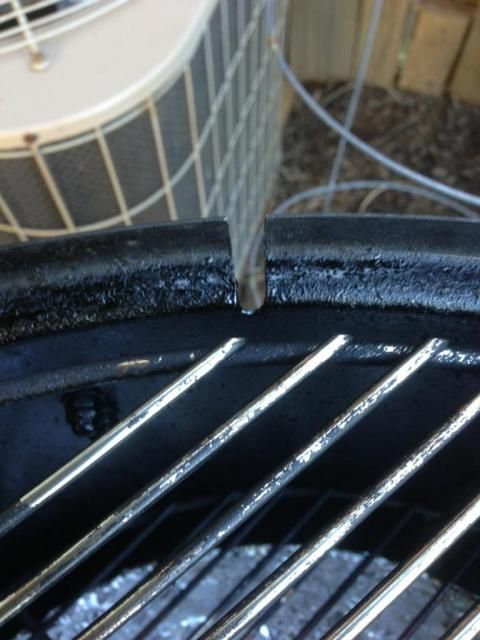
Chad- that's a good point about self-correcting with the grease. I was thinking that I'd look for a new 3/8 drill bit but it's a good idea to start with the pilot hole was well. Thanks for reminding me to take it slow since I'd probably just try to burn right through it- lol!
Andrew Luis
TVWBB Fan
Hi Andy--I have yet to drill...so I can't help ya.
Chad could though!
With that said--still haven't gotten a definitive answer on whether that vent is removable. I want to install one of the newer 'screw' in ones.
Chad could though!
With that said--still haven't gotten a definitive answer on whether that vent is removable. I want to install one of the newer 'screw' in ones.
Andrew/Chad- just to be sure- the thermo diameter is 3/8ths correct? I thought I saw on a different thread that was the proper diameter. Realizing of course to go slow and start with a pilot hole and work from there with the sharpest bits I have. Thanks!
I recommend using a step bit after drilling a pilot hole as it makes a cleaner hole. IIRC it may have been just over 3/8, but you should compare the bit to the therm before you drill to be sure. You'll also need to decide if you will drill a second hole for the lock tab on the bezel or just bend it out of the way. I went with the latter.
With that said--still haven't gotten a definitive answer on whether that vent is removable. I want to install one of the newer 'screw' in ones.
Yes, as with any rivet you can just drill it out, but I still don't see why you should. The "newer ones" aren't screw in btw, only the replacement vents are. Weber uses the rivet because it lasts longer and imo, looks cleaner too. If you are determined to do it, you may want to drill from the inside of the lid.
Andrew Luis
TVWBB Fan
I just thought the rivet on there now is beyond restoration. Am I wrong?
The rivet looks fully functional to me, which is why I'd lean towards leaving it in place. If your vent is close to falling off, then by all means, replace the rivet with a stainless steel bolt. You can use sandpaper to remove the rust. A dremel would make quick work of it as well. Just mask the vent and the surrounding porcelain on the lid area so you don't inadvertently scratch it up. Start with a lower grit and work your way up to say 320 or 400 grit to smooth it out. Then remove your masking tape and go to work with some 0000 steel wool on both the vent and the rivet. Polish it up with some aluminum polish (Mother's, blue magic, etc) and it will look BETTER than brand new.
Then get to cooking on the dang thing and dirty it up! It's a cooker after all
Then get to cooking on the dang thing and dirty it up! It's a cooker after all
Andrew Luis
TVWBB Fan
Will do!