Gas Assist template


Joel H in Brat City

TVWBB Member
I added gas assist to a kettle I put together for my Dad for Fathers Day and thought I would share the template that I made up.

This template is to be printed on standard 8 1/2 x 11 printer paper.

To line things up, print out the template, then fold the paper in half lengthwise - I measured 13 3/4" from the ends of the bowl mounts to center the template - mark that point and line up the fold in the template to that mark.

The template is made so the edge of the paper sits in the rolled edge of the bowl - set it down and mark you holes.

Hope this helps someone looking to add gas assist.
 

Attachments

  • Gas assist template.pdf
    251.9 KB · Views: 67
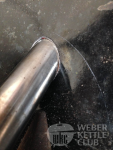
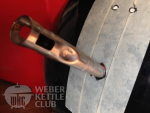
FYI everyone just to make it easier. You can actually avoid cutting the almond shaped hole. Simply drill a hole that is wide enough to insert the gas assist tube on the round end. Then disconnect the tube from the gas assembly by removing the small metal clip, insert the tube through your round hole from the inside of the kettle, then reconnect it to the gas assembly on the outside. It is a much easier to drill it this way and is likely a little more air tight.

I wasn't the first one to come up with this, but I just wanted to share!
 
A Master Touch with the Summit Charcoal tank compartment/control center mounted to it would be awesome!
 
This is fantastic. Very cool. I would have loved to have had this a month or so ago when I was drilling out a kettle to fit on to a Performer frame. My method was much more of a cave man approach.

Also, Bill...that's a nice tip that I didn't know either. Bookmarking this thread for use later. Much easier drilling a circle hole than it is with the almond top/bottom.
 
FYI everyone just to make it easier. You can actually avoid cutting the almond shaped hole. Simply drill a hole that is wide enough to insert the gas assist tube on the round end. Then disconnect the tube from the gas assembly by removing the small metal clip, insert the tube through your round hole from the inside of the kettle, then reconnect it to the gas assembly on the outside. It is a much easier to drill it this way and is likely a little more air tight.

I wasn't the first one to come up with this, but I just wanted to share!
I think the reason the hole ends up almond shape is because the burner tube doesn't mount at a 90 degree angle to a curved surface. I found this HOW-TO on WKC: http://weberkettleclub.com/blog/2014/04/25/weber-grill-mod-adding-gas-assist/
 
See how closely the almond-shaped hole fits the circular part of the burner tube when installed? Could you do that with a round hole? It's almond shape because the burner tube fits at an angle to the spherical surface.
Yes, you can. I've drilled out two kettles this year to fit on Performer frames with the burner tubes. You don't need to make the hole in an almond shape.
 
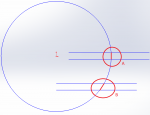
Maybe a picture would help. The only time the hole would be circular is if it is at 90 degrees to the surface (at A), As you move the burner further down the sphere and hold it in the horizontal plane, the hole would elongate (as at B).

Would you agree that B is longer than A? I can post a more extreme example if needed.


1594845015607.png
 
I only have drill bits that drill round holes and the round hole worked for me. I've done this twice now, once in April and another in May. I did try going through the trouble of making an almond shape on the first kettle I drilled out to adapt to a Performer frame and it was a total waste of time. Maybe with better tools it's easier to do the almond shape.
The wall of the kettle is so thin that it does not make a difference what shape the hole is. The almond shape makes it easier to remove the burner tube with the bracket attached. With the round hole you can't do that, you have to remove the bracket from the burner tube which is a pain, but not that bad.
Stick the burner tube through the round hole and it'll go all sorts of angles up and down left to right. The key to getting a 90 degree angle is the placement of your two holes that hold the burner bracket to the kettle, you mark and drill those out last.
 
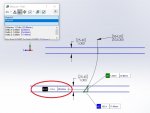
Another picture. For a 1" burner, you will need a 1.214" hole on the surface to fit it horizontally. Your hole will be elliptical, 1.000" minimum/1.214" maximum


Untitled.jpg
 

this is a Kettle performer swap out which covers brackets, etc but he also drills a round hole for the propane tube
 
Ok, drill a round hole. Look at it straight on. It's round, isn't it?

Part1.PNG

Put a round burner in it. Round burner in a round hole.

SeeThru.PNG

Put a piece of paper on the outside of the kettle. Trace the round hole. It's not round, it's elliptical. on the surface of the kettle. The reason it's elliptical it because of the geometry, not for burner clearance.

Outline.PNG


I can't explain it any better. I give up.
 
Last edited:
I thought you were arguing that when drilling a hole for the burner, you have to measure and drill a very specific almond shape.

Of course the curve of the bowl will naturally alter the curve of the hole. Nice pictures though.
 
Of course the curve of the bowl will naturally alter the curve of the hole. Nice pictures though.

Of course.

I thought it was obvious, too, and I'm glad you agree. Let's move on.

giphy.gif
 
Last edited:


Back
Top