BBQ season started early for us here in Sonoma County with some beautiful days and nights. With the BBQ fired up and an adult beverage in hand, nights are just warm enough to be outside making delicious food. I decided that this year I am going to hit it hard and heavy, so I knew that either a serious revamp on the rapidly rusting CG Smokin Pro w/SFB was required or a reassessment of my BBQ equipment.
While I enjoy the CG for its Side Fire Box which allows some nice low and slow cooks, it is a beast to maintain both during and after cooks. I have "modded" it as much as possible to try and even out the hotspots and even lined it with fire bricks to increase thermal mass and stabilize temps. After at least three seasons of mediocre BBQ despite my best efforts (I admit that I am still working on fire control), I decided that if we are going to be outside most of the season on the BBQ, I need something that I can have a few really good successes on that is easy to maintain both during and after cooks and is sturdy enough to last more than four seasons before it rusts out.
Knowing that vertical water smokers have a reputation for easily maintaining temps throughout long cooks, I knew that our old friend Weber would probably have the best bet. After all, I grew up with a grey Weber Bar-B-Kettle with the three dampers on the bottom, and have had a Weber of my own for most of my life. In fact recently I received a 22.5 One Touch Silver for free from a friend... He basically let gunk and the elements turn a beautiful piece of BBQ equipment into a huge mess, so had his fiance' by him a One Touch Platinum. Well guess what he did to that one! Anyway, I replaced the One Touch system, sprayed the whole thing with BBQ cleaner and scrubbed then rinsed and dried. Looks Brand New!
So of course the WSM is a beautiful piece of work. What I enjoy about the CG Smokin Pro w/SFB is that for around $200 it has a high versatility/functionality to price ratio; tons of grilling or smoking space, you can raise or lower the charcoal grate, etc. What I don't feel is that for $400 you get very much functionality with the WSM. It smokes really well and grills not so well. If I had to cough up that much, I might as well stay with the CG. Which led me to research alternatives...
I started researching the Cajun Bandit along with other devices such as the Smoke EZ and the ProQ Stacker and the multitude of others designed to add a longer and more Low and Slow functionality to your existing Weber. I liked the idea of being able to use some equipment that I already have which could be easily converted back to a very functional grill. What I liked about the Cajun Bandit is that it is a very sturdy product that basically turns your 22.5 One Touch into a WSM, but just take the center portion off and you are back to your One Touch Grill. Half the price of a similarly sized WSM - Nice!
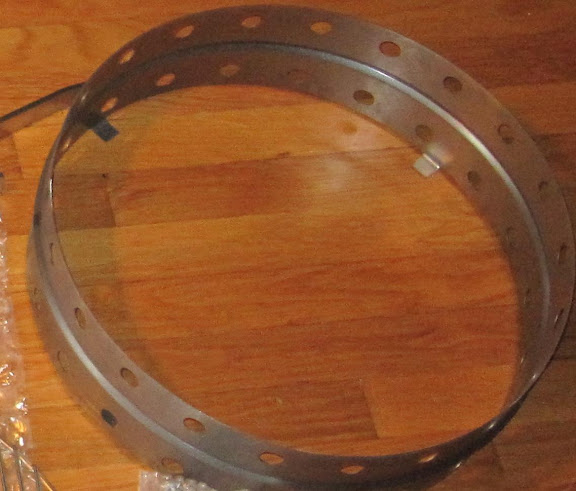
So I ordered one. Chris over there was very communicative with Tracking info and I received it very quickly. UPS just left it on the doorstep - that was fine for me since I was at work but luckily nobody around the neighborhood got curious! Like previous posters on this thread have said, when I lifted the box I could tell that it was not just a thin piece of metal. After removing all of the packing material, I couldn't help but put the center section on my 22.5 just to see how it fit - seamlessly, and the lid clamped down on that thing like it was born to. Continuing on to installation made me even happier; while some people who have purchased this kit have the luxury of being able to seat it on a Performer or Platinum, I was using a One touch Silver. I'm sure you can picture it (don't worry, pictures to follow) - wobbly legs, cheap wheels, bent up ash pan... Well this kit took my Wobblepus and turned it into the Black Tank. The included legs are installed onto the One Touch Bowl and make a super sturdy base for the center section and lid. It renewed my faith in the One Touch Silver! Of course as a grill it is significantly lower now in height than before, but thats fine - I just pull up a comfy chair outside and grill!
One concern with my particular unit was that one of the legs did not have the hole required to hold the bolt for the OTS ash pan, so after considerable effort with the drill and bit included I made my own hole. I also noticed (as others have on this thread) the center section is basically painted 18 gauge steel, so the interior is bare metal. I don't know if anyone else on here may have mentioned it already, but I decided to rub the inside with a good coat of vegetable oil and season it for a couple of hours at about 200 degrees before my first cook. I don't know that this is necessary, but from what I have read on other forums, it can't hurt.
So here comes the juicy stuff; for the first cook, I decided to do a couple of CA chickens purchased at $0.99/lb at my local Warehouse Store. The day before BBQ I brined the chickens for two hours in a solution of 1.5 cups of Kosher Salt and 1 cup of Sugar dissolved in two quarts of water. After brining, I removed the chickens and rinsed off the remaining brine. I then placed the chickens on a rack and placed the rack over a pan and placed the pan in the fridge overnight to allow the chickens to dry and develop what's called a Pellicle, or tacky outer surface that more readily absorbs smoke.
On the day of BBQ, I jumped out of bed and made a pot of coffee. Before I even fired up the BBQ, I took the chickens out of the fridge and rubbed them down with my own recipe BBQ rub (includes Chipotle Powder!) then trussed them before skewering them with my Weber Rotisserie skewer and forks.
I then went outside to start up the BBQ. I loaded the bottom of my Weber Charcoal Chimney with a couple of rolled up newspaper donuts, then filled it full with lump and set it aflame.
As you can see, the charcoal ring sits firmly where the charcoal grate goes and acts as the perfect charcoal basket. After checking the thermometer that I plucked into one of the vent holes (with no loss of performance), I noticed that the lid temps were about 25-35 degrees off from the grate temps, measured with a Polder style Maverick Ready Chek wireless thermometer.
At about 11:30 I started a pot of BBQ Beans (aka Greasy Beans) that I made from scratch on the stove to bring it up to temp. My plan was to do an indirect cook of some Rotisserie Chickens and I figured a large pot of Beans would be a great "water pan" to help stabilize temps and would be a great place for some of the chicken drippings to land and get mixed in. Once the beans were at a gentle simmer, I placed them on the now hot BBQ to continue to cook.
Lunch is where it started to really get interesting. I took a couple of Caspers hot dogs and wrapped them really well with some bacon. I then moved the beans down to the second rack, and placed the hotdogs on the top rack immediately above the beans so any bacon drippings would fall into the beans. After all, they are called Greasy Beans! I let them hang out in the BBQ for about an hour, maybe a little too long, but they were a delicious way to have lunch hot off the BBQ!
Next came the chickens. After having hung out in the fridge for a while with Rub, they were itchin to go on the cooker. I attached the Rotisserie ring (horribly out of round by the way) and opened the access door to toss in a chunk of partially burned Almond wood. Once it started smoking really well, I put the chickens on the Rotisserie, then closed her up.
With everything in the smoker, temps held pretty well at 325 - 350 for the hour and a half, two hours or so that the chickens cooked.
At this time the beans were also done, and I could tell visually that they had picked up a lot of chicken drippings. I gently took the chickens off the rotisserie, then the top grate, and then finally the beans out of the cooker. Using a shallow cooking spoon, I scooped off the top layer of chicken fat, as well as any ash that might have blown around. After removing as much as I could, I mixed the rest of the lovely chicken flavor into the beans.
Overall I loved the whole experience. The chicken was absolutely fabulous and had just the right combo of Rub and Smoke, and the Rotisserie went one step further towards keeping the chickens nice and moist. The smoky hotdogs for lunch were fantastic, and I don't think I have ever tasted better BBQ Beans before. I will be happy to post my recipe on those later!
Later that afternoon when I went go serve dinner, I took the center section and lid off off the cooker and had nothing but the low kettle base and a small load of hot coals still going. I threw a couple of almond logs on there while we were eating to catch, and by the time we were done, they had caught for us to enjoy our own little firepit and smores on the cool Sonoma County Evening! One of the best BBQ experiences that I have had in a long time...
I really love what I do! I hope you enjoy... More to come...