Awesome, Inexpensive DIY ATC


Neil,

Sorry so long getting back. Jeff's answers are pretty well dead on but here's the links to what I used:
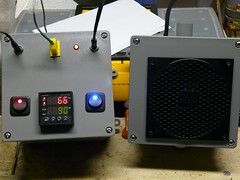
PID Controller

Thermocouple

Panel Mount Connector

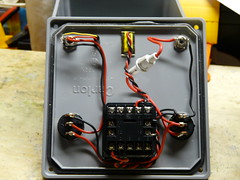
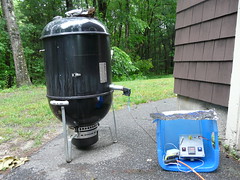
Regarding the SSR. I spoke with Auber regarding this when I received the PID controller. You DO NOT need an SSR for this PID controller <span class="ev_code_RED">(If you will be using the J1 ouput on pins four and five)</span>. This controller uses a "dry switch" to control the fan. Meaning, no voltage is used. You connect the controller in the ground circuit for the fan. I did install a one amp fuse between the 12 volt power source and the PID controller to protect it from spikes and such, but the power to the fan is not supplied by the PID.

I'll try to get a wiring diagram posted so you can see how I wired it.

Thanks for the interest and good luck with yours!
 
Here's my wiring diagram:

Wiring.JPG


Sorry about the rough sketch.

As you'll see, the voltage is supplied directly to the fan (through a switch) and not from the PID controller. The PID opens and closes the ground circuit in my setup.

This switch is what allows me to turn off the fan when I raise the lid but still leave the PID controller power on.
 
Before purchasing the Auber plug in play SYL-1613 I did a ton of research on building one on my own. I have no electrical background and I do not like playing with electricity. I wish this diagram was provided prior too, I would have built it myself. I actually started buying the components at Radioshack and HD then the Auber SYL-1613 went on sale and I purchased it. As part of my research I came across this link. This is a diy atc similar to AJ's. He uses a SSR to control the fan. He also built his own fan adapter. My plan was to do a combination of AJ's and this link to build my own and try to build in a "ramp mode".
 
The sketch is perfect, thanks for posting it!

I was toying with the idea of putting a 1k or 10k pot on the fan to control the speed.
Do you think some sort of fan speed control is worthwhile? Slow the fan down = less overshoot when bringing the temp up.

Neil

<BLOCKQUOTE class="ip-ubbcode-quote"><div class="ip-ubbcode-quote-title">quote:</div><div class="ip-ubbcode-quote-content">Originally posted by A.J. Crocker:
Here's my wiring diagram:

.
.
.
Sorry about the rough sketch.

As you'll see, the voltage is supplied directly to the fan (through a switch) and not from the PID controller. The PID opens and closes the ground circuit in my setup.

This switch is what allows me to turn off the fan when I raise the lid but still leave the PID controller power on. </div></BLOCKQUOTE>
 
I saw similar blower fan/dog food dish setups on the web. I find working with sheet metal to be difficult (at least making it look
decent) without some better tools. I'm pretty good with electronics, plastic and wood, which is what I liked about AJ's solution.
I'm using a smaller box which is 3/4" larger then the fan, so a 1x2 as a spacer works perfectly. But I'm also separating the controller from the fan enclosure so I can use a different controller in the future.

Thanks for the insight!

<BLOCKQUOTE class="ip-ubbcode-quote"><div class="ip-ubbcode-quote-title">quote:</div><div class="ip-ubbcode-quote-content">Originally posted by Richard Diaz:
Before purchasing the Auber plug in play SYL-1613 I did a ton of research on building one on my own. I have no electrical background and I do not like playing with electricity. I wish this diagram was provided prior too, I would have built it myself. I actually started buying the components at Radioshack and HD then the Auber SYL-1613 went on sale and I purchased it. As part of my research I came across this link. This is a diy atc similar to AJ's. He uses a SSR to control the fan. He also built his own fan adapter. My plan was to do a combination of AJ's and this link to build my own and try to build in a "ramp mode". </div></BLOCKQUOTE>
 
<BLOCKQUOTE class="ip-ubbcode-quote"><div class="ip-ubbcode-quote-title">quote:</div><div class="ip-ubbcode-quote-content">Originally posted by Neil Mager:
The sketch is perfect, thanks for posting it!

I was toying with the idea of putting a 1k or 10k pot on the fan to control the speed.
Do you think some sort of fan speed control is worthwhile? Slow the fan down = less overshoot when bringing the temp up. </div></BLOCKQUOTE>

Niel,

It definitely would be beneficial to control the speed of the fan. Mine seems to be just the right speed, but based on the fan you use, it could greatly help with an overshoot issue.

There are many people that have purchased controllers that have to partially close the top vent to control the air flow because the fan in their atc is too strong. Other controllers have a damper on the blower.

I would suggest building it without and judging what kind of overshoot you get. If you find the OS is too large for your liking, then modify your atc to control the fan speed.

One good thing about the design I've used is the fact that you don't have to worry about air leakage around the fan. Even though the air passage is open at all times, the small amount of air that comes in the inlet when the fan isn't running is mostly (if not completely) deflected around the inside of the atc housing and never makes it to the smoker. This leaves fan speed as the most important variable.

Good luck!

AJ
 
I built mine, here's pictures of what I've got.
Unfortunately, I wasn't getting enough air flow, so I'm switching to a blower setup. I'll post info about that next. But I separated the fan box from the controller, and added a fan-on led, which makes testing very easy.


5798852164_feaffe8b63_m.jpg


5798852504_48e2807c56_m.jpg


A couple of notes about AJ's excellent schematic:
the fan swtich light goes on when then fan is turned on by the temperature controller.

The power switch does not switch the + to the fan. I moved the + on the fan switch to the load line of the power switch, so the power switch will also switch off the power to the fan. More of a master switch for the whole system. That also puts the fan after the fuse.

The controller works fine, but I need more air flow - the fan I used was too weak. I working on that now.

Thanks AJ for all the help - you made this project much easier!

Neil
 
I updated the fan to a 6.7 cfm blower from digi-key. It worked really well. I connected it to
some 1 1/4 conduit with a few PVC electrical connectors. Here's some pix:

5825306838_43c0515893_m.jpg


5824807879_23b730b441_m.jpg


5825307858_9656ce3dc2_m.jpg


I updated AJ's schematic with my changes (Master switch, fan on light)

FanControllerSchematic1.jpeg


5825309312_5170f0821c_m.jpg


I set it up around 8pm, went to a graduation party, then to a movie. Got home went
to bed, got up around 8, temp was perfect. It was done around 11am. No getting up in the middle of the night
or at the crack of dawn to tweak the vents...Thanks AJ!!

Neil
 
Awesome Job Neil!

Glad the fan change fixed your problem.

You said exactly what I was thinking when I started this project - No getting up in the middle of the night.....


Back
Top