3D Printed Barrel Servo/Fan


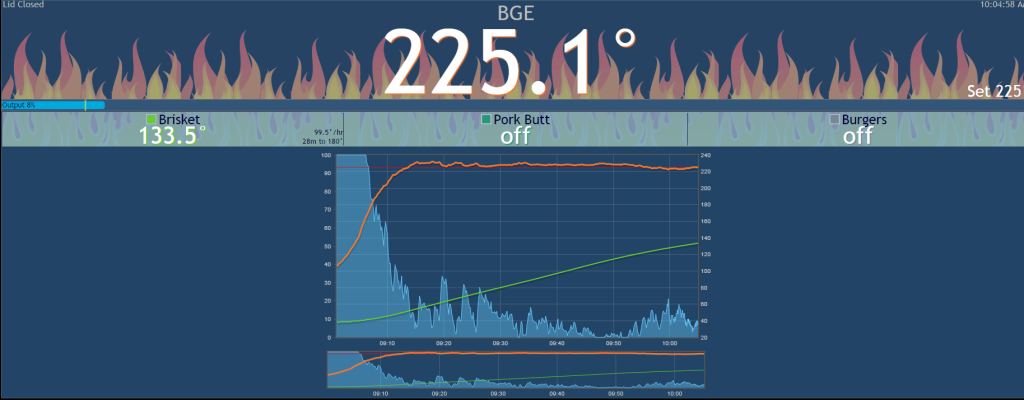
You can set the HeaterMeter to manual mode then set it to 0% and 100% output which will give you a pretty good range. However the settings in the default config are conservative as to the endpoints so you can actually subtract some from the low or add some to the high to increase the travel range. They're intentionally not set to a point too far because some servos could be damaged if the 0% is way beyond their pulse range.

Thanks, Bryan. I didn't realize that the manual settings changed the servo position as well as control the fan speed. That's good to know. I do use that setting sometimes just to get the fire started when I'm not planning to use the HM for a cook. I'll see if I have some time at lunch to monkey with it--I'm sure looking forward to having a proper damper set up with them HM sure sure. Thanks, Tom--that and my 2nd case came in yesterday.
 
I usually turn the servo manually to the end of it's range and then back a few degrees before mounting the valve in the open position. I then adjust the software values to the desired range.
 
Tom, I'm all set up and running good! Thanks for the help. I'm not entirely sure why the fan is turning on under 10% because I have the fan set at min 10% and max 50% but it doesn't seem to be hurting anything so I'm not too concerned. The top vents are wide open and it's not running away so that's great news. I welded some stainless sheet metal square tubing together this morning and just slid the aluminum tube that fits the damper into the tubing and taped it up. I'll solve that interface more elegantly when I have time but wanted to get this 1/2 brisket on as early as possible. I used the 90 because it helps me keep the whole thing tucked under my table and out of the way. I'm going to work on this some more as well so that the fan/cable are protected from the rain better but it's a project for way down the road. Lots of things are in front of that at the moment.

Supabowl_zpslxuba6ry.png


IMAG2366_zpsxd8ezzo7.jpg


IMAG2368_zpsrdyqbgbz.jpg
 
I have the files for the UDS version of the offset design. It doesn't look like there's a port for the ethernet jack. Is that right or are my 3D navigation skills worse than I thought? Also, has anyone used the UDS version? I'm mounting this on an 18.5 WSM and figured round would be easier to deal with when mounting than rectangular.

Todd
 
The RJ45 port is there but it may be obscured in your view due to the floating support fins that I have built into it. They pop right out after you print it.
 
The RJ45 port is there but it may be obscured in your view due to the floating support fins that I have built into it. They pop right out after you print it.

Thanks Tom. I went back and found it after I knew what to look for. Were you ever able to confirm that the diameter of the mounting hole in the UDS version is 1 3/8"? [EDIT: I finally learned how to measure in my free Netfabb software and it looks like the standard diameter for the UDS mounting hole is 1.25"] I'm thinking about using the SS pet bowl for the mounting "bell" to cover one of the vents on the WSM and thought that drilling a hole would be easier than fabricating a rectangular opening. However, after re-reading some threads I saw where you mention better airflow with the rectangle model so I may shift my thinking. I could probably cut/grind/chisel an appropriate opening in the bottom of the bowl and figure some way to secure the 1x2 tubing.
 
Last edited:
You can also adjust the hole size to whatever you want. In the main file there are actually 2 versions for the UDS. The 1.25" that you saw and a 23 mm version that someone else had requested. Most people with WSM like the pet bowl method because it's pretty easy to attach.
 
Does anyone have an issue where the servo doesn't seem to have enough power to move the barrel ? min seems to get stuck a little, and if i tap the servo it moves right along... thinking perhaps i got a dud servo....

supposedly its a mg90s......
 
I've only had that problem with the less powerful sg90 servos. There are 2 things that I would try before giving up on the servo.

1. make sure that the servo propeller is seated all the way into the barrel so that the barrel is not being pressed against the side of the housing.
2. take a piece of 150 to 180 grit sand paper and lightly sand the outside of the barrel in case there are any small pieces of plastic that are causing the servo to hang. Especially pay attention to the edge around the flat bottom of the barrel. The part prints from that edge up and there can sometimes be a subtle flange that develops from the printing process.
3. You can add a small amount of lubricant to the outside of the barrel to reduce the friction.
 
Does anyone have a template for the adapter? Maybe even step-by-step photos?
Looking for a template for a large BGE.
I'm a visual person.

Thanks,
Jake
 
Last edited:
I don't have a template but I think this description should suffice.

Mount
The mount can be fabricated in the following manner:

Supplies: aluminum sheet (I forget the exact gauge but is should be fairly bendable to conform to the curvature of the smoker), 1" square aluminum tubing (barrel damper) or 1" X 2" aluminum tubing (rotary damper), a 1" chisel, hammer, metal snips, JB weld or high temp silicone, and a drill with 1/8" drill bit.

1. Cut out a 77 mm square (1" square conduit) or a 105 mm X 77 mm rectangle (2" X 1" conduit) from the sheet metal (for large BGE, adjust dimensions for your smoker)
2. Draw an "H" in the middle with dimensions of 1"x 1" (1" square conduit) or 2" X 1" (for 2" X 1" conduit, make the "H" two inches tall)
3. Use chisel to pierce through metal along the borders of the "H"
4. Use hammer to bend back the newly formed tabs at 90 degree angles
5. For the barrel damper, insert a 2" piece of 1" square aluminum tube through the square hole until the edges line up with the end of the tabs. For the rorary damper, insert a 3" piece of 1" X 2" aluminum tube through the square hole until the edges line up with the end of the tabs.
6. Use 1/8" drill bit to drill a single hole through the tabs and metal tube
7. Use an M3 or 1/8" screw to fasten together
8. Place JB weld or high temp silicone along the tabs and edge of the tube that is protruding through the sheet metal to form a nice airtight seal
 
Hi all,

Just gathering all of my parts to finally build myself on of these (and my first Heatermeter!). Can anyone tell me what size the round opening in the UDS valve body is? I have a 1" threaded nipple in the bottom of my drum at the moment and am hoping that it goes straight in or it's just a case of using a reducing bush.

Thanks in advance.
 
Chris, you can easily adjust the 3d file to accommodate any size pipe you'd like. Just right click the hole and change the diameter accordingly then save as an STL file. If you are having trouble, PM me your email address and I can help you.

Tom
 
Chris, you can easily adjust the 3d file to accommodate any size pipe you'd like. Just right click the hole and change the diameter accordingly then save as an STL file. If you are having trouble, PM me your email address and I can help you.

Tom

Thanks Tom. PM sent.


Back
Top