Version 2 of my homebrew controller


Oh what the heck! Every time you said "Yellow Jacket" I kept thinking "Black Widow". That is definitely very cool and cost effective. I could seriously save some space in my 2.0 design with that. Unfortunately there's no flash chip on it so I'd need a way to serve up my web pages (17kB so far).

I've posted my code on my site:
HeaterMeter r24
Libraries r24

I've included the libraries in a separate zip file because I had to change the dataflash library to get it to work at all. I think the other two are completely stock, but I can't tell because they're outside my source repository.

I stole most of Bob's steinhart-hart calculation, but the rest is pretty much written from scratch. Note that the temperature is measured 8 times over the course of every second and averaged to produce the result. There's a ton of other junk in there too, and I tried to make it as readable as possible, but if you have any questions let me know and I can answer them.
 
I build trail cameras and many people are using the picaxe microcontroller, writing code is suppose to be very easy. It looks like it may be able to do the same thing.
 
Guys I just wanted to let you know I'm really enjoying reading about all your progress and mods
icon_smile.gif

I always hoped someone would take this to new levels.
 
Originally posted by Bryan Mayland:
Oh what the heck! Every time you said "Yellow Jacket" I kept thinking "Black Widow". That is definitely very cool and cost effective. I could seriously save some space in my 2.0 design with that. Unfortunately there's no flash chip on it so I'd need a way to serve up my web pages (17kB so far).

I've posted my code on my site:
HeaterMeter r24
Libraries r24

I've included the libraries in a separate zip file because I had to change the dataflash library to get it to work at all. I think the other two are completely stock, but I can't tell because they're outside my source repository.

I stole most of Bob's steinhart-hart calculation, but the rest is pretty much written from scratch. Note that the temperature is measured 8 times over the course of every second and averaged to produce the result. There's a ton of other junk in there too, and I tried to make it as readable as possible, but if you have any questions let me know and I can answer them.

Thanks Bryan, Yeah I saw that about the flash, I didn't know you were using it to serve up your pages, looks like I'm stuck with the plain text for now. Great work and thanks for keeping the project moving forward and sharing your knowledge.
 
Originally posted by Ed Pinnell:
Another, less obvious (for me, anyway) question: with Bryan's amazing work on this project, is the WiShield still optional?

With the LCD display, and now input buttons (thanks again, Bryan!), I can't really say that I need or want to use a computer to monitor my low-and-slows. For not much more than the price of the probes, I can buy another ET-73 (I already own one that I plan to borrow the probes from temporarily) to do the monitoring and make use of its HI/LO alarms while not being tied to or tying up a computer on the home LAN. And I still have an upgrade path down the road when my system has stabilized should I have the desire...

So my question is, without a WiShield installed, is the new code going to break? Should I try to comment out all the parts of the code that have to do with the WiShield?

The WiShield is still optional. It would require minor changes to the code to remove it though.
 
Originally posted by Ed Pinnell:
Awesome work! I can't wait to build one!

But...

The 400 lb. gorilla hiding in the corner wants me to ask...is someone going to make an Instructable out of this any time soon?

Define "anytime soon". Lol. I plan to make one and already have it started. If someone beats me to it then great!

Once I get more of the "meat" added to the instructable (right now I'm capturing everything in a MS Word doc for ease of editing, I can provide a link to my draft version for review. I've been wasting far too much time getting twitter updates to work. I don't really need them, but it's just a fun little feature that I'm going to make optional.
 
Originally posted by Ed Pinnell:
<BLOCKQUOTE class="ip-ubbcode-quote"><div class="ip-ubbcode-quote-title">quote:</div><div class="ip-ubbcode-quote-content">Originally posted by John Mangan:
<BLOCKQUOTE class="ip-ubbcode-quote"><div class="ip-ubbcode-quote-title">quote:</div><div class="ip-ubbcode-quote-content">Originally posted by Ed Pinnell:

<snip>
So my question is, without a WiShield installed, is the new code going to break? Should I try to comment out all the parts of the code that have to do with the WiShield?

The WiShield is still optional. It would require minor changes to the code to remove it though. </div></BLOCKQUOTE>

Define "minor". Sorry, I couldn't resist the repartee, but if you are planning to do an Instructable, and you have the programming ability to do so, I humbly request a rewrite of the code to include a #ifdef + #define for the WiShield portion to be able to turn that part of it off or on...

And I would love to see your draft version! </div></BLOCKQUOTE>

Lol! Yes, I plan to make my build modular with "options" so people can choose whether to implement WiFi or not, twitter alerts for alarms/reporting, etc.
 
Actually, my version of the code works without a WiShield attached, but you have to hold a button (any button) during startup. Doing so skips all the network setup and never calls the WiServer task. Oh I guess the storing the log in dataflash would fail too.

As far as the Instructable, I've been a little busy with the new house, but I've been doing some articles for my blog about the project. If anyone is doing the Instructable you're free to use any of the content if you're looking for additional pictures or copy.
http://capnbry.net/blog/?cat=11

I've been spending most my time trying to convert the PWM to a linear voltage control. I've built a switching async buck converter but it was virtually useless. I've simulated another circuit with even more components but still no joy. I've also been experimenting with a software-controlled timer, running the fan at a low speed for a few seconds at a time to simulate lower fan speed. Some success with that.

Other changes I've done are fix a PID option setting bug, turn fans off if you unplug the it probe (they'd stick before), and a massive speedup of serving static content from flash (up to the max 1.5KB/s limit imposed by Windows delayed ACK implementation).

Also working on a straight manual fan mode for when you want to use the fan to just add extra air. Used that to do a pizza experiment at 800F.
 
Originally posted by Ed Pinnell:
My blower is on its way from Digikey. Let me see what I can cobble up and maybe I can contribute to this project. What I'd like to know is how far away is your plastic blower mounted to keep it away from the heat of the fire box during your 800 deg pizza cook. Are you using your cardboard prototype as drawn?

I'm a WSM owner myself (although I LOVE the BGE). If you're going to be doing super high temp pizza cooks then you'll definitely want it further away. This little fan is very fragile.
That said, do you really need a temperature controller for short pizza cooks? I think it's better suited for low & slow cooking for long periods of time.

Some people have gone overkill, putting the blower 3ft away from the WSM with a long tube connecting it. I need to experiment myself, but I think mine is going to end up being a minimum of 6" from the WSM, if not more like 8" or 10". My only real requirement is that the blower can easily be removed for transportation / pickup (otherwise someone is bound to rip it off by accident).
 
Originally posted by Ed Pinnell:
The reason I brought the Instructable up is that I think this project is absolutely awesome and I would like to see it get the attention it deserves! By all rights, this project belongs to Bob and Bryan and the others who contributed to its development, and they are the ones who should do the Instructable, IMHO. I just want to know where I need to go to keep up with the latest developments!

I agree on the Instructable and had already begun creating one before it was even mentioned here. I would love it if Bob and/or Bryan already had one done. They will certainly be acknowledged (along with this forum) in my write up. A lot of fantastic information is already posted (including source code), but it's rather scattered throughout these forums and various web sites. My goal with the Instructable is to get everything in one place with one detailed article. Complete with all source code required. I'm also researching the materials carefully so I can minimize the suppliers if possible (for example, if we have to order the fan from Digikey, why not get most if not all of the Radio Shack parts from there as well? They are much cheaper from Digikey).

Feel free to subscribe to my Instructable profile so you'll be notified when it is finally released. Note that I'm taking my time on this to get it right. I know you don't want to hear this, but I don't plan on having this project "done" for several months. If I'm lucky, it will be ready just before Christmas. Who knows though, that could change if it ends up going a lot easier than I initially expect (half the work is just writing the instructions, taking pics along the way, etc.).

Originally posted by Ed Pinnell:
All very interesting and exciting stuff! Please, keep updating your blog and the forum with your latest innovations, and if you don't mind sharing your code, I for one would be eternally grateful! I studied 'C' programming nearly 20 years ago (I got the K&R book to prove it!) so I can kinda sorta make sense of what you're doing...

As mentioned, all code will be posted. FYI, in parallel I'm also investigating the use of a " Netduino". It's supposed to work with all Arduino shields but allows me to program (and more importantly, DEBUG), with the .NET micro framework. I know my way around C and C++, but the debugging is horrible in the Arduino IDE and I would much rather be working in C# if possible. If that all ports well, I may end up using the Netduino which is actually slightly cheaper (or same cost) than an Arduino.

- John
 
Originally posted by Bryan Mayland:
As far as the Instructable, I've been a little busy with the new house, but I've been doing some articles for my blog about the project. If anyone is doing the Instructable you're free to use any of the content if you're looking for additional pictures or copy.
http://capnbry.net/blog/?cat=11

That's great, thanks Bryan!

Originally posted by Bryan Mayland:
I've been spending most my time trying to convert the PWM to a linear voltage control. I've built a switching async buck converter but it was virtually useless. I've simulated another circuit with even more components but still no joy. I've also been experimenting with a software-controlled timer, running the fan at a low speed for a few seconds at a time to simulate lower fan speed. Some success with that.

Bryan, isn't that fan capable of variable speed control? That's what I was planning on doing by regulating the voltage to it.

Originally posted by Bryan Mayland:
Other changes I've done are fix a PID option setting bug, turn fans off if you unplug the it probe (they'd stick before), and a massive speedup of serving static content from flash (up to the max 1.5KB/s limit imposed by Windows delayed ACK implementation).

I'm in the process of writing up a "features/requirements" list for the design I'm building. Once I have that done (hopefully this weekend), I'll post a link here for feedback and suggestions for improvement. I definitely want to build in some safety measures where if something goes wrong, the fan doesn't continue to blow forever. I would hate to accidentally turn my BBQ into a kiln! Lol.

- John
 
Originally posted by Ed Pinnell:
I hope we are not drifting too far off topic with this Instructables thing, but there was a lull in this thread with nearly a month passing with no new development so I pretty much thought it was a done deal and wanted to find out if anyone was thinking about an Instructable. John, I'm not in a hurry, but what keeps a project alive and breathing is interest and input, and I thought that it might be time to expose this to a wider audience.

This project has been on my "to-do" list for over a year, since I discovered Bob's 1st implementation of it. Creating and releasing the Instructable is secondary to actually performing the work, but they must be done hand-in-hand because none of us have time to go back when the project is complete and re-document everything (and hope something isn't missed).

I have 90% of the parts that I need already ordered, received, and sitting on my work bench. Some of my planned features may be a stretch, but I'm breaking the project down in to "bite size" pieces and plan to get basic functionality up and running 1st before some of the "bells & whistles" are added on.

If anyone wants to collaborate on the build together (and actually go through the process of building one together), let me know. I already setup a non-public project site to document all the requirements, tasks and milestones which I have a decent amount already defined.

I can't guarantee anything though. This is all just for fun but I'm committed to putting a decent amount of effort into it over the next few months. Too many times I've rushed through projects just to get something working only to find I never have time to go back and document things so I can share the info later.

-John
 
FYI, the Instructable has been started. I believe I have most of my planned features captured under the Features / Functionality step. Note: During my build, the features will be broken down in to several "milestones" for the project. I'm starting with core functionality and then adding on later. The initial design will take into account all those features from day one though.

Many of the "steps" (including Acknowledgments) are just placeholders right now and may be written quite sloppy. I'm just capturing the thoughts.

Normally I would never post something that is in such an early draft state, but I think this is a special case. Many of you have been involved in this project over the years and your input is very valuable.

Below is a non-published link to the Instructable for review.

Please keep in mind that this is a work in progress. I'm totally open to constructive criticism and your thoughts on how this can be made better.

http://www.instructables.com/id/EZCA68RGEY8AKPT/

You should see regular progress on the article if you check back every week or so. I often gather data off-line prior to posting so if you don't see any quick updates, fear not. I'm still working on it. I may even post status updates in each section while this is in draft just so everyone has an idea where things stand on overall progress.

- John
 
Oh man, I take a trip to Washington DC and this thread explodes with activity!

Ed: Yeah that's the actual design that I'm still using the cardboard prototype of. The "tunnel" is 30mm long and the heat is not even an issue. Running a 300F cook the temperature at the door is only ~125F. The closest part of the fan is under 100F with the 30mm extension. Most of the heat is going up from the coals, which themselves are elevated off the floor of the cooker.

I considered putting an angle on the end of the extension so when mounted it would be horizontal with respect to the ground. There is a disadvantage to that in the if the blower blows directly in, it blows up ash that is accumulating on the bottom. With the blower at a slight up angle, it seems to blow over most of it without disturbing. I mention that but I'm really excited to see what you come up with. I have actually cut the whole thing out of a sheet of stainless but it came out pretty poorly because the bends are awful if you just try to clamp it to a bench and bend it over the edge
icon_smile.gif


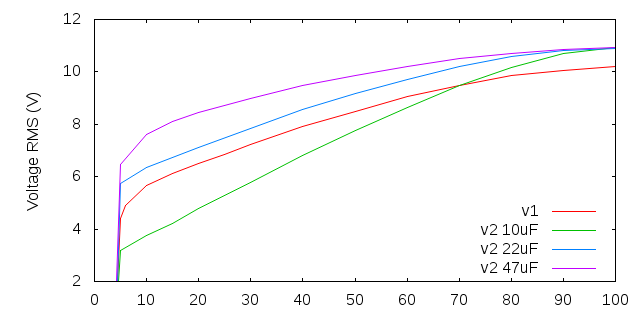
John: The fan I used can operate over the range of 6-12V, so it is variable speed, but with the MOSFET + Capacitor PWM, I get a terribly non-linear response:
fanvoltages.png


With the 10uF cap, the fan makes a lot of noise and supposedly this reduces the life of the fan considerably. The voltage isn't smooth either. If you watch on the oscilloscope, 9V is actually 0V, then a jump up to 12V, which drops to about 3V, and starts heading back to 12V, until the PWM cuts off and there's a spike to 22V. It would be much better to have something that regulated the power (because if you switch out the fan, the curves will be completely different).

Oh and I didn't use the heatermeter to control the grill for making 750F pizza. The probe isn't rated for higher than 400F and with a 22k ohm resistor biasing it, the ADC would bottom out around 400F anyway. I used the fan to stoke the fire supplying extra air to bump the temperature up because I didn't use enough fuel to get it to ultra hot temperatures.
 
Oh and while we're got everyone's attention, what are some other ideas we can implement? Let's Blue Sky(tm) and Think Outside the Box(tm). Ideally, what features are we missing?

-- Temperature ramp down. Set the temperature you want your meat at and as it approaches it, the set point ramps down so they converge. Based on what we know about the cooking process and the plateaus along the way, I think this can be done with a long moving average. This will also tell you when your food will be done, but unfortunately only after it passes the 180F mark. I wonder if there is a way to provide an estimate of cooking time based on the temperature rise time from 40F to 160F.

-- Alerts. The whole system is lacking a decent alert system. Alert me that my fire is out of fuel, alert me the food is almost ready. Twitter is not exactly ideal. E-mail may be an option but that's not much better.

What else?
 
Originally posted by Bryan Mayland:

-- Temperature ramp down. Set the temperature you want your meat at and as it approaches it, the set point ramps down so they converge. Based on what we know about the cooking process and the plateaus along the way, I think this can be done with a long moving average. This will also tell you when your food will be done, but unfortunately only after it passes the 180F mark. I wonder if there is a way to provide an estimate of cooking time based on the temperature rise time from 40F to 160F.

Ohhh..you made me remember one of my ideas that is very similar but I forgot to include it in the Instructable. It would be designed for cooking with a time-based deadline (such as competition). You could plug in the meat weight, ideal done temp, and the time it needs to be done by. Then the program would decide whether or not it's possible to do (within reason). If it is, the cooker will automatically ramp up the temp as needed to a higher temperature in order to have the food done by that given time. Using the same logic, you could have it slow cook something for a bit longer than normal so it would be ready hot off the smoker for your guests. Seems like this should be possible with some creative coding. This would certainly be an option to add-on later though. It's going to take time to get it right.

As mentioned in the Instructable already, I'm planning a series of audio and visual alerts in addition to an optional twitter alert system. I chose twitter because that would cover email, text message to phone, etc. I've personally found it to be pretty responsive but I may just have been lucky during my testing.

- John
 
Originally posted by Bryan Mayland:
John: The fan I used can operate over the range of 6-12V, so it is variable speed, but with the MOSFET + Capacitor PWM, I get a terribly non-linear response:...

Brian,

I plan on enlisting the help of a good friend of mine for this piece. He's a mechanical / electrical engineer and when I described to him what I wanted to do, he seemed to think this would be very simple to accomplish. It will require a separate, yet simple circuit that the Arduino controls, which in turn controls the fan. More to come on that once I get to that point.
 
Originally posted by John Mangan:
I plan on enlisting the help of a good friend of mine for this piece. He's a mechanical / electrical engineer and when I described to him what I wanted to do, he seemed to think this would be very simple to accomplish.
Oh sweet. Yeah, I've been saying for months that if I had a friend who knew anything about building circuits, he wouldn't be my friend anymore with the amount of questions I would have asked by this point! If you can get that nailed down, I may have to move up my plans of creating Heatermeter v3.0


Back
Top