You are using an out of date browser. It may not display this or other websites correctly.
You should upgrade or use an alternative browser.
You should upgrade or use an alternative browser.
How do I edit the main Heatermeter display page
- Thread starter Gerard H
- Start date
RalphTrimble
TVWBB Diamond Member
I have changed the index file as described and it looks great. But the one thing I have not figured out is the header name for probe 0 is the header name for the page but mine always says My in front of any text entered. Any way of changing that?
Just search the page for "MY" and when you find it you can erase it or replace it with whatever you want....
Bryan Mayland
TVWBB Hall of Fame
It's always been fire.png in the index.htm ")
Scott Krasnigor
New member
Thanks for the modified index.htm file updates. Love the black background look. One thing I also changed was to swap the y axis. I put the temperature on the right side. I like to reference the temperature as the plot goes from right to left instead of fan percentage. Just the way I prefer to view the data.
RalphTrimble
TVWBB Diamond Member
Thanks for the modified index.htm file updates. Love the black background look. One thing I also changed was to swap the y axis. I put the temperature on the right side. I like to reference the temperature as the plot goes from right to left instead of fan percentage. Just the way I prefer to view the data.
Funny you mention that, I requested that Bryan move the temp over to the right side of the graph recently in the development thread. He put it up for a vote and everyone seemed to agree, so I hope a future release will have the change....
Bryan Mayland
TVWBB Hall of Fame
Yeah it's going to be swapped in the next release.
I'm going to move all the css to a separate configurable file as well so all your changes won't be blowing away your mods every time there's a new release. Were there any structural changes to the page that are needed to make this work or is it all css?
I'm going to move all the css to a separate configurable file as well so all your changes won't be blowing away your mods every time there's a new release. Were there any structural changes to the page that are needed to make this work or is it all css?
Scott Krasnigor
New member
I just modified the index.htm file. Line 43 I added the position property set to right 'position: "right",' and modified line 44 changing position from right to left. This seemed to work for me. Not sure if there were other locations where this might get modified. Haven't gone through all the code yet.
Bryan Mayland
TVWBB Hall of Fame
Oh man that's much smarter than what I did, which was to swap the yaxis property on all the series. I think I'll back my changes out and use yours.
Scott Krasnigor
New member
I have my moments. If you don't mind me asking, how did you set up your development environment? I am interested in checking out your code and possibly customizing a few things when I have the time to do so. I am a software engineer and would like to contribute if possible. Thanks for all your hard work on this project.
Bryan Mayland
TVWBB Hall of Fame
I used to exclusively use the Arduino environment, but their editor is bonkers (I guess it is all what you're used to though) and there's just so many files in the project it is a pain to work with. It still works if you just need to muck around though. Everything is built with Arduino's 1.0.5 toolset.
If you have Visual Studio already though, I highly highly highly recommend Visual Micro. I've bought a license for their debugger just to throw money at them because working in visual studio is so much easier. Intellisense? Global find & replace? A solution explorer? A link so I can just right click and ssh upload to another machine? So awesome! I use it with VS 2012 Pro. Never have gotten the debugger to work reliably. I do most my stuff remotely anyway with HeaterMeter's Debug_begin()/end() and just look at it from the web browser.
If you're considering contributing, I'm terribly meticulous about the code. The project is unusual in that every feature that will ever be implemented has to fit in under 30k, so every byte is sacred.
Olli Bavaro
New member
Hello guys,
and sorry for bumping in so late into this thread. Thanks to the 4 possible probes on the HM I was experimenting with calculating
the humidity inside my smoker. Easiest way is to use a wet and dry bulb temperature.
I transformed probe 4 into a wet bulb thermo using a cotton shoe lace. Now my question is, if it is possible to do a real time
calculation / graph of the humidity using these formulas. I'm no HTML pro so fiddling with the existing or copy & paste is currently
the maximum I can perform =(
http://easycalculation.com/weather/dewpoint-humidity-calculator.php
I found this temperature quiet interesting in estimating "the stall" and keeping the meet moist and juicy.
http://modernistcuisine.com/2012/08/barbecue-stall/
Regards
Olli
Bryan Mayland
TVWBB Hall of Fame
You should probably start a new thread for this completely new concept.
The value could be calculated in the HTML but the graph comes from the database, so that means the humidity would have to be calculated on the backend and the database would have to be modified to hold the value. You'd also need to know the pressure but it appears that you can just use a standard average and it doesn't affect the output too much.
The value could be calculated in the HTML but the graph comes from the database, so that means the humidity would have to be calculated on the backend and the database would have to be modified to hold the value. You'd also need to know the pressure but it appears that you can just use a standard average and it doesn't affect the output too much.
RalphTrimble
TVWBB Diamond Member
I don't have a comment about the idea to calculate humidity, but since this thread has popped up and the method to edit the main page has changed since it was created I thought I would add that info here....
At the top of your HM Config page you will see a link to "user CSS", that is what you click to open the page where you enter your code...
To link to a background image on the SD Card where we had stored it in the past (rather than an image on the internet as in the example above) use the following line instead:
#backimage { background: #000 url('/luci-static/resources/yourimage.xxx'); }
Custom colored Home pages are now more easily accessible from the webui and saved between linkmeter versions.
Just override styles in the "User CSS" webui page
Code:#content { background: #000; border: 1px solid #467; } #backimage { background: #000 url('http://capnbry.net/~bmayland/fi/bbq/fire-hd.png'); } #backoverlay { background: inherit; } #probelist { background: rgba(100, 50, 50, 0.85); } .pname { color: #fff; } #fanl { color: #fff; } #fancontainer { background: #333; } #navcontainer ul { padding: 0; } #navcontainer li { width: 150px; padding-right: 15px; } #navcontainer li a { display: inline-block; width: 125px; }

At the top of your HM Config page you will see a link to "user CSS", that is what you click to open the page where you enter your code...
To link to a background image on the SD Card where we had stored it in the past (rather than an image on the internet as in the example above) use the following line instead:
#backimage { background: #000 url('/luci-static/resources/yourimage.xxx'); }
RalphTrimble
TVWBB Diamond Member
I've got my HM home page looking pretty much like my customized index.htm used to look now using the following code in the user CSS section:
The only thing it doesn't do, which I had before, was make the color bar in the Blower Speed indicator be semi-transparent, which I can live without but will probably still poke around and see if I can figure that out with the user CSS method...
This certainly is easier than searching through the code in the index.htm file to customize this stuff, and if I read you right, this customization should carry through after updates.... that's nice...
Code:
#content { background: #000; border: 1px solid #467; }
#backimage { background: #000 url('/luci-static/resources/fire.jpg'); }
#backoverlay { background: inherit; }
#probelist { background: transparent; }
.pname { color: #fff; }
#fanl { color: #fff; }
#fancontainer { background: transparent; }
#navcontainer ul { padding: 0; }
#navcontainer li { width: 150px; padding-right: 15px; }
#navcontainer li a { display: inline-block; width: 125px; }
The only thing it doesn't do, which I had before, was make the color bar in the Blower Speed indicator be semi-transparent, which I can live without but will probably still poke around and see if I can figure that out with the user CSS method...
This certainly is easier than searching through the code in the index.htm file to customize this stuff, and if I read you right, this customization should carry through after updates.... that's nice...
Bryan Mayland
TVWBB Hall of Fame
You can make the blower speed indicator semi-transparent by setting a rgba background like (50% red):
#fanc { background: rgba(255, 0, 0, 0.5); }
#fanc { background: rgba(255, 0, 0, 0.5); }
RalphTrimble
TVWBB Diamond Member
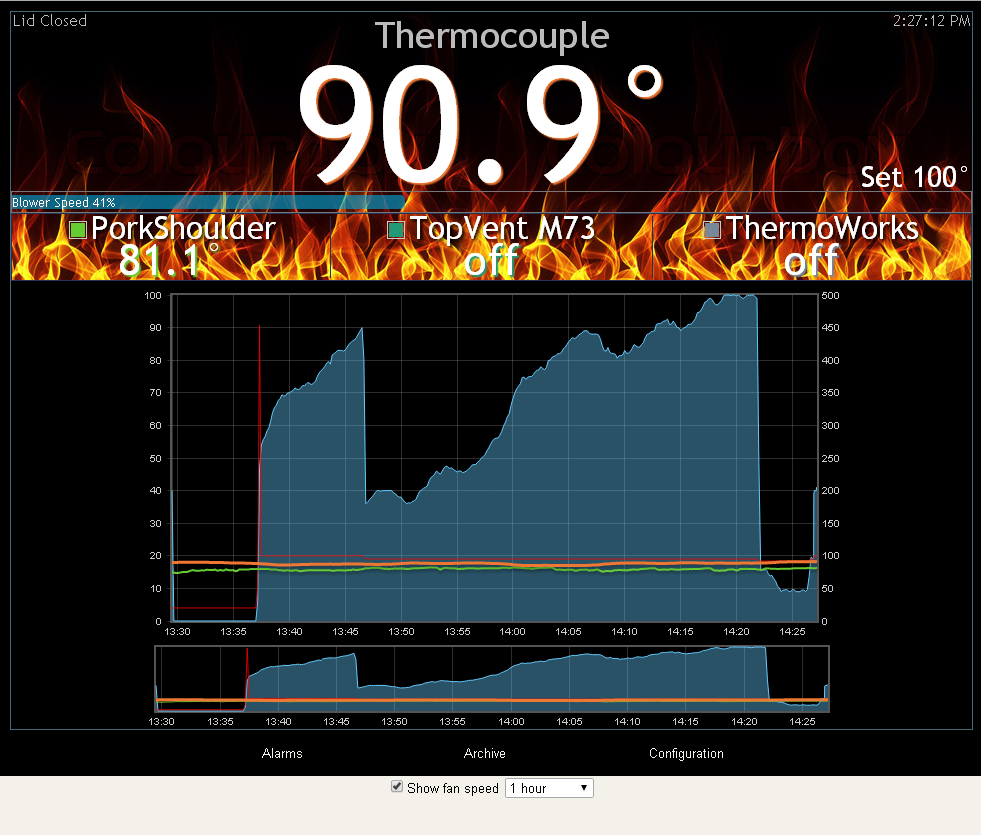
I figured out how to make the fan bar (fanc) semi-transparent again so I made that change, and bumped up the font size on the Probe Names and added a drop shadow behind them so they stand out better against the fire background.
This is now pretty close to what I had with the customized index.htm file....
Here's a screen shot of how the home page looks with the above code:
Here is the background fire image I am using:

On another note, I am surprised that I have yet to see the noise indicator on the thermocouple or food probes since I installed the latest versions of everything. I had thought I for sure see noise when running everything over this long CAT5 cable, but so far.... nadda...
Code:
#content { background: #000; border: 1px solid #467; }
#backimage { background: #000 url('/luci-static/resources/fire.jpg'); }
#backoverlay { background: inherit; }
#probelist { background: transparent; }
.pname { color: #fff; font-size: 24pt; line-height: 16pt; display: inline-block; text-shadow:2px 2px 4px #000000 ; }
#fanl { color: #fff; }
#fanc { #fe4 ; opacity: 0.6; }
#fancontainer { background: transparent; }
#navcontainer ul { padding: 0; }
#navcontainer li { width: 150px; padding-right: 15px; }
#navcontainer li a { display: inline-block; width: 125px; }
This is now pretty close to what I had with the customized index.htm file....
Here's a screen shot of how the home page looks with the above code:
Here is the background fire image I am using:
On another note, I am surprised that I have yet to see the noise indicator on the thermocouple or food probes since I installed the latest versions of everything. I had thought I for sure see noise when running everything over this long CAT5 cable, but so far.... nadda...
Last edited:
RalphTrimble
TVWBB Diamond Member
You can make the blower speed indicator semi-transparent by setting a rgba background like (50% red):
#fanc { background: rgba(255, 0, 0, 0.5); }
I tried that first and it didn't seem to work, but maybe I had it screwed up. I ended up using "opacity: 0.6" and that seems to work.... Thanks for the help....
Rebuilt mine last night after the new release. Here's my current v10 with customization's, I think I've got everything dialed in pretty well now. I can post my index.htm if others are interested.
Update: My v10 index.htm is located here.

Ok i've uploaded the index file provided by T Stinnett but now I don't have any temp readings showing. What did I do wrong?
Sam,
I'm not sure about your issue. If you are running the latest release, Bryan has added a new feature on the Configuration page where you can modify your CSS without editing your index file directly. The link is located at the top of the page. Look for a link called "user CSS". Based on this new feature, I started a new thread over here yesterday and just finished adding some tips for copying the image to the HM. I don't have the specific image in the screenshot above. But, I did post mine.
If you have a backup of your original index file, I would put it back. I'm not sure that the v11 index file (assuming you are running it) would be compatible with the v10 index file that your copy and pasted.
HTH.