Nauglanch - Mike
New member
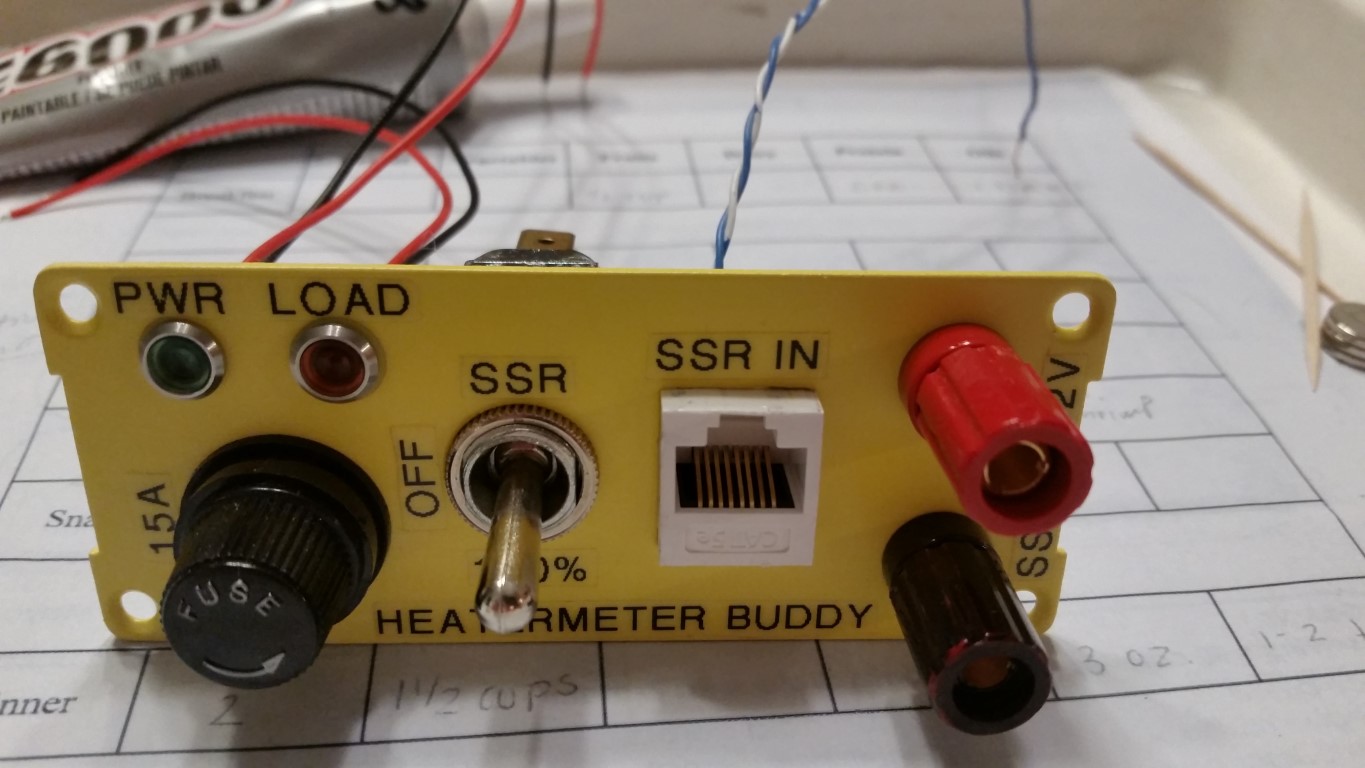
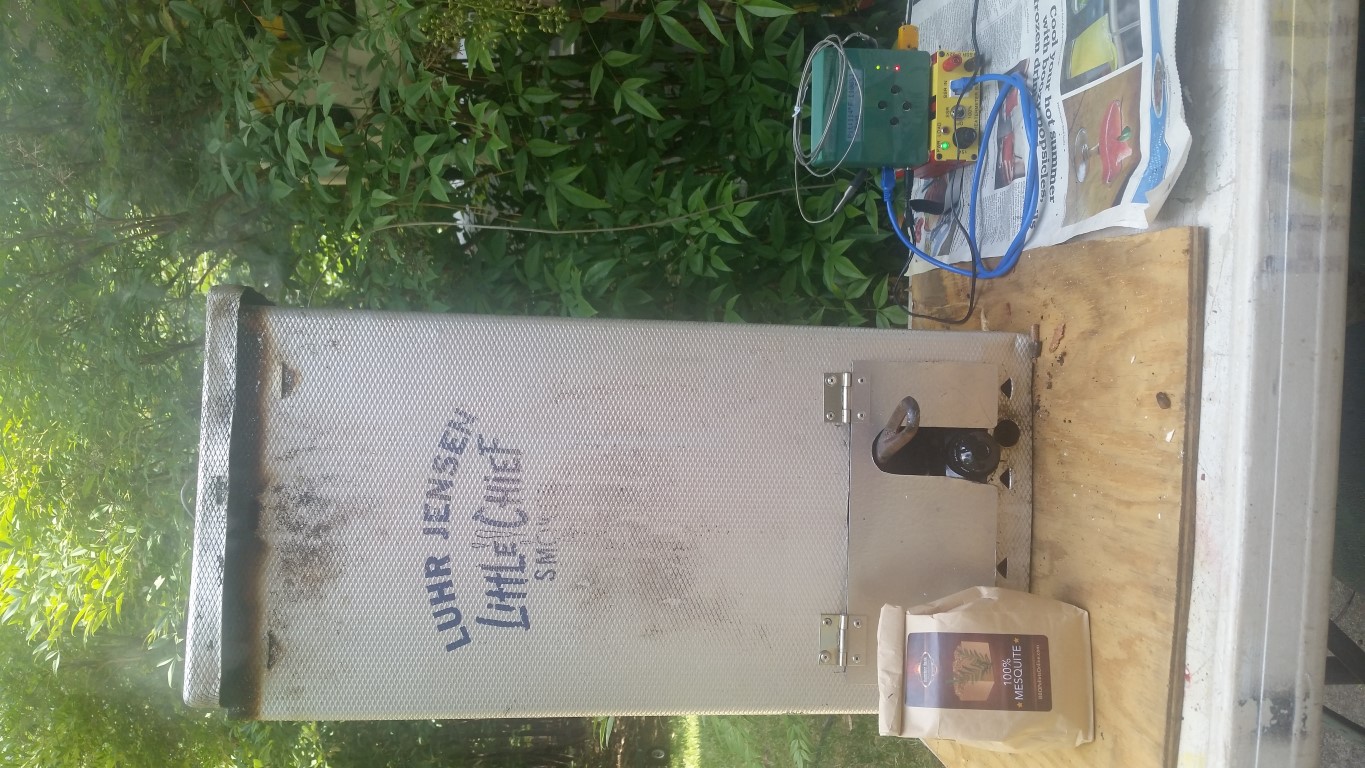
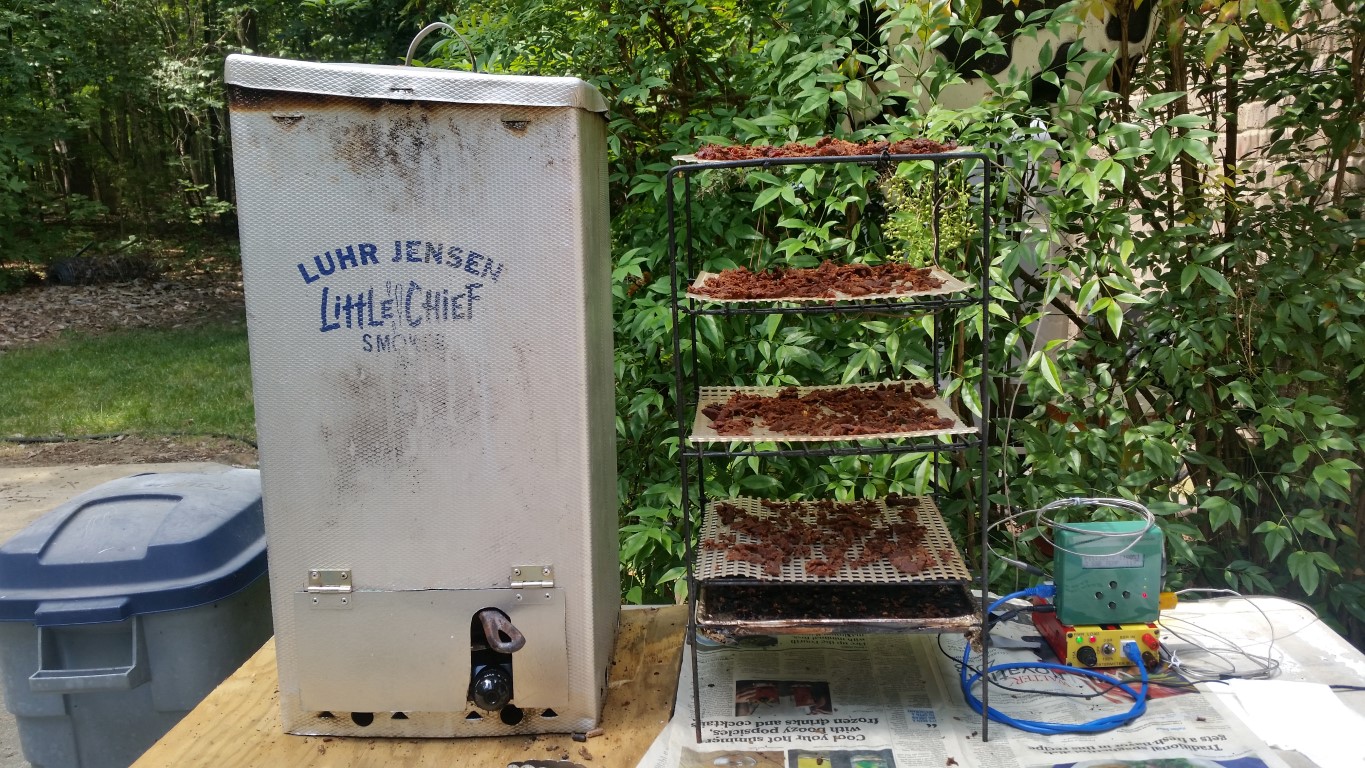
Presenting my latest project and first for the HeaterMeter. The HeaterMeter Buddy. It is an SSR "Buddy" for electric smokers
As with many HeaterMeter initiates - the HeaterMeter is a great can't-live-without item (like my first microwave 30 years ago). The issue is I have an electric smoker (a gravity feed pellet in the works) and it's just begging to use the HeaterMeter SSR PID control capabilities.
So I introduce the "HeaterMeter Buddy"
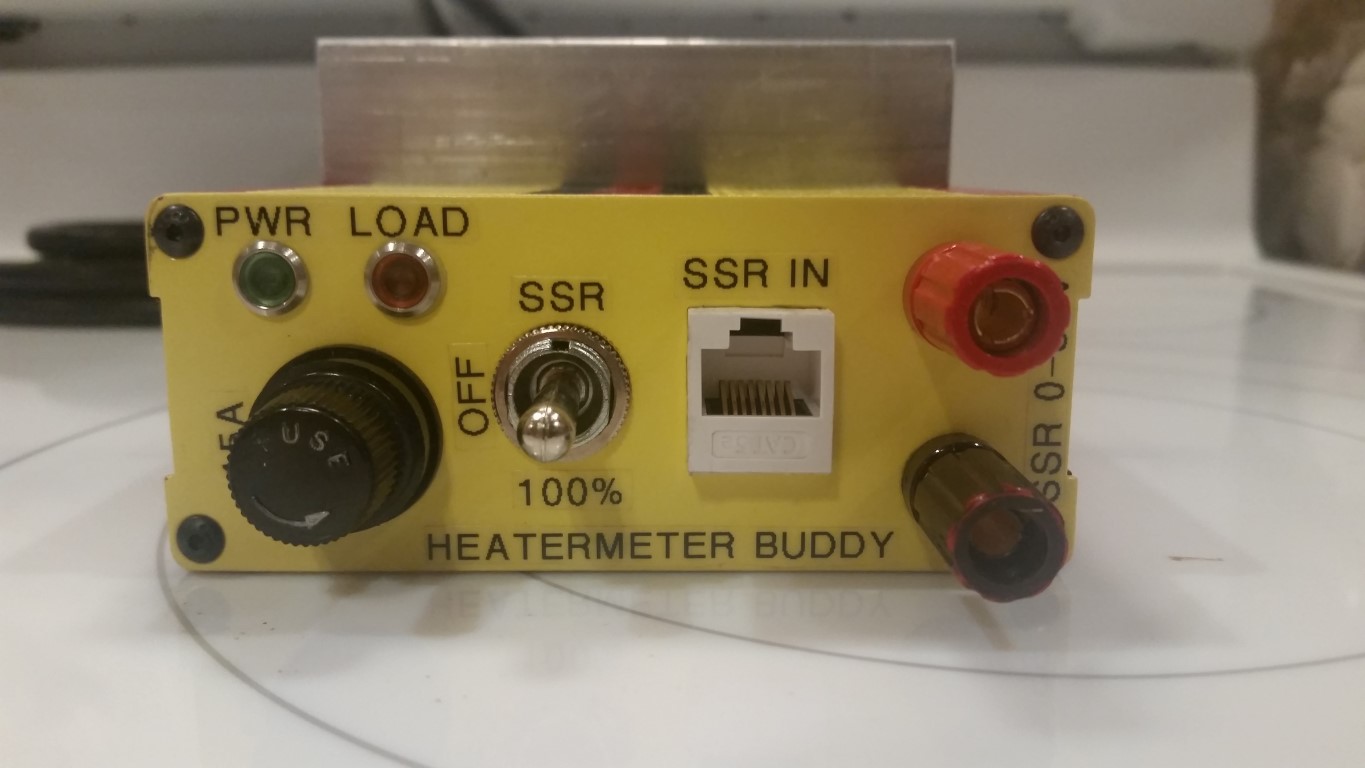
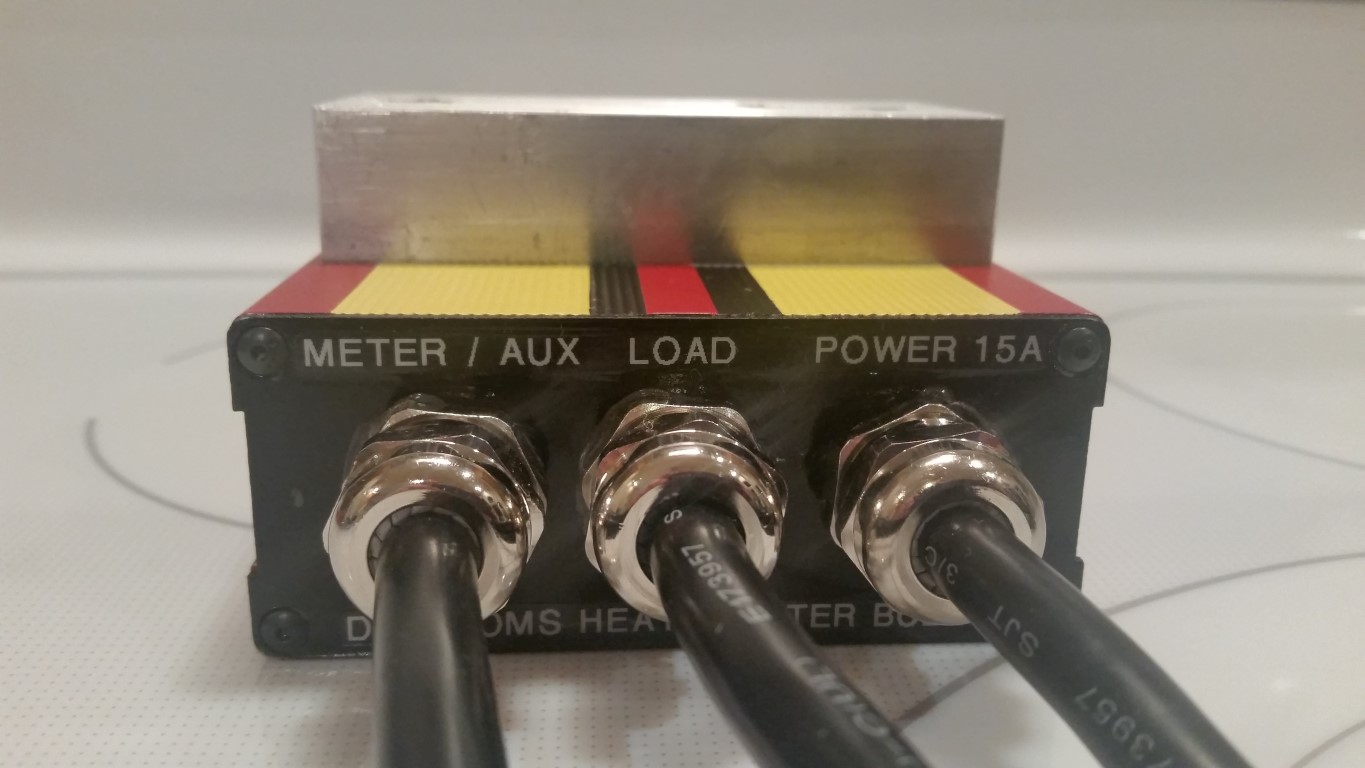
Basically it's a 25A SSR in a case with ethernet jack input, power in, and SSR controlled power out.
But I added a few bells and whistles. Power and Output Power lights. Fuse (Always have a fuse!), Aux SSR Inputs (just for flexibility around the shop), and a 2nd power out, always on, for the Heatermeter 12V power supply, and output power control switch.
Yes, I thought about back powering the HeaterMeter from the HeaterMeter Buddy. But I just couldn't fit in a 5V power supply and didn't want a larger case.
For connections you'll note I use cords. Why? Because I find chassis connectors take up a lot of room. I find they're also not very secure for heavy cable wrangling. Yes you can get uber ones but that's money and even larger product. With cords you get the same effect and cord chassis fittings are inexpensive.
I buy TrippLite 14G auxillary extension cords. If I need a short plug and a short socket I just buy a 3' (their shortest) and cut it in half. And for many of my shop accessories that get moved about I just use 6" outside the case (leaving 1' inside for wiring so can split a 3' cord). In this case my Smoker is in the same place so I used a 15' full length cord so I dont have to always add in an extension cord. The Smoker plug is shorter s it just needs to get to the smoker (so mine 3') , and the HeaterMeter power wart needs to be close so just 6" or a foot long. This is my favorite way now of connecting power to my projects.
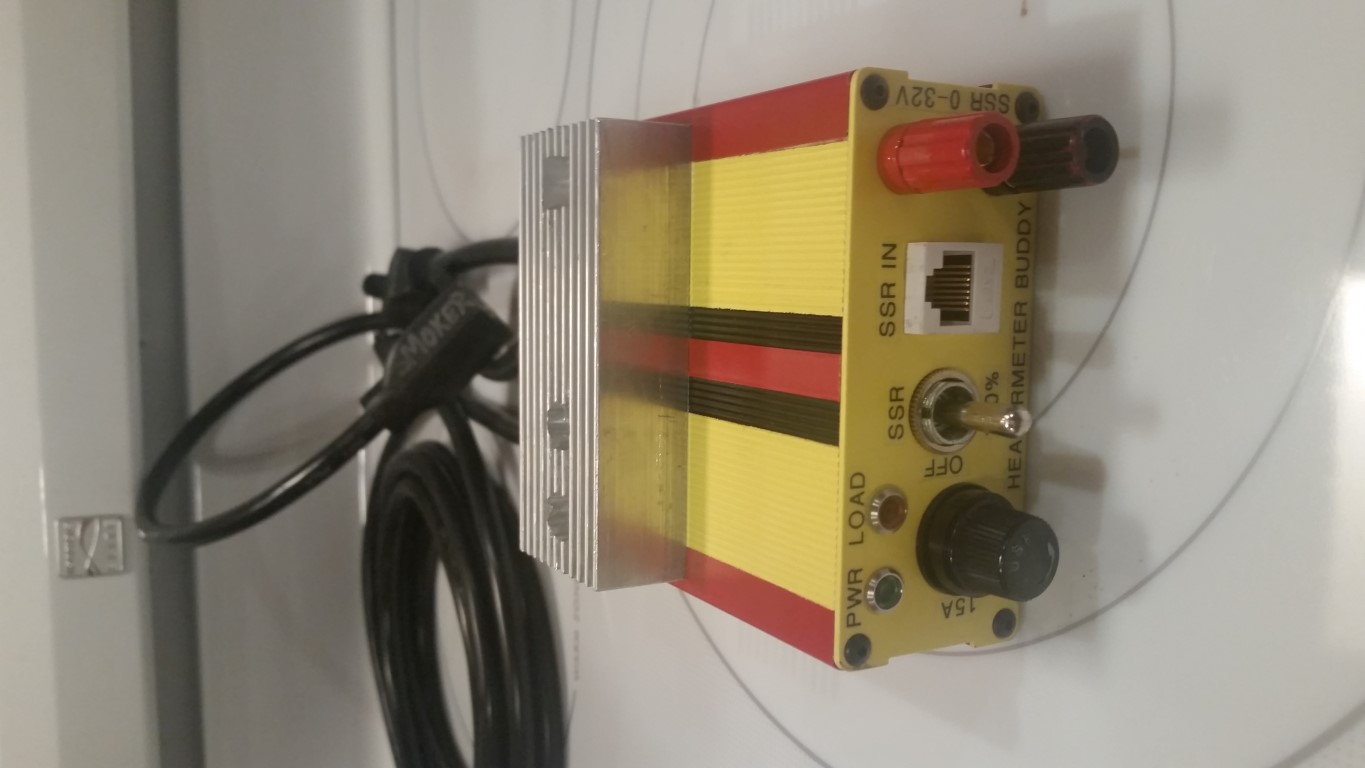
My larger PID controllers with metal cases use the case as the heat sink. That works OK for the most part. But this case is pretty tiny - and the SSR will dissapate 15W at 1000W load and 23W at 1500 watt load. Yes at 100% - but maybe that's your large electric smoker in winter. So a heat sink for this small case. Generally with a reasonable heat sink one doesn't need a fan. And it's OK if the box runs "pretty darn warm"
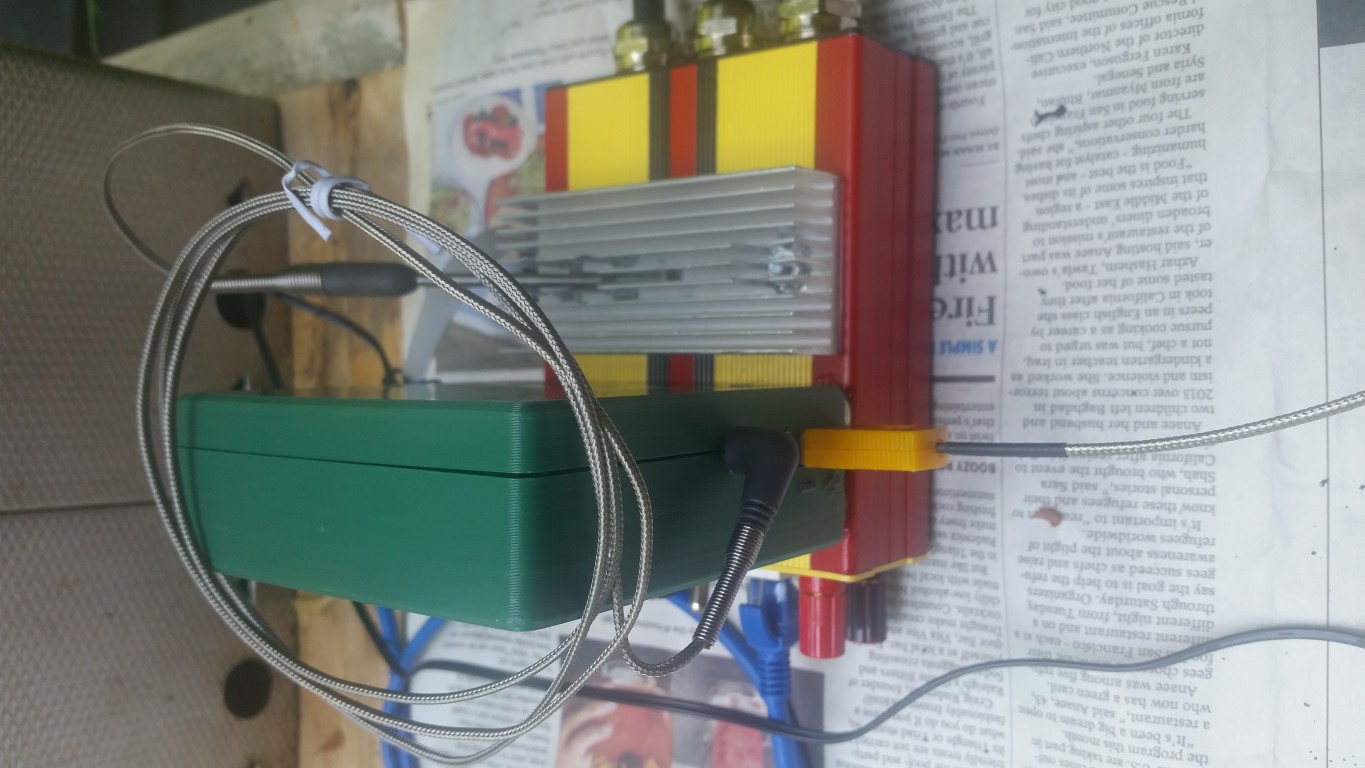
For the heat sink, well, how to size one? This one seemed right. I have smaller ones on other SSR controllers but this is a small case. This just seemed right. It's 100mm x 50mm x 20mm or so. It was a tad wide hanging over the sides and being sharp. So I cut 1/4" off of it.
A very usefull option to me is the switch. It's 3 position with center off. This lets me have everything powered up - but some manual control. Like heat off while I adjust the pan and such. Or heat at 100% to pre-eat. Or for rutime it selects the SSR output.
For the labels I use a Ptouch label maker with black on clear and white on clear (in this case) labels, I cut them to just around the letters and carefully apply (and re-apply until right! use toothpicks, xacto knife edges, patience!). Rub them in good and carefully. Apply a coat or two of clear gloss or semi-gloss to lock them and their edges in place.
Before you build - lay everying out. Put your parts on the front and back, with double sticky if necessary. See how the layout seems and works. Make sure you've got top and bottom and side clearance. And room for wires.
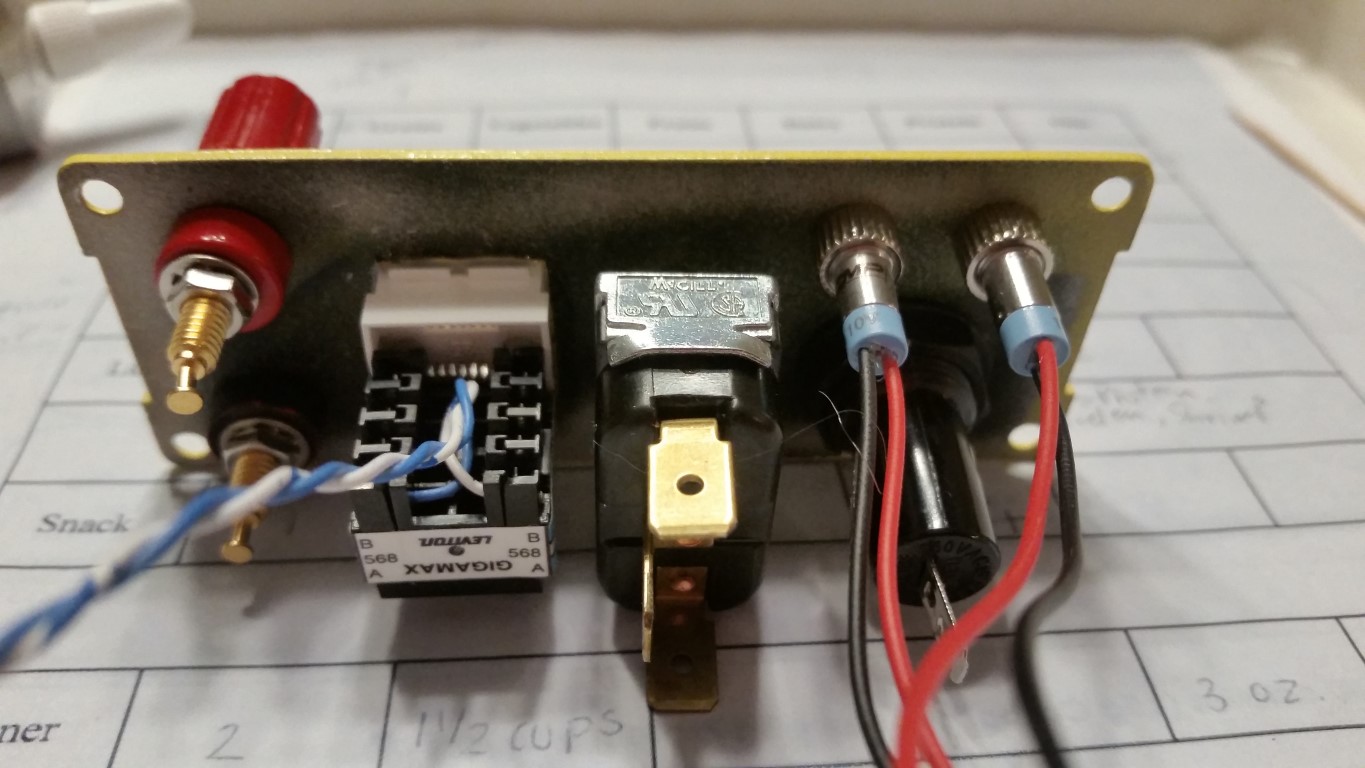
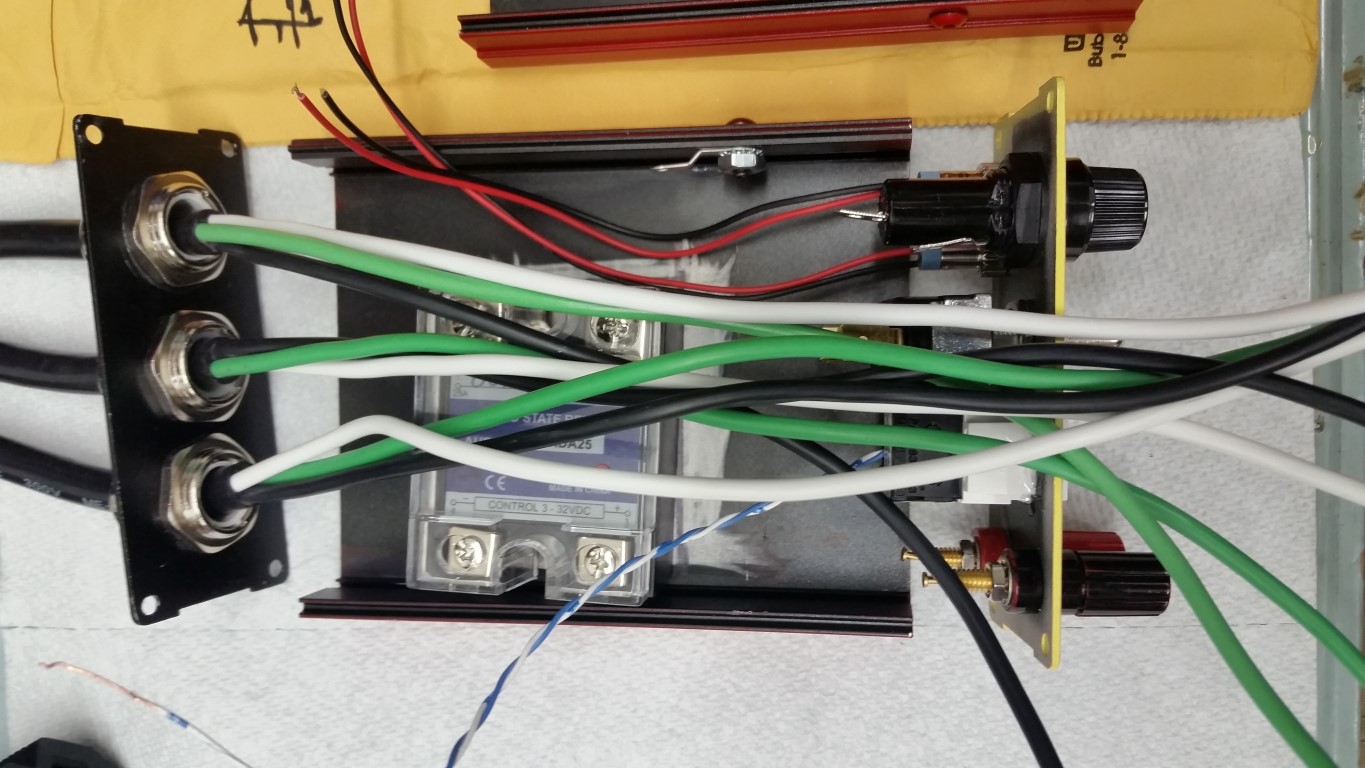
Similarly take those end pieces and put them up to the case and see where the SSR goes. In this case I left room in the front for the fuse and switch wires (as the back power wires were bendable). I put the SSR to the side to leave routing room for the high power wires for straighter runs to the switch and the fuse.
Only then mark and drill for the SSR. Use blue tape and consider using a square to square up your marks and holes. Use a center punch or spring punch to make a dimple to start your drill.
Now you need to mount your heat sink. I drew a centerline on the bottom with fine Sharpy. Put that on the top, flip, and line up all the way around. Mark your holes with sharpy or pen. Double check, center punch and drill.
Note I have 3 screws. Two for the SSR are required. For the heat sink I wanted both ends secured the same. So I added the third. Thats why two look close. The "middle ish" SSR mounting screw and the final end one.
You'll now have to remove fin material on the other side. This is a PITA but I used my milling machine. A drill press with the sink in a vise will work (use a router bit straight cutter as an option).
Now test fit the heat sink, top, and SSR. Make sure you're happy. I advise using a dremel wire wheel or such to remove paint in the SSR and heat sink area.
Now you can put that assembly together - but I recommend just attaching the SSR loosely. This is so it's in place for fitting wires - but it sits flat on the work bench. Just easier to work with.
When finally affixing the heat sink and SSR ensure you use a properly thin layer of heat sink compound. Since my top was finely ridged I ensured the valleys were filled. Now clean it all up! It gets everywhere!
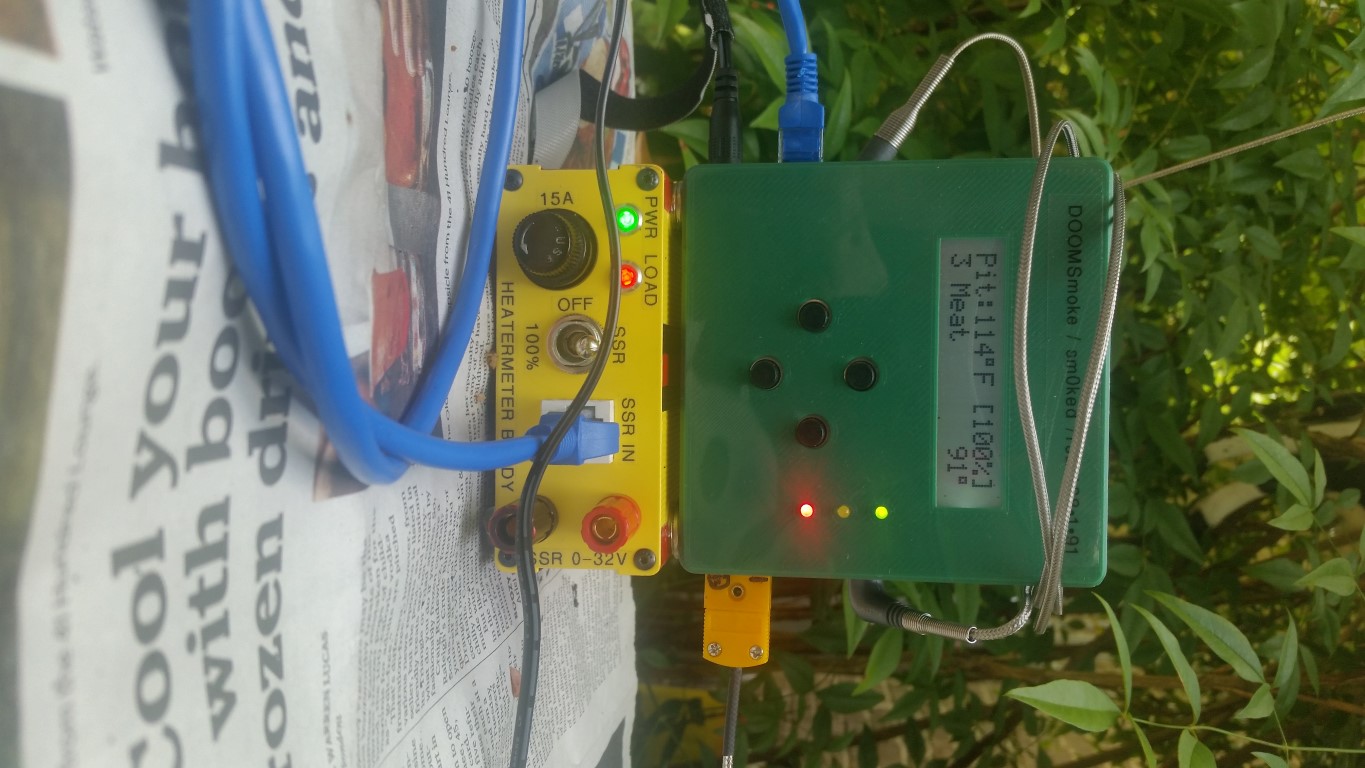
One issue of the HeaterMeter is it's light weight in combination with the heavy, tangly, pull of all those cables. Cables are a PITA! And I wanted it (mostly) to be with the HeaterMeter Buddy.
So I got a stack (well 8 out of a stack) of disc 1mm rare earth magnets (10mm x 1mm or so). Remove the 3M or sticky layer if they have them. Fingers, rub, Goo Gone. But you want fresh metal for the E6000 glue. The sometimes pre-applied stickum doesn't hold well on non smooth surfaces like a HeaterMeter and maybe not your case.
Glue 4 to the bottom corners of the HeaterMeter.
Watch it as they'll fly off and stick to each other. So you may want to do oppposite corners at a time until you get the hang of it. I found it easier if they near ones were opposite polarity. Otherwise one pushed the other apart/off. It just seemed more stable that way. Play around before applying glue!
I used (and like for many things - but every glue has a purpose - none are universal) E6000 a slightly runny clear rubber. Awesome stuff. Get you some and get hooked!
Once the bottom magnets are well secured - and for E6000 just wait morning to evening or overnight - otherwise you still risk pulling them off until fully cured.
Now take the other 4, adhesive removed, and gently let them click onto their mates. This "stuck together" is your "precision alignment jig" for gluing.
Figure out where you want the HeaterMeter on The Buddy (or wherever you want to do this that needs magnets applied). Do you need a spacer (things will move some on you). I used a pencil between the heat sink and the back of the HeaterMeter. Get good eyeball on this and get everything in place or nearby.
Apply a small (pea sized) dab of E6000 to each magnet bottom . Watch the E6000 is it can be a tad stringy. Ignore strings or any minor issues for now.
Carefully position, apply, and with gentle pressure push it down and on and adust against your stop (my pencil). Don't push too hard as you dont want glue starvation.
If you didn't use too much glue then you'll have some squeeze out that will make a nice fillet around your magnet. If you've made a huge mess -then wipe it up - otherwise leave it and you can rub off/out minor strings and such.
Leave overnight!!! Dont be tempted to test it !!!
Now you have a snap on / snap off HeaterMeter - to anything magnetic - and you have a precision mounting on your HeaterMeter Buddy. Enjoy!
For materials - nothing special
As with many HeaterMeter initiates - the HeaterMeter is a great can't-live-without item (like my first microwave 30 years ago). The issue is I have an electric smoker (a gravity feed pellet in the works) and it's just begging to use the HeaterMeter SSR PID control capabilities.
So I introduce the "HeaterMeter Buddy"
Basically it's a 25A SSR in a case with ethernet jack input, power in, and SSR controlled power out.
But I added a few bells and whistles. Power and Output Power lights. Fuse (Always have a fuse!), Aux SSR Inputs (just for flexibility around the shop), and a 2nd power out, always on, for the Heatermeter 12V power supply, and output power control switch.
Yes, I thought about back powering the HeaterMeter from the HeaterMeter Buddy. But I just couldn't fit in a 5V power supply and didn't want a larger case.
For connections you'll note I use cords. Why? Because I find chassis connectors take up a lot of room. I find they're also not very secure for heavy cable wrangling. Yes you can get uber ones but that's money and even larger product. With cords you get the same effect and cord chassis fittings are inexpensive.
I buy TrippLite 14G auxillary extension cords. If I need a short plug and a short socket I just buy a 3' (their shortest) and cut it in half. And for many of my shop accessories that get moved about I just use 6" outside the case (leaving 1' inside for wiring so can split a 3' cord). In this case my Smoker is in the same place so I used a 15' full length cord so I dont have to always add in an extension cord. The Smoker plug is shorter s it just needs to get to the smoker (so mine 3') , and the HeaterMeter power wart needs to be close so just 6" or a foot long. This is my favorite way now of connecting power to my projects.
My larger PID controllers with metal cases use the case as the heat sink. That works OK for the most part. But this case is pretty tiny - and the SSR will dissapate 15W at 1000W load and 23W at 1500 watt load. Yes at 100% - but maybe that's your large electric smoker in winter. So a heat sink for this small case. Generally with a reasonable heat sink one doesn't need a fan. And it's OK if the box runs "pretty darn warm"
For the heat sink, well, how to size one? This one seemed right. I have smaller ones on other SSR controllers but this is a small case. This just seemed right. It's 100mm x 50mm x 20mm or so. It was a tad wide hanging over the sides and being sharp. So I cut 1/4" off of it.
A very usefull option to me is the switch. It's 3 position with center off. This lets me have everything powered up - but some manual control. Like heat off while I adjust the pan and such. Or heat at 100% to pre-eat. Or for rutime it selects the SSR output.
For the labels I use a Ptouch label maker with black on clear and white on clear (in this case) labels, I cut them to just around the letters and carefully apply (and re-apply until right! use toothpicks, xacto knife edges, patience!). Rub them in good and carefully. Apply a coat or two of clear gloss or semi-gloss to lock them and their edges in place.
Before you build - lay everying out. Put your parts on the front and back, with double sticky if necessary. See how the layout seems and works. Make sure you've got top and bottom and side clearance. And room for wires.
Similarly take those end pieces and put them up to the case and see where the SSR goes. In this case I left room in the front for the fuse and switch wires (as the back power wires were bendable). I put the SSR to the side to leave routing room for the high power wires for straighter runs to the switch and the fuse.
Only then mark and drill for the SSR. Use blue tape and consider using a square to square up your marks and holes. Use a center punch or spring punch to make a dimple to start your drill.
Now you need to mount your heat sink. I drew a centerline on the bottom with fine Sharpy. Put that on the top, flip, and line up all the way around. Mark your holes with sharpy or pen. Double check, center punch and drill.
Note I have 3 screws. Two for the SSR are required. For the heat sink I wanted both ends secured the same. So I added the third. Thats why two look close. The "middle ish" SSR mounting screw and the final end one.
You'll now have to remove fin material on the other side. This is a PITA but I used my milling machine. A drill press with the sink in a vise will work (use a router bit straight cutter as an option).
Now test fit the heat sink, top, and SSR. Make sure you're happy. I advise using a dremel wire wheel or such to remove paint in the SSR and heat sink area.
Now you can put that assembly together - but I recommend just attaching the SSR loosely. This is so it's in place for fitting wires - but it sits flat on the work bench. Just easier to work with.
When finally affixing the heat sink and SSR ensure you use a properly thin layer of heat sink compound. Since my top was finely ridged I ensured the valleys were filled. Now clean it all up! It gets everywhere!
One issue of the HeaterMeter is it's light weight in combination with the heavy, tangly, pull of all those cables. Cables are a PITA! And I wanted it (mostly) to be with the HeaterMeter Buddy.
So I got a stack (well 8 out of a stack) of disc 1mm rare earth magnets (10mm x 1mm or so). Remove the 3M or sticky layer if they have them. Fingers, rub, Goo Gone. But you want fresh metal for the E6000 glue. The sometimes pre-applied stickum doesn't hold well on non smooth surfaces like a HeaterMeter and maybe not your case.
Glue 4 to the bottom corners of the HeaterMeter.
Watch it as they'll fly off and stick to each other. So you may want to do oppposite corners at a time until you get the hang of it. I found it easier if they near ones were opposite polarity. Otherwise one pushed the other apart/off. It just seemed more stable that way. Play around before applying glue!
I used (and like for many things - but every glue has a purpose - none are universal) E6000 a slightly runny clear rubber. Awesome stuff. Get you some and get hooked!
Once the bottom magnets are well secured - and for E6000 just wait morning to evening or overnight - otherwise you still risk pulling them off until fully cured.
Now take the other 4, adhesive removed, and gently let them click onto their mates. This "stuck together" is your "precision alignment jig" for gluing.
Figure out where you want the HeaterMeter on The Buddy (or wherever you want to do this that needs magnets applied). Do you need a spacer (things will move some on you). I used a pencil between the heat sink and the back of the HeaterMeter. Get good eyeball on this and get everything in place or nearby.
Apply a small (pea sized) dab of E6000 to each magnet bottom . Watch the E6000 is it can be a tad stringy. Ignore strings or any minor issues for now.
Carefully position, apply, and with gentle pressure push it down and on and adust against your stop (my pencil). Don't push too hard as you dont want glue starvation.
If you didn't use too much glue then you'll have some squeeze out that will make a nice fillet around your magnet. If you've made a huge mess -then wipe it up - otherwise leave it and you can rub off/out minor strings and such.
Leave overnight!!! Dont be tempted to test it !!!
Now you have a snap on / snap off HeaterMeter - to anything magnetic - and you have a precision mounting on your HeaterMeter Buddy. Enjoy!
For materials - nothing special
- Case is 100mm x 150mm x 25 or 30mm. ePray China. This one came hard anodized black (unfortunately somewhat of a heat soak for a heat generating device! Paint!
- 120V LED indicators from Auberins
- Fuse Holder from any electronics supply, ePray, Amazon, Jameco, etc
- SPDT Center off Switch from any electronics supply or home center
- Ethernet Jack from monoprice or for just a single from Lowes or home center
- Banana jacks from ePray (surplus Palomar in this case).
- Power cord fittings from Auberins
- Power cords from Amazon
- SSR from Auberins or your favorite supplier. I recomend MGR over "generic Chinese" even though it's also a Chinese product - it doesn't seem to be cloned, has a cover, and has an indicator light. Other BBQers seem to have acceptable results from generics. You can get MGR from Auberins (seems to be their house brand) or ePray. Check prices. I recomend a 40 or 50A for durability margin due to heat, heat sinks, starting loads, shorts to survive until fuse blows. Read below about my blown SSR and why I now recommend a 40 or 50A.
Last edited: