You are using an out of date browser. It may not display this or other websites correctly.
You should upgrade or use an alternative browser.
You should upgrade or use an alternative browser.
When you grill your flashlight
- Thread starter LMichaels
- Start date


Brett-EDH
TVWBB Hall of Fame
BrutalWhat kind of rub? Any sauce? Wrap or no wrap? Drip pan? Water pan? We need details, Larry!
R
LMichaels
TVWBB 1-Star Olympian
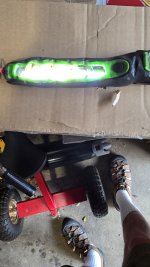
Thank heavens the only damage was to my ego. I still can't believe the switch and even though melted the LEDs work. Thinking I should donate it to Menards and show them how much the product can withstand. Like a TimexOh man, no permanent damage to the grill?
I almost grilled a grill brush, something made me check for it before it was a plastic mess.
Darryl - swazies
TVWBB Emerald Member
Looks like minimal harm done, still works probably for the job it needs to do.
We are all buying some, link to said light from the god's?
We are all buying some, link to said light from the god's?

Timothy F. Lewis
TVWBB 1-Star Olympian
This is a prime example of the “Menard’s reaction”Not much of a Maillard reaction, although I do see some grill marks. Perhaps a higher sear temp next time?
Gerry

LMichaels
TVWBB 1-Star Olympian
That thing was about the handiest little work light I've ever bought and IIRC cost me all of $3.50 and WITH BATTERIES! I'll grab another at Menards next time I am there and post a photo of what it's supposed to look like. But even the magnets still work and the adhesive holding them in is still holding. Frankly I am pretty darn amazed
Bob Erdman
TVWBB Pro
Glad that didn't mess up your smoker.That thing was about the handiest little work light I've ever bought and IIRC cost me all of $3.50 and WITH BATTERIES! I'll grab another at Menards next time I am there and post a photo of what it's supposed to look like. But even the magnets still work and the adhesive holding them in is still holding. Frankly I am pretty darn amazed
You may want to look for a fire resistant flashlight!
Bob Bailey
TVWBB Wizard
Ain't research great? My excuse for stupid things
Todd K Wisc
TVWBB Fan
I am sure the toxic flavor imparted on your meat is fantastic!
JeffG
TVWBB Emerald Member
I did kinda the same thing while camping/trout fishing at Silver Lake Campground in the June lake loop.
Been fishing, drinking beer and having some good laughs all day.
So I'm foiling three racks of baby back ribs right before dark for the second part of High Heat rib cook.
I ask my Buddys have you seen my flashlight.....could have sworn it was right here a few minutes ago.
Nope they said and went about looking for said flashlight.
So an hour later I pull the foiled ribs off the Weber 22" and low and behold when I open the second foiled babyback
rib packet there's the flashlight, somehow I foiled it up with the ribs and the flashlight is still on after an hour on the bbq.
My buddies see this and are dying laughing ....boy did I take a ribbing for the rest of the night.
Best part is, it still works to this day.
Brett-EDH
TVWBB Hall of Fame
Recipe: Crispy Baked Flashlight Fries
- 1 large LED flashlight
- Olive oil
- Salt
- Pepper
- Garlic powder
- Paprika
1. Preheat your oven to 425 degrees Fahrenheit (218 degrees Celsius).
2. Cut the LED flashlight into thin, fry-like strips.
3. In a large mixing bowl, toss the flashlight strips with a drizzle of olive oil, salt, pepper, garlic powder, and paprika until evenly coated.
4. Spread the seasoned flashlight strips onto a baking sheet lined with parchment paper.
5. Bake for 10-12 minutes, flipping the strips halfway through, until they are crispy and golden brown.
6. Carefully remove the fries from the oven and sprinkle with a little more salt and pepper, if desired.
7. Serve hot as a unique and tasty snack or side dish. Enjoy your crispy baked flashlight fries!
Ingredients:
- 1 large LED flashlight
- Olive oil
- Salt
- Pepper
- Garlic powder
- Paprika
Instructions:
1. Preheat your oven to 425 degrees Fahrenheit (218 degrees Celsius).
2. Cut the LED flashlight into thin, fry-like strips.
3. In a large mixing bowl, toss the flashlight strips with a drizzle of olive oil, salt, pepper, garlic powder, and paprika until evenly coated.
4. Spread the seasoned flashlight strips onto a baking sheet lined with parchment paper.
5. Bake for 10-12 minutes, flipping the strips halfway through, until they are crispy and golden brown.
6. Carefully remove the fries from the oven and sprinkle with a little more salt and pepper, if desired.
7. Serve hot as a unique and tasty snack or side dish. Enjoy your crispy baked flashlight fries!
Bob Bailey
TVWBB Wizard
Sounds like you've had experience with this recipeRecipe: Crispy Baked Flashlight Fries
Ingredients:
- 1 large LED flashlight
- Olive oil
- Salt
- Pepper
- Garlic powder
- Paprika
Instructions:
1. Preheat your oven to 425 degrees Fahrenheit (218 degrees Celsius).
2. Cut the LED flashlight into thin, fry-like strips.
3. In a large mixing bowl, toss the flashlight strips with a drizzle of olive oil, salt, pepper, garlic powder, and paprika until evenly coated.
4. Spread the seasoned flashlight strips onto a baking sheet lined with parchment paper.
5. Bake for 10-12 minutes, flipping the strips halfway through, until they are crispy and golden brown.
6. Carefully remove the fries from the oven and sprinkle with a little more salt and pepper, if desired.
7. Serve hot as a unique and tasty snack or side dish. Enjoy your crispy baked flashlight fries!I