S J. Gold Mini WSM Smoker


Status
Not open for further replies.
You guys are AWESOME!!! I have had this idea on my mind for a couple of years now. Tamale cooker / stock pot never crossed my mind. I never thought a pot that big would be cheap enough to buy, or easy enough to cut. It looks perfect!

More pics, please!

We need to keep a good thread going on this. Seriously, I have googled everything and finally this discussion was a direct hit.

Ordering the tamale cooker from target today!

Thanks guys, and great work. I'm sure I will have some questions when I build.
 
Can anybody give me suggestions on how to cut the bottom out of the tamale pot and get a straight edge? What kind of cutter to I need?

Chris Peres from CB offered to cut the bottom out of my pot, but he's almost 2 hours away and those 2 hours up and back have been hard to come by.

Our local Piggly Wiggly is all the time selling these little mini-butts - about 3.5 lbs each - and they would be just too darn cute on one of these little Mini-WSM's!

I've got all the hardware - just need to get my pot cut!

Pat
 
Originally posted by Pat Smith:
Can anybody give me suggestions on how to cut the bottom out of the tamale pot and get a straight edge? What kind of cutter to I need?

I used a sawzall type of saw and it was way overkill. (And did not get a very straight cut.) That metal is really thin you will find it not hard at all to cut. I would use aviation snips. They have tiny teeth that grip the metal which make cutting easier. Depending on which side the lower vs. upper blade is on, they can cut left hand turns or right hand turns so work with that. I think a sturdy pair of kitchen shears would be enough.

Someone else mentioned cutting in about an inch in from the curve on the bottom which I think is an idea worth repeating. The bottom curve on the pot fits the shoulder in the SJ so the straightness of the cut is not critical. And have a file handy to take the sharp edge off the cut.
 
Originally posted by Pat Smith:
Can anybody give me suggestions on how to cut the bottom out of the tamale pot and get a straight edge? What kind of cutter to I need?

If your cutting out the bottom than a Roto-Zip or a Jigsaw with a metal blade will work.
If your cutting along the side than an Angle Grinder with a metal cut-off wheel ( as George suggested ) or a Circular saw with a blade made to cut Aluminum siding will work ( or you can just flip an 18 - 24 T blade backwards, and get the same results )
Another option is calling a Sheet Metal or Auto body shop.
Seems it might be cheaper than driving 2 hours, or buying a tool that you might not have.
Good luck with your mod!!

Tim
 
Received my tamale cooker from Target today. Looks like it will make a pretty nice fit. Tomorrow is the big day.

My question is: How close together can I position extra racks?

This thing would be perfect to fill up with ABT's, Fatties, MOINK, wings, and other delicious snacks while the big grill is full of larger cuts.

I would love to fit 4 racks, but that might be a little too tight.

Think it is possible?
 
Here is the system that worked well for me. The key is marking a straight line around the pot where your cut line will be. I have a nice compass that I inserted a pencil upside down in one arm. The pencil eraser follows around in the channel of the pot nicely so that I could have the other compass arm scribe a scratch line 1.25 inches beneath the point where the channel's low side rises up to meet the outside perimeter of the pot.

Next take a drill and make a hole in the side of the pot at the bottom most point. Then insert the tip of a straight cutting aviation snips into the hole and remove the very bottom of the pot. This will allow the remaining material to come away more freely when you cut further up on the scribe line made earlier.

For your second cut maneuver your snips onto the scribe line but make sure not to cut all the way to the snips tip or there will be jagged edges left behind. Just cut 3/4 of the way up the snips blades. You will come out with an extremely precise straight line that will seat squarely inside the SJ. Make sure to file down the edges of the cut to smooth it out.

One bit of advice is that I will not be using a clay pot again as a water pan and drip catcher. I picked up an 11 inch by 4 inch stainless steel dog water bowl at target yesterday for $7.50 that I will be using. I just insert the SJ grate down to the bottom of the steamer insert and place the foil lined dog bowl on top of it. Then I lay a second grill on top of the bowl which leaves 6 inches to the top edge of the steamer pot.

Good luck.
 
Originally posted by Ernie D:
Received my tamale cooker from Target today. Looks like it will make a pretty nice fit. Tomorrow is the big day.

My question is: How close together can I position extra racks?

This thing would be perfect to fill up with ATB's, Fatties, MOINK, wings, and other delicious snacks while the big grill is full of larger cuts.

I would love to fit 4 racks, but that might be a little too tight.

Think it is possible?
Hi Ernie,
The 14" weber grills are a snug fit in the pot I have. That means I can use a pretty small screw to support them. With a short screw, it does not take much swing to clear the screw for the next rack up when placing or removing racks. I think if you chose sufficiently small fasteners as rack supports, you would be able to fit 4.
 
or maybe hang a bunch of racks off of a top gril with small chains so you just have to support the top grill. pull up the top grate and they all come out.
 
Originally posted by ron "Rondo" hanson:
I'm gonna make one of these...anybody paint the tamale kettle black..or add a door?
I have not. On the paint account, I think you may have difficulty finding paint that will stick well to aluminum. But I am not a painting expert so I could be wrong about that. As far as a door goes, that is way too much trouble for me (lazy bastage here.
icon_biggrin.gif
) But the metal is thin so I would argue to keep the rest of the pot intact to maintain structural strength. Besides, the handles make it easy to just pick the whole thing up to tend the coals.

I did my first salmon in the mini a couple days ago (before the temperature plummeted.) Weather conditions were 34° F and 20 mph winds so I set the smoker on the downwind side of the porch to provide some wind protection. I never cut back on the bottom vent because smoker temp (via Maverick) never went above 185° F. Nevertheless, the Salmon was done to a turn in an hour. At 2 1/2 hours I took the chicken off (pinwheels - leg quarters I guess) and finished it in the oven because smoker temp was dropping. I think the cut down dog food bowl I'm using for a charcoal ring is not big enough and does not hold enough coals. I lose space in it due to the taper as well. I think I need to find something that will increase the charcoal capacity, particularly if I'm going to use this over the winter.

-hank
 
First time posting, so hopefully I dont mess up the images too badly.

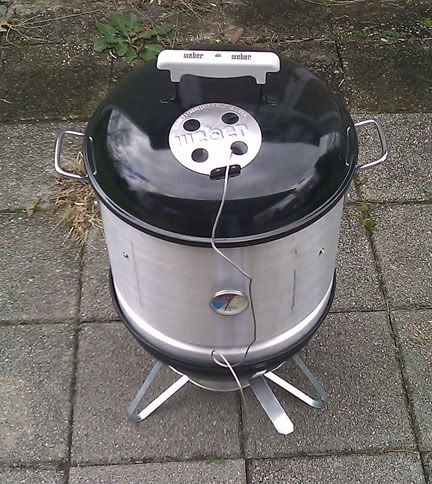
I just want to thank LDean and WalterWhite for the great information. So far I love my little cooker. Its great for smoking for just 1-2 people.

IMAG0045.jpg


I plan to insert the remote smoker thermometer prob through a hole in the side of the cooker, that way I dont have to worry about positioning it again every time I take the top off.

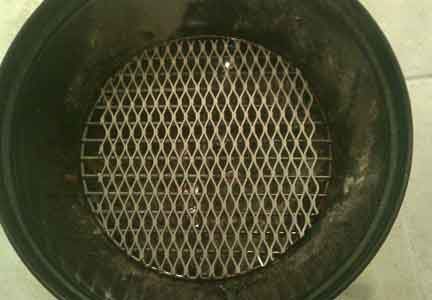
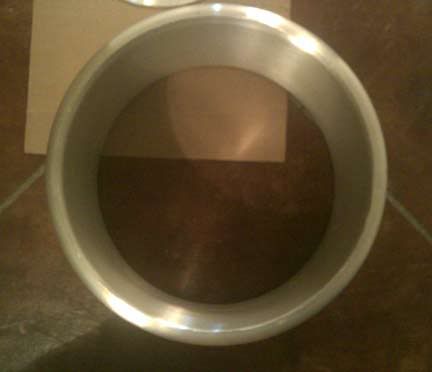
Fire Grate - this helps to keep big chunks of coals from falling down and clogging the air intakes on the bottom.
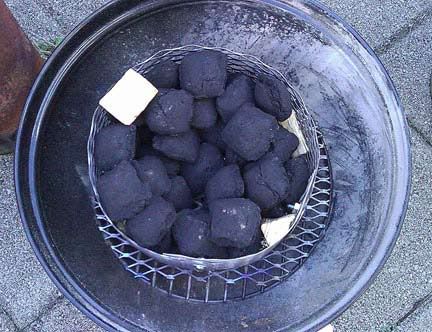
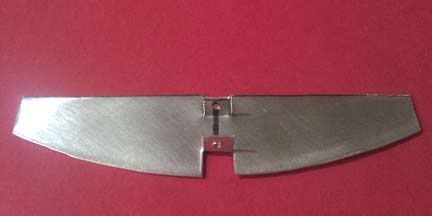
IMAG0039.jpg


Charcoal Ring

IMAG0054.jpg


However since this picture was taken I have increased the size of the ring to hold more charcoal. I believe it is about 30 inches in circumference I have done two cooks so far with it, the first putting 35 coals in the ring and inserting 6 lit charcoal for a minion method. Second time was 41 coals and 6 lit. Each time I was ran around 220 to 270 for close to 7 hours. In the future ill be going with more lit charcoal to get the temp up faster.
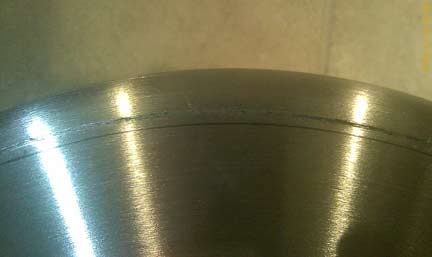
Cut design

IMAG0031.jpg


I placed the tamale cooker inside the grill and turned it a couple of times, when I took it out I saw the faint black line where it was contacting the metal. I then drew a line inside that line to determine where I would cut the bottom out. I decided to cut the bottom out to make the cooker stronger as previously mentioned in other posts.

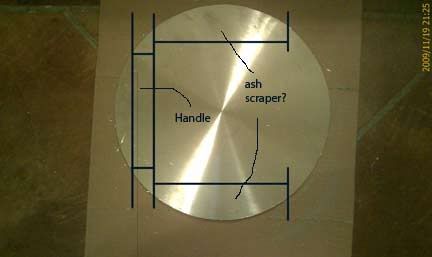
What to do with cutout.

IMAG0034.jpg


Picture of the hole cut out of bottom. I used a dremel with a cut wheel to cut the bottom out. One thing I did learn last night, that where I cut it the curve fits the bottom of the SJS perfectly. So I started to design a ash mover/cleaner. I just have to figure out exactly how to attach it.

IMAG0033.jpg


Ash cleaner, the plan is to inside a long bolt through the rivet of the bottom damper and then through the ash cleaner. I just have to figure out how to turn it to clean the ashes the best.
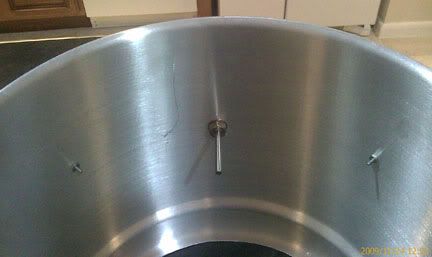
ash_cleaner.jpg


Thermometer

IMAG0038.jpg


Grate Holders. Like someone else said you can use very small nuts and bolts to hold the 14" grill in place. You can also see where the thermometer prob comes in. I have three bolts to hold the grill in place. The two near the prob makes it easier to slip the grill in and out of the cooker.

IMAG0040.jpg


Currently I am using a foiled 11.75 inch clay saucer. I would like to find one that is a little bigger and taller to hold more heat, to try to stabilize the cooker a bit more.

Things still working on:
Hammer the sides of the top of the tamale cookers rim in order for the SJS lid to fit correctly. Its still a little too tight. Set it up so that the remote smoker thermometer can go through the side of the cooker. I will also be adding a stackable grill that will sit on top of the other grill. I would prefer not to use a rib rack while doing ribs and the second grill grate would help to do 2 racks instead of just one at a time. Finally to figure out how exactly mount the ash cleaner.
 
Originally posted by michael_seifert:
First time posting, so hopefully I dont mess up the images too badly.
Wow! I don't think your concerns are unfounded.

Welcome to the site and it looks like an incredible job you've done. It did not even occur to me to do anything with the scrap I cut out.

Are those screws to hold your grate? Seems like a good position for a single grate. I have the upper grate about half way between your mount and the top and the bottom grate about 1 1/2" above the ridge near the bottom.

thanks,
walt
 
Michael:
Looks great. Like you, I wanted to cut the bottom completely out, however the metal is so thin that it would be rather fragile, so I cut about a half inch out from the curved bottom. I used a Skill electric jig saw, with metal blade, after drilling holes in the bottom to insert the saw. Not as neat as your job. You could pop rivet a strip of 1/2" aluminum strip, bent to fit the curve of the pot, riveted to the inside of the pot, to strengthen the open end of the pot. Would look better, but would not be as strong. I intend to modify my Mini a little, will mount a spare grate on screw hangers, almost to the bottom of the cooker, then set the ceramic planter on top of the spare cooking grate. LDW
 
Fantastic Michael!!
Weber should be knockin down your door offering you an engineering position!
Nice job!!
 
Michael,
That cut looks like you used an exacto-knife.

I cut mine tonight with a 32 tpi jigsaw blade from harbor freight (3 bucks for 2 pack) I thought it looked pretty good till I saw those pics. Great Job!

As soon as I am finished, I will post some pics of mine. Love the thermometer on the side. Where should I get a cheap one of those?

The scraps from my bottom will be testers for high temp black paint. I agree that a door shouldn't be needed on this little guy. The pot is easy to pick up by the handles.

First cook tomorrow if everything goes as planned... 2 or maybe 3 grates... Wings, ABT's, Fatties!!!!
 
George $16 is a steal! Making this thing has been really fun.

Smokey Joe smoker is all finished. I made a few mods to hopefully help in cold weather.

My fire will be surrounded by 4 half bricks which have an 11 inch diam. glazed dish resting directly on top of the bricks. The bottom of the dish is almost flush with the top edge of the original SJS bottom bowl. this gives about 1 to 2 inches to the first cooking grate resting on the indented tamale steamer lip. 4.5 inches up to the next grill, and 4.5 inches up to the top grill. The top grate has the same space from the lid as the original SJS grill.

This setup looks good initially because the middle grate will be ideal for whole chickens and any other tall items having almost 9 full inches to the lid.

Another cool discovery is that my weber rib rack will fit perfectly. Guess I never tried it in the smokey joe before.

Really hoping to fire this baby up tomorrow.
 
Status
Not open for further replies.


Back
Top