Runaway temps? Cheap fix/long story....


You eat dinner pretty late.

Life is different for me every day, some days are early but most days are on the late side. This cook was way later than I wanted cause the day got away from me and I clogged and broke my servo valve when I finally got to the grill, but I wanted that shoulder pretty bad, which is why I cooked at 325. I was a bit worried about doing a shoulder that high/fast but it was really excellent. I made sure to let it get up to near 200 degrees where collagen breaks down and it was tender and tasty, specially the bark where the fat layer had been..... mmmmmm good!
 
Last edited:
Taking it to the next level...

So I was working with Matt Miller, and I decided to put this simple valve on my UDS. I found that there were so many leaks with the valve when fully closed that it didn't damp the vent properly.

So, 3D printing comes to the rescue.

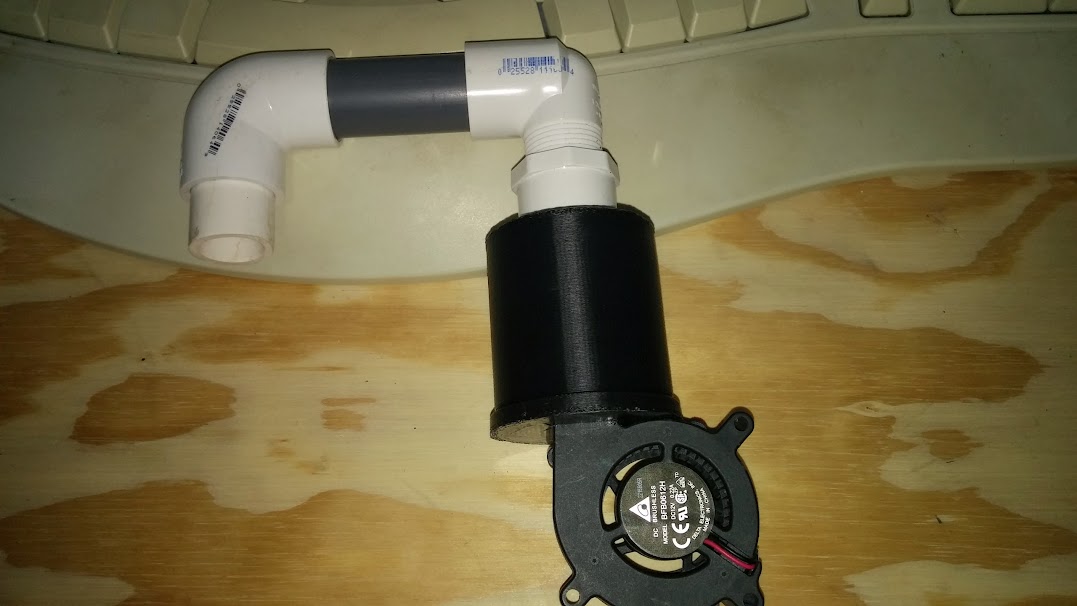
Matt did a 3D print of a push fit valve that connects directly to the fan. The part that the ping pong ball rests on is a exact negative impression of the ball (using the newest 40mm international standard for ping pong balls).

d9JOB9cqO23dJMo8pQp9f02VaqqHALsdsmjdirL8edU=w155-h207-p-no


The ball fits perfectly. With some putty sealant (the yellow in the picture below), there is no need for weighting the ball:

WN-JGY8j3cP_jYZmPEnEDTfaNARIPVQqkp5AMFpLiaA=w155-h207-p-no


This is what is looks like with the ball on the press fit mount:

GL0Tv6C7zvEUHSRsc4WRFZjbm6RBXEHgDfgRjMW8vRI=w155-h207-p-no


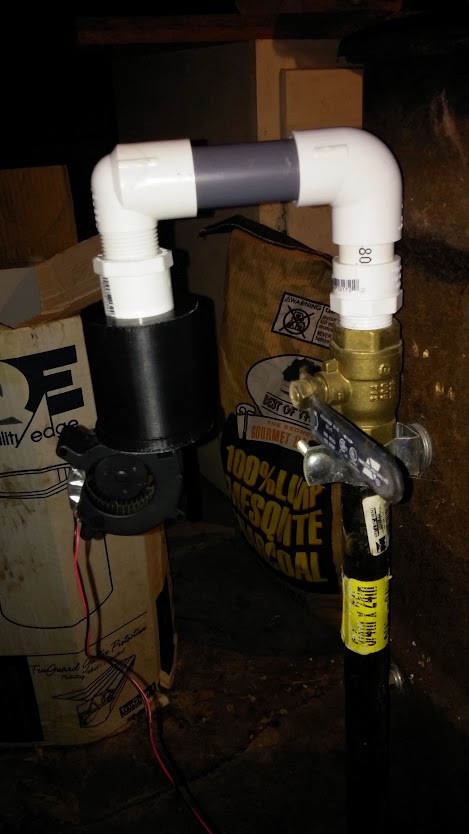
And this is what the entire unit looks like (it press fits into a chamber) mounted on the pipe on the UDS:

6Tl5tXoDYFg6j34WHowH5c5egSDBdsVfVgMdXP28g70=w155-h207-p-no


There is a spare mount next to it, so you can see what the 3D printed part looks like.

The results - temps were rock solid at 220 degrees last night, for a kick butt pork roast.

Thank you, Matt! And thanks to Ralph for the original inspiration!
 
Nice job taking it one step further, though I haven't had any problems with the original valve leaking, my ping pong valve works perfectly. It seals off and tamps down the largest fires, I've never had problem with overshoot using it. The main idea behind making this valve was that all parts can be sourced at any hardware store for only a couple bucks, for those who don't have access to a 3D printer...

I've made a couple of these valves, each one worked as good as the next, so I am curious why yours didn't? Did you weight the ping pong ball at all? Was your valve relatively upright? (Mine runs at about a 15 degree angle and still works fine). If the ball is not weighted and the fire is raging then the valve will leak a little, but I found with just a bit of salt in the ball the valve will seal off well and tamp down the fire. I experimented using an empty ball which leaked, then a heavily weighted ball that sealed (but wouldn't open until the fan really started to blow), then I lightened the ball incrementally until I had it where it sealed well and lifted up easily enough when the fan turned on. I think I had to set the min blower speed to like 30%, can't remember exactly, but I did post that info in the earlier part of this thread...

At any rate, congrats on getting things done to suite your needs, that's what this forum is all about....
 
I think the ping pong ball size is part of the issue. All i could find was the 40mm international versions, and the fit seemed to be problematic compared to domestic 38mm versions. I also didn't want to weigh the ball, and then set min blower speed for 30%.
 
Oh yah, I remember reading about the ping pong ball size... Funny thing is, after I read the post about the ball size it seemed I was seeing ping pong balls everywhere... like at the grocery store in the soda isle just hanging there on a hook, I was like, GO FIGURE! LOL I almost bought a pack just to measure them...
Though my ping pong valve works wonderfully with the weighted ball and the blower set to a minimum of 30% (if I recall correctly), I'm glad to see with a customized base for the ball you can get away without using any weight in the ball. After I broke my first 3D printed flap valve (by letting some coal chunks get down inside it) I went back to the ping pong valve for a while and it worked great. I almost decided to stick with that cause I thought my flap valve wasn't durable enough. Then I came up with the Roto-Damper, I've had it in place for weeks now and it seems really solid and works great, so I am using that these days, with the ping pong valve on deck in case I have any failure with the servo unit....
 
i'm getting to the point where having a servo and a fan, when just a fan is better, and works with less points of failure. In a multi-hour cook, perhaps overnight, do we really want to deal with a failed servo???

I'd rather not, but that's just me.

I say that, but now I'm eyeing up a pellet smoker - one of those MAK general deals, which I'm sure adds even more complications... :)
 
Dave, that was exactly where I was at when my first servo flap valve failed. I thought, hey, this ping pong valve works just as good and has no parts to fail. I really did consider going back to using the ping pong valve over the servo...

That is why I kicked all my previous design attempts and ideas for a flap style servo damper to the curb and took a minute to re-imagine the concept. I came up with the roto-damper design after tossing out LOTS of other ideas. After I took the roto-damper from concept to reality I started leaning back toward the servo damper system again. The roto-damper offers very little resistance to the servo and is made of only two very solid parts. It is much less likely to fail than other systems that may be harder for the servo to move or made with smaller more fragile parts, it is also able to adjust the opening of the damper much more accurately and seals off completely when closed. I put it through the paces in bad weather, cold and rain and even below freezing, leaving it outside and plugged in for weeks at a time. I let it spazz out with a bad pit probe that kept dropping off causing the damper to open and close every couple seconds for more than a day. After all that abuse my prototype roto-damper is still working like the day I made it... So I have gained confidence in the design and am less worried about potential failure.

The reason why I prefer a servo damper over a fan driven system is I prefer my pit to be stoked my natural convection over forced air. I find the blower tends to push more air through the smoker and stokes the fire a bit more while it pushes more heat out of the top vent, so I need to clamp down on the vent more to keep things in check. With a servo damper I can leave the top vent open much more and the air flow is slower and more natural. Actually, I prefer the combo system, using the blower to stoke the pit (at 100% only) and letting the servo take it from there... and with the combo system the fan is also in place to handle high heat cooks like pizza. So I will stick to using the roto-damper plus the fan with my ping pong valve at the ready in case anything goes off the rails. So far so good, I'll post back if/when my roto-damper fails, cause part of my experiment is to determine how durable a servo damper system can be....
 
Last edited:
So... When are we gonna get some sweet 3d printed ping-pong parts ;)?

This is exactly what I'd need, I'm having a lot of problems with too much air going into my UDS. And if I tape up the fan, later on the cook the amount of air is not enough.
 
So... When are we gonna get some sweet 3d printed ping-pong parts ;)?

This is exactly what I'd need, I'm having a lot of problems with too much air going into my UDS. And if I tape up the fan, later on the cook the amount of air is not enough.

What size of inlet do you have? I have a half inch ball valve and I have the valve set about half closed and it works great with my 32cpm(30% max speed). A UDS should be rock stable without the HM.

To get the UDS set for using the UDS:

Start the UDS with a half a chimney starter, without the HM and with the ball valve open all the way
wait for the temp to settle to whatever temp it goes to( mine usually is around 230-250)
close the ball valve until the UDS's Temp drops about 30-50, put a mark on the ball valve at that point.
Then put the blower on the UDS and start the fan at a low max speed setting and gradually increase the max speed until you see the temp goes down. If you don't see the temp going down then you probably don't have a big enough fan for the UDS(stock HM fan not big enough). If the temp does drop then back the speed off until you see the temps going up. At that point that will be your max blower speed.

I can set my UDS to the mark I put on the Valve and the HM will hold a very good stable temp below 300. above 300 I sometimes have to adjust the ball valve open more.

Also, the stock HM blower is way to small for the UDS, IMHO. So, I got a 32cfm and never run it at max speed, on mine 35% is the point that the blower will have the effect of cooling the UDS, and when the blower stops then the temps overshoot setpoint alot
 
I currently have a hole in my UDS, no ball valve at all. But I've closed it about 60% with a magnet before my fan attachment.

It is pretty stable for around 8 hours, but sometimes the temp starts to drop and I need to temporarily open up my inlet more.

It's actually more stable without HM, but I like my HM too much to give up on it ;-)

My fan's running at around 30-40% max speed and it goes on maybe once in a couple of minutes. So there's definitely too much air going in just by natural convection. I don't thin the fan's too small, running at full speed is insane, there's like a tornado in the drum :D

I can get it going pretty steadily if I tape up 80-90% of my fan inlet, but then there are going to be problems later on the cook...
 
So I constructed a ping pong ball check valve and fired up the Heatermeter for the first time. I have a Chargriller Akorn and am satisfied with the first attempt at temperature control. I did experience some issues with temperature control at low fan percentages. What I found is that the ball chatters just off it's seating from 0% to ~35% before it starts to hover and get pushed against the top. I believe this chattering is creating a large hysteresis in the airflow. So very little air from 0 to 35%, then all of a sudden a lot of air.

Hopefully the fix to this is by using the min% field changing it from 0% now to 40% for a reliable airflow. It appears the on/off duty cycle per 10 second period works for the percentages below 40%. (quick test with temp probe on a soldering iron tip with the blower airflow upon it). I did try some zip tie shims in the tube to prevent chatter, but that causes wedging problems. I even tried a turbulator ring on the ball, but it gets wedged.

Anyone else experienced this chatter? If so, what was the fix?
 
Yes, I made the ping pong ball valve just before servo support had been added, at which point I made the Roto Damper and have been using that ever since. With the ping pong ball valve it is best to do some testing to see what speed the fan needs to blow to lift the ball reliably and then I set that as the MIN % fan speed. The ping pong ball valve does work remarkably well for a cheap low tech solution.... but Steve is right, the servo damper setup is a better way to go now that it is available...
 
Yes, I made the ping pong ball valve just before servo support had been added, at which point I made the Roto Damper and have been using that ever since. With the ping pong ball valve it is best to do some testing to see what speed the fan needs to blow to lift the ball reliably and then I set that as the MIN % fan speed. The ping pong ball valve does work remarkably well for a cheap low tech solution.... but Steve is right, the servo damper setup is a better way to go now that it is available...

Thanks Ralph. I think this confirms my experience and need to go back and try it out.

I like the idea of simplicity of the ball valve. I had a fuzzy idea in mind on using a ping pong ball and then coincidentally ran across this thread. If it can control temperatures across the operating range, I don't see a need for the added complexity of a servo. I am a tinkering ham radio operator, analog electrical engineer, and fly RC airplanes (Ie. boxes of servos). You'd think I'd be a prime candidate "Marked for Servo". :D Wish me luck in taming this beast!

I'll post a photo once I get it working on the Chargriller. The fan/valve arrangement is mounted on the leg of the grill and plumbed into the air inlet with a flange and rubber radiator hose. This way I don't have anything sticking out of the side of the grill and can stay in at all times and not worrying about bumping it while stored in the garage.
 
I think you will find the ping pong ball valve will get the job done for sure... As for PPV VS Servo Damper, it's not just a matter of working or not, it's a matter of HOW if works....

With the ping pong valve you have to FORCE air through your grill with the blower, and typically at a higher rate than just using the blower alone ('cause you've got to raise the fan Min% to whatever it takes to lift the ball). When you raise the Min% of the blower the HM will kinda store up the time it has run below the Min% and give you bursts of air at the Min% that would be equivalent to the amount of time spent below the min% (hope that makes sense?).... It will make up for time spent below the Min% with an on/off/on/off routine.... If you are cooking at higher temps that require steady flow above the speed it takes to lift the ball you are in good territory, you will get a nice steady burn... If you are doing low and slow and the flow required is below what it takes to lift the ball you will get bursts of air and then choke when the ball drops, which is not the ideal way to run a low and slow fire IMHO.

With a servo damper you have much more control. First of all you don't have to worry about raising the blower Min%, and since Bryan added the Voltage Mode and the little burst start routine to get the fan spinning the stock HM blower is capable of providing a nice slow trickle of air, so you don't get the burst/choke routine. Secondly, with a servo damper you also have the ability to disable the fan and let the HM control the fire by natural convection by adjusting the servo damper just as a human would adjust vent manually. (well, maybe the HM is like a hyperactive over attentive human manning your grill!) This is a nice way to go for low and slow because you get less air flow through your grill, food retains more moisture, you burn less charcoal and I think the smoking goes better than when you have the puff puff puff of the blower.... Of coarse you also have the ability to use the blower to aid in stoking up the pit (on at max only), which is a nice option to have, kinda best of both worlds...

...but like I said, I am sure you will find the PPV valve will work great for you, and you will likely get nice steady graphs with very little tinkering. However, for someone that is inclined to tinker and shoot for the best methods the servo damper is the way to go....


Back
Top