Mini-WSM Build attempts... EXTREMELY frustrated


That Vasconia pot is the one I have as well. Fits awesome. In fact, the "seal" into the bottom of the SJS is so good, a little soot and it is getting sticky enough that it can be difficult to pull off to add coals. I read on here that the Vasconia pot, while a little more expensive, was found to be very consistent. Sometimes the first cost is the cheapest cost...

http://www.bbq-brethren.com/fo...wthread.php?t=117974
 
<BLOCKQUOTE class="ip-ubbcode-quote"><div class="ip-ubbcode-quote-title">quote:</div><div class="ip-ubbcode-quote-content">Sometimes the first cost is the cheapest cost... </div></BLOCKQUOTE>

Certainly seems to be the case here... It's out for delivery right now according to package tracking, so as soon as it arrives, I'll know and post back here.

Edit:
IT FITS LIKE A GLOVE!!! It even has the plastic handles and all that. That little knob on the lid will look good as an vent adjuster handle, too. It's absolutely worth the money, IMO.

It's important to note that all the Vasconia steamers do not work. There is another, nearly identical 32 qt made-in-china model sold by the grocery store around here that's far too small. I'll compare UPCs to see if there is a difference.

It would be nice to have an authoritative parts and common modification list (perhaps with links to amazon) somewhere on this site for people like me who are looking to get into a build. With the information scattered all over the internet, it's hard to know what you're doing without some help.

That said, thank you guys very much once again not only for the help with the parts, but for giving me the encouragement to give it another shot.

Now, I'm off to make some measurements...
 
J, I just got a dinner plate out of the cabinet and used it to trace a line for my cut out. I posted my pics on page 24 of the SJG mini smoker topic.
Good luck,
Tim
 
After considering all the options for the bottom of the pot, I figured just cutting it out was the best way. I really want the cooking dynamics of this thing to be as similar to the WSM as possible, and therefore I'm trying to mimic it closely in design. To remove the base, I ended up drilling a hole in the center of the bottom, then placing a screw in it. I looped a wire around the screw, then attached a sharpie marker to the other end of the wire. This allowed me to draw an exact circle on the center of the base. I saw this method used on one of the many builds out there on the Internet, but I couldn't tell you where. Maybe on here. I used a dremel tool with cutting wheels to remove the base. It came out very well, working slowly to follow the sharpie line exactly. A little sandpaper around the cut smoothed out any inconsistencies.

In retrospect, a dinner plate would have worked as well. Probably easier that way.

I used a coffee can to create an ash deflector for the bottom vent. It sits on top of the bottom vent with about 3/4" of clearance between it and the charcoal grate to make sure it doesn't block air to the coals. That's another Internet idea I saw somewhere.

Used small-size (~3/8" diamond) expanded metal to line the charcoal grate and built a small charcoal basket out of the same. It's just tall enough to where you can barely set the cooking grate on the grill.

I still have to measure and drill holes for the grates. That's going to take some planning and precision, so it'll wait until tomorrow. Based on the grate placement, I'll be drilling and mounting an Old Smokey-style thermometer, which I chose for it's colors. I've got some black VHT brand caliper paint that I'll be using after drilling all the holes but before finally mounting the stainless hardware. I think the contrast will look sharp.

I'll probably holler at Marty Leach and see about getting a handle that says Still Smokin' on both sides, maybe with a little outline of Texas between the words, if possible.
 
When you measure for the placement of the holes that support the grate, just remeber that they don't need to be perfect if you stay with 3 screws and not 4.. If they are slightly off, they will still support the grate without any wobble. Happy Drilling, err Grilling!
 
Matt, Glad to see progress on your end! Just take your time and have fun with it. half of the beauty of these little things is how much fun it is to make 'em! One question; why a charcoal ring? I know you are trying to replicate a WSM as much as possible, but IMO, you will be costing yourself cook time. I have found that you need to be able to cram as much fuel into these little smokers as possible for it to run as long as possible. By using a charcoal basket, you are robbing yourself of precious space. (Again, this is just something I have learned along the way.) Looking forward to seeing some pics, and then, the all important "first Smoke" pic!
Good Luck, and Have Fun!
Tim
mini-
wsmsmile8gm.gif
 
AJ:

Thanks for the tip! That's the way I ended up going, and it turned out perfectly. Also, for anybody interested in doing this, 14.25" is approximately 1/3 of the circumference of the pot, measured from the outside. So, using that interval should give you evenly spaced bolts.

Tim:

You make an interesting point. To be honest, I didn't really think about it. I suppose there's not any problem with just filling it full... I'll take the basket out of the equation and just line the coal grate completely with the small expanded . That will still be useful for keeping pieces of charcoal from falling through before they're completely burned.

Also, to maximize my heat to fuel ratio and keep ash buildup to a minimum, I plan on using lump. I don't know if that's absolutely the best idea or not, but I figure it probably is.

I've got the upper grate supports and thermometer installed... At this point, except for removing the basket from the charcoal grate, I think the only things to do are cosmetic (paint, handles, etc.). It might be a good afternoon to take this thing out for it's maiden voyage! I'd crack a bottle of Highlife on it's hull, but that would probably dent it.
 
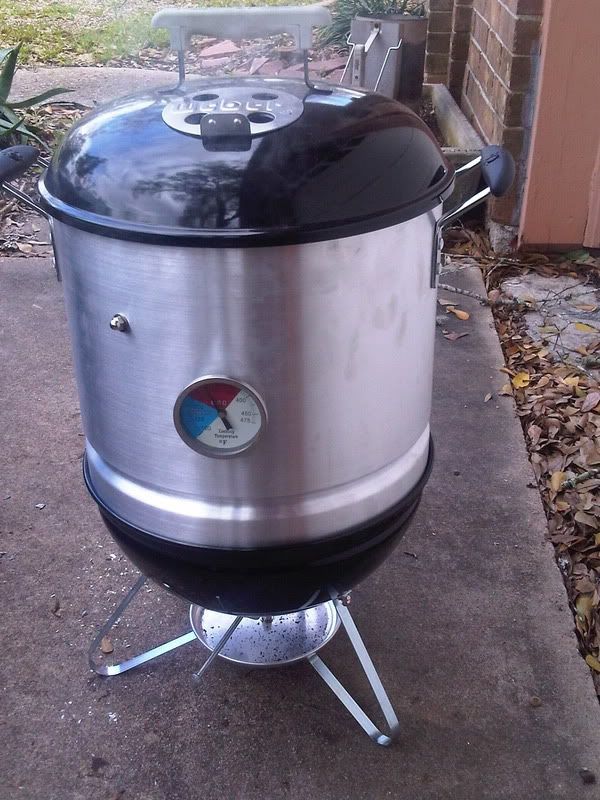
Well, I took her for a spin yesterday...
IMG-20120226-00043.jpg


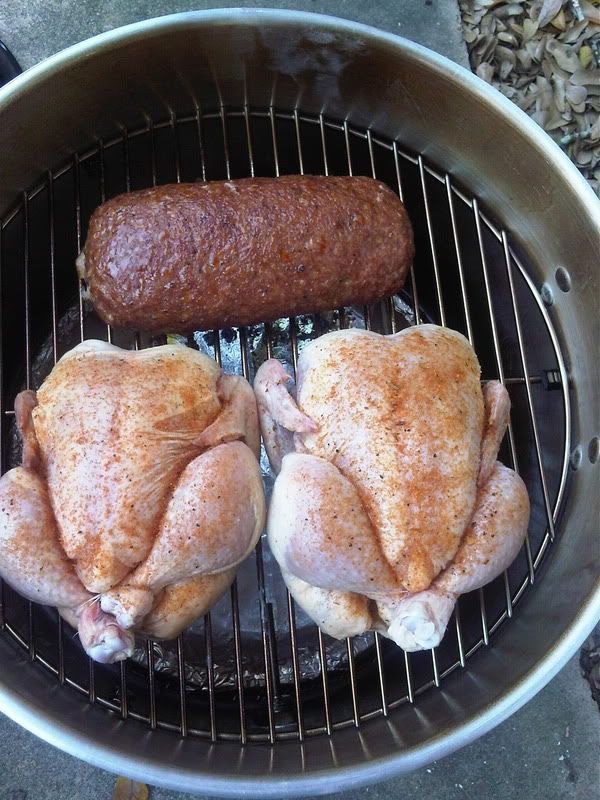
Ended up doing a fatty and two cornish game hens to start, then putting on a little 1.5lb rack of baby backs. The hens were trussed using sewing thread, which I wouldn't recommend because of how thin it is. It was all we had, though, and it worked well enough.
IMG-20120226-00045.jpg

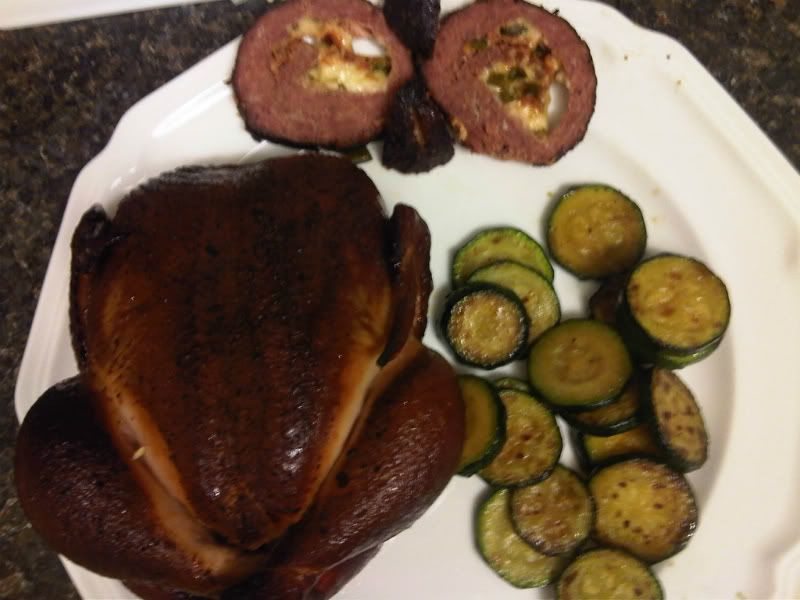
I'd never smoked hens before, but let me tell you it was great. I brined them in a strong solution for an hour, then patted them dry and allowed them to sit on a rack in the fridge for another hour before applying a light dust of rub and smoking for 2.5 hours at about 275-300 (I was learning temp. control) with pecan. Juicy, great flavor, and crisp skin - I couldn't ask for more.
IMG-20120226-00050.jpg

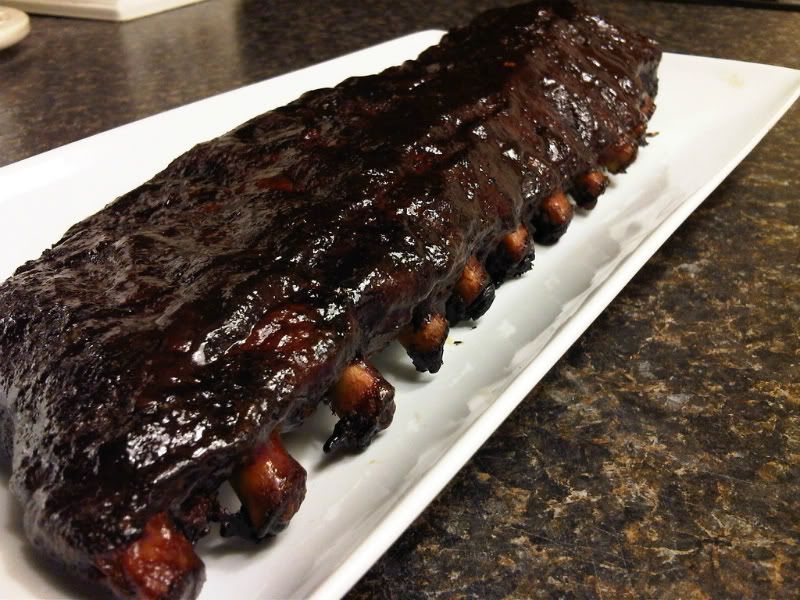
And now a quasi-artistic shot of some ribs. (They came out a little over-done, but that's just part of the learning process.
IMG-20120226-00055.jpg


Next up, I'll be deciding on paint and handle design. I might even try to carve a set myself.

Last but not least:
Let me just say once again, THANK YOU to everybody in this thread for helping encourage me to persevere and for giving me tips. I was about ready to throw in the towel, but now I've got a fun little toy that turns out some fine barbecue.
 
Matt, I really lime that steamer pot for this mod. Just seem to be a hived quality. I'm glad you finally got 'er up and running! Now its just a matter of learning its personality and how it acts/reacts to certain situations. I love my little mini, and I think the fact that we make them ourself, gives us a feeling of satisfacition every time we fire 'em up!
Youroosl looks great, seems like all your trouble and effort resulted in a fine smoker, and some delicious Q!
Great job,
Tim


Back
Top