T MacGreggor
TVWBB Pro
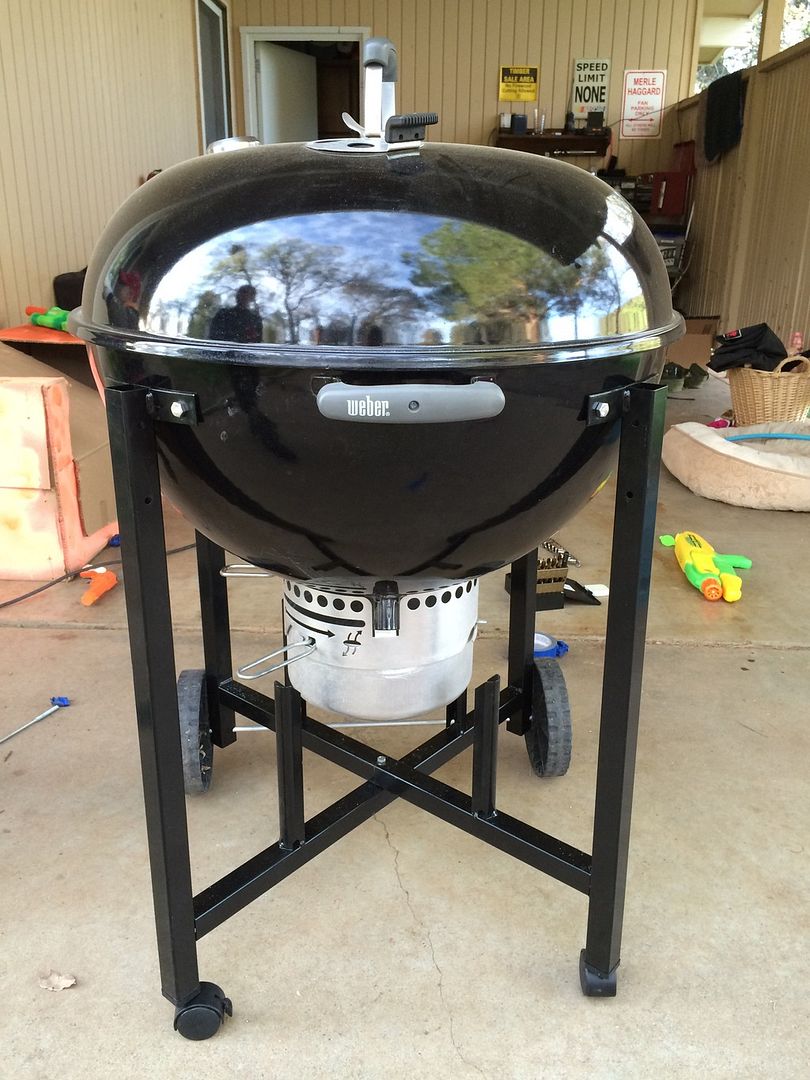
Wow, very nice job!
Thank you. The frames from eReplacment parts were 78 bucks for both. The casters and the little tiny hubcaps from Weber were about 20 and the nuts, bolts and lock washers (i did stainless) plus the rod for the axel were about 30. I had the 1" tubing and angle on hand if I had to purchase that too I would say grand total was about 140-150. And that's including shipping to CA from Weber and eReplacment. The most expensive part was the frame. Person could do it for close to a 100 if the had the hardware on hand and used the old axel from the kettle it self (would have to cut the triangle off).Dustin very nice job i love how solid it makes that grill.
SO without the grill about how much do have in the parts?
As I may just have to make one of these.

Thank you. The frames from eReplacment parts were 78 bucks for both. The casters and the little tiny hubcaps from Weber were about 20 and the nuts, bolts and lock washers (i did stainless) plus the rod for the axel were about 30. I had the 1" tubing and angle on hand if I had to purchase that too I would say grand total was about 140-150. And that's including shipping to CA from Weber and eReplacment. The most expensive part was the frame. Person could do it for close to a 100 if the had the hardware on hand and used the old axel from the kettle it self (would have to cut the triangle off).
I would highly recommend. I know the 26 isn't cheap and you shouldnt have to put out another 150 bucks because of the crummy stock legs, but it is super sturdy and it does look really cool
Dave, I can understand not wanting to drill into a fairly new grill. You might be on to something. When I put the kettle into the freshly built frame it fit pretty snug and rested real nice up against the lip of the kettle. The only problem I see would be the side to side movement of the kettle without securing. When I set the kettle into the frame and was centering it was real easy or move side to side...with that said though I had mine raised and on blocks. If I remember correctly the lid bale fit perfectly between the back two frame legs with the plastic lid holders pushed out enough to have frame in between the holders and the kettle...does that make sense??? It would be about and 1 1/2" lower if you set on the lip. If you decided to bolt it down in the future you would want to raise it up so the bolts wouldn't get in the way of the grill (I set my bolts below the cooking grill tabs).Dustin, man, you have me so close to doing this. Seriously. Thing is though, my 26er is brand new and I'm not sure that I want to drill holes in it at this point. Then I got to thinking and wondering if it might work to attach some non-slip padded material (silicone?) on the mounting brackets of the RK frame and then just drop the bowl of the 26er in ? I know that when I took my RK apart and put it back together, the bowl sat very snugly in the frame without being bolted in. Legs didn't flex at all. But then again, I didn't have any weight on the grill itself either.
Any thoughts on this ?
Dave, I can understand not wanting to drill into a fairly new grill. You might be on to something. When I put the kettle into the freshly built frame it fit pretty snug and rested real nice up against the lip of the kettle. The only problem I see would be the side to side movement of the kettle without securing. When I set the kettle into the frame and was centering it was real easy or move side to side...with that said though I had mine raised and on blocks. If I remember correctly the lid bale fit perfectly between the back two frame legs with the plastic lid holders pushed out enough to have frame in between the holders and the kettle...does that make sense??? It would be about and 1 1/2" lower if you set on the lip. If you decided to bolt it down in the future you would want to raise it up so the bolts wouldn't get in the way of the grill (I set my bolts below the cooking grill tabs).
Anyway, as for material to use on the brackets silicon would work but might not be super attractive. Perhaps nomex with an adhesive back to stick to the leg frame brackets. Not sure on that. One thing about it your only out the frame if it doesn't work and the option to bolt it down is still there. If you decide to try it unattached with bolts you might need to take a little more out than the 8.75" of the middle section to ensure a tighter fit.
i think you will love the results. Over time on those stock legs will get wobbly and take your 26er out of level. I like this mod because it makes the 26 more functional and it looks really cool. Good luck, keep us posted and if you have any questions please let me know.
If you order the casters from weber then they will come with the inserts. The casters are the same for the performer and the RK. In the box was one caster and one square insert. The part number on the caster box was the same you have listed. Interestingly enough the bottom frame had the caster instert and the top frame did not. As for the top of the frame it did not come with the caps on either one. I was going to order those from eReplacement parts but they were 5.60 for 1. I'll see what I can find at the hardware store for that kind of money.
The material on the bottom of coffee cups would be perfect and probably more skid resistant then nomex. As for the front handle not sure how that would work. I wanted to do the same but the way it's bent on my RK I don't think you can cut it down from the center and have enough room for an insert to marry the two together. Handle ends have brackets on the ends to attach to the frame so shortening there would be tough too unless you can weld the handle together after shortening.
If you decide to go with the same height I did, take the two center sections you cut out of the two frames, cut them in half and you can use them as blocks between the frame and kettle bowl lip to get the height.
Look forward to seeing how it turns out
Very nice Dustin. Looks like a job well done.
Yes please share some details
Would this work on 22" OTG.
Dave, if you don't mind what did the aluminum caps set you back from Weber? From eReplacement they were 5.60 each and plastic.
Glad to hear you ordered the parts...your commited too it now! Can't wait to hear how it turns out. Look forward to see what turns out on the handle too.
Dustin one last question;
On the lower X frames you have four Up right Tubes about 1 inch diameter, do these have a purpose or could they be removed?
They just seem to be close to the ash pan and could interfere.
Yes they can be removed and yes the do interfere with the ash bucket. I decided to leave them when I built mine since I was anxious to complete the build and didn't want to grind and paint the frame at the time. I figured I could do later if it interfered with the ash bucket. Purpose of those uprights on the RK is to hold an ash pan silmilar to the silver model kettles. Hope this helps.
Yes they can be removed and yes the do interfere with the ash bucket. I decided to leave them when I built mine since I was anxious to complete the build and didn't want to grind and paint the frame at the time. I figured I could do later if it interfered with the ash bucket. Purpose of those uprights on the RK is to hold an ash pan silmilar to the silver model kettles. Hope this helps.
Dustin, my parts made it in today !! Having ADD, I had already been massively overthinking and over-complicating the plans for my conversion. Reading what you just said, I think I have an idea. Instead of taking 8.75 inches out of the middle of each frame piece and then drilling new center holes, I'm thinking about cutting 4 and 3/8's from the left and right of each frame piece. This will remove the upright tubes without requiring any grinding or repainting. For some reason, I think it might also make things easier if I find that I need to remove a bit more than 8.75 inches overall.
Outstanding! I think your idea of cutting from each frame piece is a good idea and a good way to get the ash pan parts removed. I am sure you know this but you'll have to marry each frame piece twice by not taking the center out and just marrying it once for each frame. Do you have a band or chop saw to keep your cuts straight? Look forward to see how it works out.
Yeah, 4 cuts on each frame instead of 2. I don't have a band or chop saw, but do have a miter saw. Might get a metal cutting blade for it and see if that works.
Something that is confusing me a bit right now are the measurements. I took the cook grate out of my 26'er and measured the internal diameter where I want the frame and bowl to meet. Figures are a bit rough, but, tape said it was ~25 inches. I then measured between the legs of the frame and came up with 34.75 inches. By those measurements, it looks like I need to take out 9.75 inches ? To be sure, I think I'll start at the 8.75 inches that you and others used, then adjust if necessary.
As for the marrying of the frame, I'm going to take one of the legs up to Home Depot and check out their square stock, angle, and flat stock. With the extra cuts, I want to make sure that the space is packed tightly inside for maximum rigidity.
BTW, in case you haven't noticed, this kind of thing is way out of my wheelhouse.
) so I may not be the best guy to get advice from. My build went well but I went off info from the builds from Stu G and Steve Porter and it worked.