Joe Milczewski
TVWBB Fan
We finally had some decent garden tomatoes and herbs last night so we broke out the Kettle Pizza. Below is my method as I've refined it over the past couple years. This board has been a great learning tool for me on this so I'm always open for some shared wisdom.
The Kettle Pizza is a great tool if you love the process of trying to replicate Neapolitan style wood fired pizzas without a true wood fired oven. It is also temperamental and tricky and this process is fairly involved so it's not for everyone.
Before I start anything I put my pizza stone in the oven in the house and heat to 500*. I leave in until I'm ready to cook outside.
I like to start in the Kettle with a small base of KBB covered in a large pile of lump. The bigger the lump chunks the better. I use the base of KBB because I think it extends the life of the fire. I can't prove that and it might be a figment of my imagination but I believe it anyway.

Once that is burning with an open flame I pile it all to one side. I typically use the side of the Performer with the gas assist in case I need a little push later on in the cook.

I let that burn a while longer until the coals are gray and red hot. Then I take a log of hardwood and put it on top of the fire. I used to use chunks because they are cheaper and easier to find but they do not provide as much heat and they certainly don't burn as long. This is a mesquite "mini-log" I found at Home Depot sold by Brinkman. It was dense as heck and burned great. Do not under any circumstances use chips. They burn way too fast and you'll have nothing but smoke.

This is where it gets weird but I think there's a method to the madness. You can see in the previous pic I have one grill on the floor of the Kettle Pizza that is the stock Weber hinged grate. I put that in the grill upside down so the hinged grate hangs open in the back. You could also just take the hinged parts off. I just haven't gotten around to it yet. Having the grate on this way allows me to push additional logs back across the pizza stone and onto the fire as needed. Then I place another grill on the top of the Kettle Pizza to serve as the "ceiling." On that grate I pile up some cheap unglazed tiles I bought for about .25 a piece and the fragments of an old broken pizza stone. The idea here is that I want to create some thermal mass above the cooking floor. This is a principle of wood fired ovens that I'm trying to recreate where you have heat stored up in the stone to cook the pie from bottom up, but also heat radiating down on to the pie from the roof to create all those great crispy bits on top. I also put a couple tiles on that bottom grate for the pizza stone to sit on later. I think this little bit of insulation helps from scorching the bottom of the pizzas later in the cook.

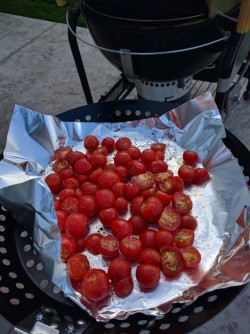
It sounds involved but that whole process probably takes me just under a half hour. Once I have the structure cobbled together I let the wood burn maybe another 10 or 15 minutes to get some of the smoke out. While that happened I put some garden tomatoes in a grill pan and quick roasted them for the pizza sauce.
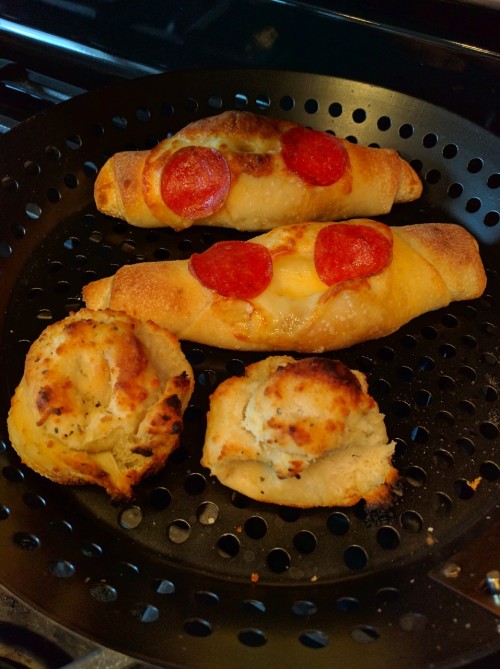
I brought down the hot pizza stone and slid it in the kettle. I had some leftover pizza dough so I made a couple garlic knots and pepperoni rolls. They went in first, mostly for me to check my heat. These took about 5 minutes.
Then it was time for the first pie. This was rosemary from the garden along with a little pecorino and parmesan. We had this pizza the first time when we went to Napa last year. Comes out salty and herby and awesome. This one took just under 4 minutes to cook. I basically put it in and quarter turn it every minute. The timing isn't exact. You just have to eyeball it.

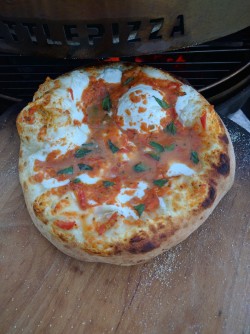
Next up were a couple margaritas. We do these a bit different now in that when we have a fresh tomato sauce we put the cheese on first and then the sauce on top. I think this helps keep the dough from getting soggy and gets the sauce even a little more roasted. Not traditional but what the heck. It tastes great.
My ideal in this whole setup is to get a lot of clean burning flame running in the back off the unit to the point that the flames hit that ceiling I created and lick forward toward the opening of the Kettle Pizza to draw in air. This licking forward helps crisp the top of the pies. This is my attempt at capturing what it looks like.

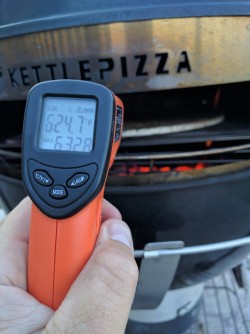
I took this temperature reading of the stone after I cooked 4 pies. The unit had been running at full cooking temperature for maybe about 40 minutes. It's hard for me to get an accurate temp reading of the roof of the cooking chamber but I think I've gotten it up into the low 800's.
Also of note is that your cooking window on this is fairly limited. Once it is burning how I like, and depending on the size and density of the wood I have burning, I can cook pizzas for about 40 minutes. After that I need to slide in another log and give it maybe 15 or 20 mins to burn the smoke off of it. And after about the third pie the pizza stone simply gets too hot and the bottom of the pizzas begin to scorch if I'm not very careful. I need to either get a thicker stone or add more insulation under it. I'm still working on that problem.
So that's my method. Hope it gives someone a good idea as to how to build on it. Thanks for the look!
The Kettle Pizza is a great tool if you love the process of trying to replicate Neapolitan style wood fired pizzas without a true wood fired oven. It is also temperamental and tricky and this process is fairly involved so it's not for everyone.
Before I start anything I put my pizza stone in the oven in the house and heat to 500*. I leave in until I'm ready to cook outside.
I like to start in the Kettle with a small base of KBB covered in a large pile of lump. The bigger the lump chunks the better. I use the base of KBB because I think it extends the life of the fire. I can't prove that and it might be a figment of my imagination but I believe it anyway.
Once that is burning with an open flame I pile it all to one side. I typically use the side of the Performer with the gas assist in case I need a little push later on in the cook.
I let that burn a while longer until the coals are gray and red hot. Then I take a log of hardwood and put it on top of the fire. I used to use chunks because they are cheaper and easier to find but they do not provide as much heat and they certainly don't burn as long. This is a mesquite "mini-log" I found at Home Depot sold by Brinkman. It was dense as heck and burned great. Do not under any circumstances use chips. They burn way too fast and you'll have nothing but smoke.
This is where it gets weird but I think there's a method to the madness. You can see in the previous pic I have one grill on the floor of the Kettle Pizza that is the stock Weber hinged grate. I put that in the grill upside down so the hinged grate hangs open in the back. You could also just take the hinged parts off. I just haven't gotten around to it yet. Having the grate on this way allows me to push additional logs back across the pizza stone and onto the fire as needed. Then I place another grill on the top of the Kettle Pizza to serve as the "ceiling." On that grate I pile up some cheap unglazed tiles I bought for about .25 a piece and the fragments of an old broken pizza stone. The idea here is that I want to create some thermal mass above the cooking floor. This is a principle of wood fired ovens that I'm trying to recreate where you have heat stored up in the stone to cook the pie from bottom up, but also heat radiating down on to the pie from the roof to create all those great crispy bits on top. I also put a couple tiles on that bottom grate for the pizza stone to sit on later. I think this little bit of insulation helps from scorching the bottom of the pizzas later in the cook.
It sounds involved but that whole process probably takes me just under a half hour. Once I have the structure cobbled together I let the wood burn maybe another 10 or 15 minutes to get some of the smoke out. While that happened I put some garden tomatoes in a grill pan and quick roasted them for the pizza sauce.
I brought down the hot pizza stone and slid it in the kettle. I had some leftover pizza dough so I made a couple garlic knots and pepperoni rolls. They went in first, mostly for me to check my heat. These took about 5 minutes.
Then it was time for the first pie. This was rosemary from the garden along with a little pecorino and parmesan. We had this pizza the first time when we went to Napa last year. Comes out salty and herby and awesome. This one took just under 4 minutes to cook. I basically put it in and quarter turn it every minute. The timing isn't exact. You just have to eyeball it.
Next up were a couple margaritas. We do these a bit different now in that when we have a fresh tomato sauce we put the cheese on first and then the sauce on top. I think this helps keep the dough from getting soggy and gets the sauce even a little more roasted. Not traditional but what the heck. It tastes great.
My ideal in this whole setup is to get a lot of clean burning flame running in the back off the unit to the point that the flames hit that ceiling I created and lick forward toward the opening of the Kettle Pizza to draw in air. This licking forward helps crisp the top of the pies. This is my attempt at capturing what it looks like.
I took this temperature reading of the stone after I cooked 4 pies. The unit had been running at full cooking temperature for maybe about 40 minutes. It's hard for me to get an accurate temp reading of the roof of the cooking chamber but I think I've gotten it up into the low 800's.
Also of note is that your cooking window on this is fairly limited. Once it is burning how I like, and depending on the size and density of the wood I have burning, I can cook pizzas for about 40 minutes. After that I need to slide in another log and give it maybe 15 or 20 mins to burn the smoke off of it. And after about the third pie the pizza stone simply gets too hot and the bottom of the pizzas begin to scorch if I'm not very careful. I need to either get a thicker stone or add more insulation under it. I'm still working on that problem.
So that's my method. Hope it gives someone a good idea as to how to build on it. Thanks for the look!

") .
. ") . Oh man what a great idea.
. Oh man what a great idea.