You are using an out of date browser. It may not display this or other websites correctly.
You should upgrade or use an alternative browser.
You should upgrade or use an alternative browser.
2nd Chance for a True Weber Classic: A 1998 1st Generation Summit 450
- Thread starter Jon Tofte
- Start date
-
- Tags
- restored summit
I wrote this article after replacing the igniters in my 2002 Summit 450. I ordered these direct from Weber at 800-446-1071.I just picked one these summits up, a 1997 425 open cart. the igniters are missing, anyone know the part number or what they look like?
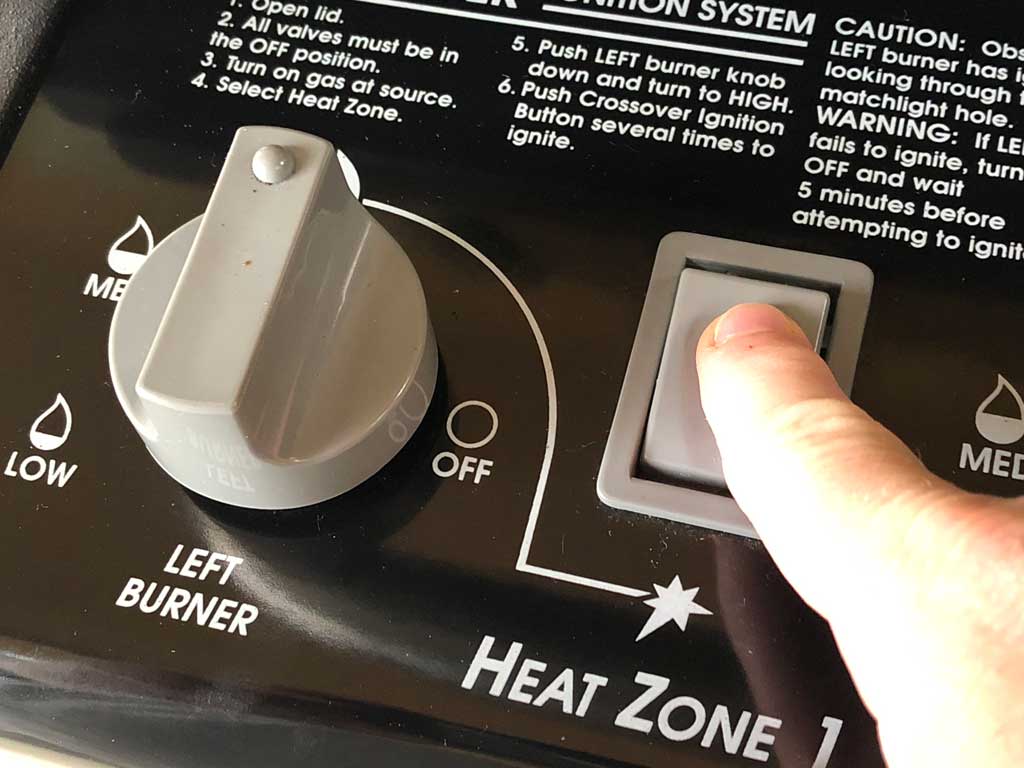
Replacing Weber Gas Grill Igniters - The Virtual Weber Gas Grill
Replacing the igniters in your Weber gas grill is an easy fix that anyone can do. It just takes a little time and the correct igniter replacement parts kit.

This is the information that I was looking for. I was thrown off by the teardrop shape hole in the cook box where the igniter is installed, now that I see the photo I understand how it should be installed, I expected it to exactly like the old Genesis with small and large holes. Thanks for your help with this issue.


Jon Tofte
TVWBB 1-Star Olympian
EVER SO SLOWLY…
It’s been very cold, a busy time at work and with Christmas & family, plus an ongoing house project... Accordingly, my never-ending Summit project has literally been gathering dust. I have, however, worked behind the scenes with my sand blaster friend and took advantage of a recent break from ice age conditions to at least get my dream grill a little closer to reality.
Here are the cast aluminum pieces back from the sand blaster. I had tried to go it alone and just wire brush them, but the outside texture was blotchy. I didn’t want to go to a shiny smooth finish, and my efforts to camouflage the chipped off parts were a flop. Sand blasting leaves a texture more like the original finish:


I am using the higher gloss black for my firebox parts. I ran out of Rustoleum High Heat Ultra after just finishing the first coat, so I am letting them dry well - in the warm and dry inside - and then will put on one more light coat to be sure the black is completely covering. I wish now I had used Krylon’s “Max” gloss high heat, which I personally like better. The Rustoleum is fine, however.
I decided to go stock on the bolts that hold the end caps to the hood and also are used on one hole in the upper firebox. These are the visible connectors, and although I admire the quality, rugged-build look of replacing these with stainless, I opted for the blend-in black.
First I had to clean them up. Sam’s Members Mark grill cleaner did a great soak and clean:

I stuck them in an old piece of thin cardboard to paint:


Meanwhile, I also cleaned up the brackets that hold the clips for the flavorizer bars. One was bent, but my cheap Harbor Freight vice was adequate to fix that:


I did some more cleaning of the porcelain hood. It’s far from perfect with scratches and a bit of the Weber fade. At its 25th year, I accept that I can’t expect perfect. Rubbing compound DOES help get things cleaner, but it won’t remove scratches, fade, or some burned-on stuff that I had already given up on since it will be concealed:
Halfway:

Done as I am going to get:

Lastly, I got the logo badge ready using the method proven by many here of sanding with progressively finer grade paper:


And, one non-stock mod - the classic red kettle:

I have never tried the follow up with high heat clear coat. I am thinking about it this time. Any opinions from your experience?
If the weather holds out and time allows, I hope to FINISH with painting very soon. That would leave mostly assembling the firebox with zillions of 316 stainless bolts and high heat RTV. The firebox side pieces actually have channels cast in to pour in the RTV.


This is work that I can do inside regardless of weather. I do have burners to clean and some other stuff, but this is definitely a one slow step at a time thing !
!
It’s been very cold, a busy time at work and with Christmas & family, plus an ongoing house project... Accordingly, my never-ending Summit project has literally been gathering dust. I have, however, worked behind the scenes with my sand blaster friend and took advantage of a recent break from ice age conditions to at least get my dream grill a little closer to reality.
Here are the cast aluminum pieces back from the sand blaster. I had tried to go it alone and just wire brush them, but the outside texture was blotchy. I didn’t want to go to a shiny smooth finish, and my efforts to camouflage the chipped off parts were a flop. Sand blasting leaves a texture more like the original finish:
I am using the higher gloss black for my firebox parts. I ran out of Rustoleum High Heat Ultra after just finishing the first coat, so I am letting them dry well - in the warm and dry inside - and then will put on one more light coat to be sure the black is completely covering. I wish now I had used Krylon’s “Max” gloss high heat, which I personally like better. The Rustoleum is fine, however.
I decided to go stock on the bolts that hold the end caps to the hood and also are used on one hole in the upper firebox. These are the visible connectors, and although I admire the quality, rugged-build look of replacing these with stainless, I opted for the blend-in black.
First I had to clean them up. Sam’s Members Mark grill cleaner did a great soak and clean:
I stuck them in an old piece of thin cardboard to paint:
Meanwhile, I also cleaned up the brackets that hold the clips for the flavorizer bars. One was bent, but my cheap Harbor Freight vice was adequate to fix that:
I did some more cleaning of the porcelain hood. It’s far from perfect with scratches and a bit of the Weber fade. At its 25th year, I accept that I can’t expect perfect. Rubbing compound DOES help get things cleaner, but it won’t remove scratches, fade, or some burned-on stuff that I had already given up on since it will be concealed:
Halfway:
Done as I am going to get:
Lastly, I got the logo badge ready using the method proven by many here of sanding with progressively finer grade paper:
And, one non-stock mod - the classic red kettle:
I have never tried the follow up with high heat clear coat. I am thinking about it this time. Any opinions from your experience?
If the weather holds out and time allows, I hope to FINISH with painting very soon. That would leave mostly assembling the firebox with zillions of 316 stainless bolts and high heat RTV. The firebox side pieces actually have channels cast in to pour in the RTV.
This is work that I can do inside regardless of weather. I do have burners to clean and some other stuff, but this is definitely a one slow step at a time thing
!
Last edited:
Steve Hoch
TVWBB Platinum Member
Those bolts that hold the firebox together look exactly like the ones that are used on the Genesis 1000 lids. I refinish those the exact same you did and they always come out looking brand new. As for the lid emblem, I usually clear coat them and I think they look better than new when done.
Steve Hoch
TVWBB Platinum Member
I've done them both ways and they do look just fine without the clear coat. You are correct in that clear coating them gives the bare aluminum a milky white appearance, which I prefer.When I clear coat an emblem, it makes them look WHITE, and yours seems to be very much the same.
Steve Hoch
TVWBB Platinum Member
No right or wrong on this one, just personal preference.
Jon Tofte
TVWBB 1-Star Olympian
Steve,
That one with the clear coat does look extra sharp, although I agree with you and Bruce that it’s just a preference thing. I once painted all the “Weber” letters and the outline white on the updated font version of the metal logo.

That was a torturous undertaking, and I vowed never again. It might be, though, that the whitened appearance that the clear coat gives might be an easier way to achieve what I had tried before and also make the red kettle pop even more.
I will probably give it a try and post my results.
p.s. The end caps bolts are, in fact, identical to the Genesis 1000 ones, and there are some other shared items from the Weber parts bin of that era . This old Summit is built in a more heavy-duty design, although the firebox design was obviously flawed.
That one with the clear coat does look extra sharp, although I agree with you and Bruce that it’s just a preference thing. I once painted all the “Weber” letters and the outline white on the updated font version of the metal logo.
That was a torturous undertaking, and I vowed never again. It might be, though, that the whitened appearance that the clear coat gives might be an easier way to achieve what I had tried before and also make the red kettle pop even more.
I will probably give it a try and post my results.
p.s. The end caps bolts are, in fact, identical to the Genesis 1000 ones, and there are some other shared items from the Weber parts bin of that era
. This old Summit is built in a more heavy-duty design, although the firebox design was obviously flawed.LMichaels
TVWBB 1-Star Olympian
Doing amazing work Jon. One "true confession". You may recall many times how much I have warned people to never use ScotchBrite pads to clean the porcelain? Well you're seeing why and just how I found out (the hard way) on my well loved Summit. And FWIW they were not "used" SB pads but brand new ones with lots of soap and water (not used dry). But wonderful attention to detail!
Bruce
TVWBB 2-Star Olympian
Larry, I have experienced the green scrubby issue with porcelain as well. I did trash a rehab lid using a SB pad. I find that I can use even the household stainless steel wool pads and not scratch the porcelain on lids, but those green scrubbies are somehow much more abrasive.
Disclaimer: While I have used the household SS on lids, I only use it on the inside. I don't trust it for the outside.
Disclaimer: While I have used the household SS on lids, I only use it on the inside. I don't trust it for the outside.
LMichaels
TVWBB 1-Star Olympian
I use it with no trouble on outside of lids, my stove top and so on. No issues at allLarry, I have experienced the green scrubby issue with porcelain as well. I did trash a rehab lid using a SB pad. I find that I can use even the household stainless steel wool pads and not scratch the porcelain on lids, but those green scrubbies are somehow much more abrasive.
Disclaimer: While I have used the household SS on lids, I only use it on the inside. I don't trust it for the outside.
Jon Tofte
TVWBB 1-Star Olympian
In follow-up to the discussion about clear coating older metal Weber logos, I decided to go for it:

I don’t know if the high heat clear coat I used had as much of the whitening effect that others here have seen, but I am happy with the look.
Meanwhile, I have been piecing together components in a race to finally finish before I am buried in another tax season . I gave all the cast aluminum parts a needed second coat of Rustoleum High Heat Ultra black. Still wish I had used Krylon, but the parts look good to me.
On this Summit, the larger thermometer has a cowl that attaches to the porcelain hood and only rests on the right end cap. The original screw and nut were regular steel and starting to rust. I bought new stainless.

Originally, this Summit came with a removable dual-use thermometer like the Genesis of that era. Unfortunately, being a lower volume grill and from a long time ago, there are now no Weber or non-OEM replacements. I bought this grill from Larry @LMichaels. He used some cool ingenuity to overcome this issue, grafting in a Weber thermometer of the same diameter (short stem, though). He fabricated a couple “washers” to allow this thermometer to set in properly. I think it looks great:


After my paint fully dried, I also worked on getting the rest of the hood and the top of the firebox assembled:

The massive stainless handle for this grill is attached with 4 stainless bolts that overlap the end caps on each side. In a rare compromise on this grill, Weber used regular steel for the washer and Keps nuts that hold this together. The result after almost 25 years is predictable:

I had plenty of 1/4” 316 stainless regular nuts. I couldn’t find stainless Keps nuts at Ace and after reading up on it deciding that stainless lock washers and the regular nuts would work equally well. No rust to worry about ever again.


There is still plenty of work to do, but my Summit dream is getting closer to becoming a reality .
.
I don’t know if the high heat clear coat I used had as much of the whitening effect that others here have seen, but I am happy with the look.
Meanwhile, I have been piecing together components in a race to finally finish before I am buried in another tax season
. I gave all the cast aluminum parts a needed second coat of Rustoleum High Heat Ultra black. Still wish I had used Krylon, but the parts look good to me.On this Summit, the larger thermometer has a cowl that attaches to the porcelain hood and only rests on the right end cap. The original screw and nut were regular steel and starting to rust. I bought new stainless.
Originally, this Summit came with a removable dual-use thermometer like the Genesis of that era. Unfortunately, being a lower volume grill and from a long time ago, there are now no Weber or non-OEM replacements. I bought this grill from Larry @LMichaels. He used some cool ingenuity to overcome this issue, grafting in a Weber thermometer of the same diameter (short stem, though). He fabricated a couple “washers” to allow this thermometer to set in properly. I think it looks great:
After my paint fully dried, I also worked on getting the rest of the hood and the top of the firebox assembled:
The massive stainless handle for this grill is attached with 4 stainless bolts that overlap the end caps on each side. In a rare compromise on this grill, Weber used regular steel for the washer and Keps nuts that hold this together. The result after almost 25 years is predictable:
I had plenty of 1/4” 316 stainless regular nuts. I couldn’t find stainless Keps nuts at Ace and after reading up on it deciding that stainless lock washers and the regular nuts would work equally well. No rust to worry about ever again.
There is still plenty of work to do, but my Summit dream is getting closer to becoming a reality
.