I run a buttonless, screenless, LEDless Heatermeter and I wanted to share a quick tutorial on how got my servo numbers set up correctly. This may be a easy way to do it even if you do have a screen.
Note: Don't forget to save and apply when tuning your servo numbers or you won't actually be doing anything.
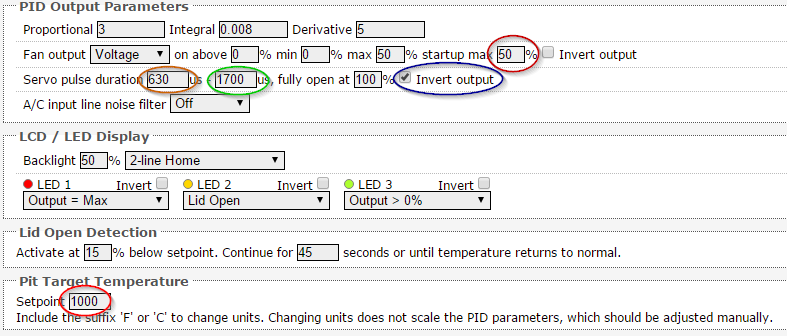
I set up the heater meter in my house with the Setpoint at 1000 (Just needs to be high enough to turn the fan on full blast) and the start up max at 50% (it's less noisy than 100%). This can really be set at anything but I prefer to feel the air blowing while tuning. These are noted by the red circles.
Check to see if your servo is inverted or not
At this point you are looking to set the Open side of your servo. If your servo is non-inverted, this will be the high servo pulse duration number. If it is inverted, it will be the low servo pulse duration number. I would start with the high servo pulse duration and set it at 1500. Then set it to 1600. If your servo opens more it is a non-inverted servo. If your servo closes (like mine) then you have an inverted servo.
Note: The rest of this guide is written for an inverted servo. If your servo is non inverted, your Invert Ouput will be in the opposite state of this guide and you will be setting the opposite servo pulse numbers.
Check the Invert output checkbox (circled in Blue) and continue by setting the low servo pulse duration (circled in orange) to 1000. continue to set to a lower and lower number until the servo stops when fully open. I prefer to go about 30 lower than full open. The servo strains a bit, but in my case, it ensures the servo fully opens every time. After this it set to your liking, we can move on to setting the closed side.
For the closed side, I like to still have the fan blowing air so that I can feel the output to ensure it is completely closed. At this point un-check the Invert output checkbox, and set the high servo pulse duration to a greater number than the low servo pulse duration. Continue to set it higher and higher until you can no longer feel air coming out. I then add another 30 or so for good measure.
After that, re-check you Invert output checkbox and make your setpoint 10. The fan should now be off and the servo completely closed. If so, everything is good and you are done!
Note: Don't forget to save and apply when tuning your servo numbers or you won't actually be doing anything.
I set up the heater meter in my house with the Setpoint at 1000 (Just needs to be high enough to turn the fan on full blast) and the start up max at 50% (it's less noisy than 100%). This can really be set at anything but I prefer to feel the air blowing while tuning. These are noted by the red circles.
Check to see if your servo is inverted or not
At this point you are looking to set the Open side of your servo. If your servo is non-inverted, this will be the high servo pulse duration number. If it is inverted, it will be the low servo pulse duration number. I would start with the high servo pulse duration and set it at 1500. Then set it to 1600. If your servo opens more it is a non-inverted servo. If your servo closes (like mine) then you have an inverted servo.
Note: The rest of this guide is written for an inverted servo. If your servo is non inverted, your Invert Ouput will be in the opposite state of this guide and you will be setting the opposite servo pulse numbers.
Check the Invert output checkbox (circled in Blue) and continue by setting the low servo pulse duration (circled in orange) to 1000. continue to set to a lower and lower number until the servo stops when fully open. I prefer to go about 30 lower than full open. The servo strains a bit, but in my case, it ensures the servo fully opens every time. After this it set to your liking, we can move on to setting the closed side.
For the closed side, I like to still have the fan blowing air so that I can feel the output to ensure it is completely closed. At this point un-check the Invert output checkbox, and set the high servo pulse duration to a greater number than the low servo pulse duration. Continue to set it higher and higher until you can no longer feel air coming out. I then add another 30 or so for good measure.
After that, re-check you Invert output checkbox and make your setpoint 10. The fan should now be off and the servo completely closed. If so, everything is good and you are done!
Last edited:
 .
.