Pesky heat deflector bolt/screw.


JimK

TVWBB 1-Star Olympian
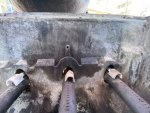
This is the heat deflector above the sear burner of my 2013 EP330. A single screw holds it on near the bottom center. It's a stubborn little bugger with no 'screw fitting' that I can see through the gunk. I've tried getting sockets and pliers on there, but can't get them to bite. Gave it a good spray with WD40 and will let it sit overnight. Tomorrow, I'll try to clean it up with an old toothbrush to see if I can get a hold on it. If that doesn't work, I'm at a loss. I guess I could try to drill it out, but that's not something I've done before. Got a shiny, new deflector ready to go on once I get this cleanup job done. Any thoughts? Thanks.
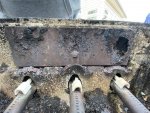
1590791456414.jpeg
 
That's definitely a shame. Looks like a job for a cut-off tool to me. Cut that bolt right flush with the rusty shield. The tougher thing will be then drill out what is left. Maybe there is some other way to attach the new shield by using new (316 stainless) self-starting screws.
 
A little progress after another WD40 treatment and cleaning up the head with a wire brush. I can wiggle the deflector and get the screw to turn with it, but its rusted to the deflector, which prevents it from turning much. I'll have to dig and see if I have a cutoff attachment for the Dremel. If not, the deflector is brittle enough that I may be able to just break it off into a smaller piece, then try and get a few turns.
 
Jim:
I don't own your grill, but I do an annual maintenance on my old Genesis which includes once a year removal of frame bolts, manifold bracket bolts and lid pins. If I had you model I'd definitely add that bolt too to avoid a similar problem in the future. Happy grilling!
 
Jim:
I don't own your grill, but I do an annual maintenance on my old Genesis which includes once a year removal of frame bolts, manifold bracket bolts and lid pins. If I had you model I'd definitely add that bolt too to avoid a similar problem in the future. Happy grilling!

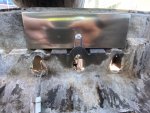
Thanks. I've definitely neglected this grill, but hopefully made up for it today. I'll be doing a little more maintenance on an annual or semi-annual basis going forward. Fortunately, once I could get a hold on that screw, it came out easily, as did all the burner screws. Here's the new shield.

1590874072559.jpeg

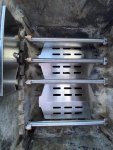
And with the new bottom heat deflectors and burners:

1590874120729.jpeg

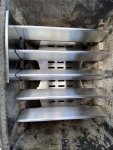
Add Flavorizer bars:

1590874171187.jpeg

My cleaning supplies haven't arrived yet, but tomorrow, I'll disassemble, clean and grease the control valves, then put the new knobs on. I fired her up after I got the burners in and everything was nice and blue. I just did a test burn after I got everything back together and she got to 500F in about 6 minutes with the 3 main burners on high. Another 7 minutes and we were reading 600.


Back
Top