New toys


Darryl - swazies

TVWBB Emerald Member
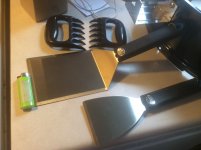
Bbq order was delivered today. Got some new toys.
Rotisserie.
Claws for the pulled pork, using forks really sucks.
This napoleon massive spatula and scrapper, plancha spatula set I think it was called.
I’m going to be starting to do smash burgers, and I needed some good tools.
Also the Weber cast iron pan that fits in the stupid hole.
I wasn’t going to but I didn’t want to use the vortex with the grate in the way.
It seems big enough to get 4 burgers in motion at the same time.
Tried the peach mango habanero bird bath.
No idea people seem to like it, we will see, and some butt rub!
4 bags of Weber bricks and some jealous devil lump.
Ready to go.
The rotisserie is the main goal, the ring seems a bit warped though, maybe with heat and the weight it will work out great.
Not sure if that is common, it’s not bad it’s just seriously not flat.
 

Attachments

  • FEA70A55-F372-4064-95B9-1D02120FFC0C.jpeg
    FEA70A55-F372-4064-95B9-1D02120FFC0C.jpeg
    91.7 KB · Views: 45
  • 0F3D881A-BA11-489D-A516-448F3923A92E.jpeg
    0F3D881A-BA11-489D-A516-448F3923A92E.jpeg
    97.4 KB · Views: 45
I need rotisserie tips.
I have done 1 once on a propane Q
Its been a long time.....
like do we go by lid temp???
Do I even have my lid on??
I need tips, give me the knowledge please!!!!!!!!!!!!
 
tips......
like basic stuff, I can manage from there,
like how hot of coals, lid on vs off ect.....
many thanks ahead of time.
 
I need rotisserie tips.
I have done 1 once on a propane Q
Its been a long time.....
like do we go by lid temp???
Do I even have my lid on??
I need tips, give me the knowledge please!!!!!!!!!!!!
#1 ALWAYS USE GLOVES WHEN HANDLING THE HOT SPIT!

Get some butchers twine and learn how to truss meat. It's easy. There are tons of instructional videos on YouTube. It helps to keep everything from cooking evenly, and not falling apart.

I never bother with checking with lid-temps.

Pack each charcoal basket to the brim, with lit charcoal, stick a disposable drip-pan in between the basket.

Load up the meat and get it spinning. Try to center the food, as much as possible, and align the forks so that the adjustment nuts are on the same side for both forks. It makes it easier to loosen them, for food removal, if both of those nuts are on the same side.

Use the lid.

Check the temps, of whatever it is that you're cooking, after an hour. If the cooks go longer, you can add lit, (or unlit), charcoal to the baskets. I generally use 10-12 lit.

Start with a chicken....it's one of the easiest, and foolproof, foods to cook on the rotisserie. You can skewer a couple of them on the spit and they generally done within an hour. That way, you get a feel for rotisserie cooking.

ALWAYS USE GLOVES WHEN HANDLING THE HOT SPIT!! USE TONGS OR THE GLOVES WHEN LOOSENING THE NUTS ON THE FORKS!

They come with counterweights, but I've rarely needed to use them, unless it's a big bird.

Hope this helps!
 
I was going to do a dizzy bird first, I bought a second set of forks in thoughts I would do 2 smaller birds at once.
After building it and seeing the space available it might be better to do just one bigger bird.
I would also have to learn to tie up the bird, I thought of this part already.
I appreciate the tips.....
GLOVES!
And using the lid, the approx. time of an hour is a good tip too just to go by.
Mine also did not come with a counter weight.
THANKS for the beginners tips.

So it seems like you want the coals to be as hot as they can be sort of........
The meat is pretty far away from those baskets.....
 
I think Rick has pretty well covered the basics. The rest will come, the more you do, you will see where you need to make adjustments. One thing that I think is important though is the use of a drip pan. Makes cleanup so much easier.
Learning how to truss is a good skill to develop, absolutely! I picked up an extra set of forks thinking I’d want them for doing two chickens but, I did that once, totally unnecessary really. Just snug them up nose to tail and it will hold together very nicely. Position them “one up/one down” and they should pretty well balance.
I use one very full chimney split between the baskets with any smoke wood in the bottom of the baskets fist size pieces work well. An hour to an hour and a half seems to work out nicely.
 
I've had my rotisserie probably about 9 years for my 11 year old OTP. I tried using the same ring (which is perfectly round and flat) on my 2 year old Performer Deluxe -i t was not a good fit. To make matters worse, I also had to use my old lid on the Performer as the new lid wouldn't sit flush. So now my old OTP is my designated rotisserie kettle.

Tips wise. As said, fill the baskets to the top but don't over fill them. Whatever you are cooking is higher than the normal grill level so under filling the baskets might not generate enough heat. I find 2/3 of a chimney is about right and I may have to start adding unlit briquettes after an hour or so. I run my rotisserie in line with the handles. As previously said a reasonable sized chicken will not take much more than an hour but die to the self basting nature of the rotisserie even a slightly overcooked bird will still be delicious. Once again, make sure anything that is being cooked os trussed into an even shape to avoid overcooking certain areas.

I cook with a drip pan between baskets on both sides, the grill grate on but the GBS middle out. I attach my Thermoworks Smoke temp probe to the grate at the edge and run the cable under the ring under the rotisserie motor. In order to use the counterweight effectively (if you so wish) ensure that if you have an uneven load such as a chicken, that you thread the spike through the thinest end of the meat first. In the case of a chicken the leg end. Centre the meat on the spike, fasten the prongs and load it into the ring without the motor attached. Let the meat turn to be heavy side down and then attach the counterweight pointing upwards. Attach the spike into the motor and start cooking!

One final preference that I have is to season the meat a few minutes after cooking has started. I find that once fat starts rendering the seasoning sticks much better to it. Another thing I like to do is to add a wood chunk to the grate over the coals for extra flavour.
 
I think Rick has pretty well covered the basics. The rest will come, the more you do, you will see where you need to make adjustments. One thing that I think is important though is the use of a drip pan. Makes cleanup so much easier.
Learning how to truss is a good skill to develop, absolutely! I picked up an extra set of forks thinking I’d want them for doing two chickens but, I did that once, totally unnecessary really. Just snug them up nose to tail and it will hold together very nicely. Position them “one up/one down” and they should pretty well balance.
I use one very full chimney split between the baskets with any smoke wood in the bottom of the baskets fist size pieces work well. An hour to an hour and a half seems to work out nicely.
Thanks for the extra tips.....
I think they will help out a lot too, especially 1 chicken up one down and the nose to tail trick.
Also it seems like you go for lots of charcoal, good to know.
I have been trying peach wood with chicken and this I have learned is super top shelf flavor.
I wish I didn't buy the extra forks.....only about $15.99 or something but i was having a ew beverages and at that moment it seemed like the right thing to do.
I already had the drip pan a priority after seeing some pics online here.
 
I've had my rotisserie probably about 9 years for my 11 year old OTP. I tried using the same ring (which is perfectly round and flat) on my 2 year old Performer Deluxe -i t was not a good fit. To make matters worse, I also had to use my old lid on the Performer as the new lid wouldn't sit flush. So now my old OTP is my designated rotisserie kettle.

Tips wise. As said, fill the baskets to the top but don't over fill them. Whatever you are cooking is higher than the normal grill level so under filling the baskets might not generate enough heat. I find 2/3 of a chimney is about right and I may have to start adding unlit briquettes after an hour or so. I run my rotisserie in line with the handles. As previously said a reasonable sized chicken will not take much more than an hour but die to the self basting nature of the rotisserie even a slightly overcooked bird will still be delicious. Once again, make sure anything that is being cooked os trussed into an even shape to avoid overcooking certain areas.

I cook with a drip pan between baskets on both sides, the grill grate on but the GBS middle out. I attach my Thermoworks Smoke temp probe to the grate at the edge and run the cable under the ring under the rotisserie motor. In order to use the counterweight effectively (if you so wish) ensure that if you have an uneven load such as a chicken, that you thread the spike through the thinest end of the meat first. In the case of a chicken the leg end. Centre the meat on the spike, fasten the prongs and load it into the ring without the motor attached. Let the meat turn to be heavy side down and then attach the counterweight pointing upwards. Attach the spike into the motor and start cooking!

One final preference that I have is to season the meat a few minutes after cooking has started. I find that once fat starts rendering the seasoning sticks much better to it. Another thing I like to do is to add a wood chunk to the grate over the coals for extra flavour.
Awesome tips too.
I don't think I can mess it up too much now with everyone's pointers
Thanks guys.
 
A spare set of forks isn’t a bad thing to have by any means. I like the smoke wood on the bottom for no particular reason, the other thing you can do is go the 3/4 (2/3) chimney and put a few unlit briquettes in the bottom which will extend the burn time.
 
Any one else chime in about the Weber rotisserie and if it laid perfectly flat when they bought it?
Nice new tools Darryl!
I own the same roti. Use it on my Performer. It does not sit perfectly flat but imo no biggie since the unevenness loses no smoke at all. I use it about 4x/month fwiw. If it lost any smoke at all, I'd be more concerned.

I love it.
 
#1 ALWAYS USE GLOVES WHEN HANDLING THE HOT SPIT!

Get some butchers twine and learn how to truss meat. It's easy. There are tons of instructional videos on YouTube. It helps to keep everything from cooking evenly, and not falling apart.

I never bother with checking with lid-temps.

Pack each charcoal basket to the brim, with lit charcoal, stick a disposable drip-pan in between the basket.

Load up the meat and get it spinning. Try to center the food, as much as possible, and align the forks so that the adjustment nuts are on the same side for both forks. It makes it easier to loosen them, for food removal, if both of those nuts are on the same side.

Use the lid.

Check the temps, of whatever it is that you're cooking, after an hour. If the cooks go longer, you can add lit, (or unlit), charcoal to the baskets. I generally use 10-12 lit.

Start with a chicken....it's one of the easiest, and foolproof, foods to cook on the rotisserie. You can skewer a couple of them on the spit and they generally done within an hour. That way, you get a feel for rotisserie cooking.

ALWAYS USE GLOVES WHEN HANDLING THE HOT SPIT!! USE TONGS OR THE GLOVES WHEN LOOSENING THE NUTS ON THE FORKS!

They come with counterweights, but I've rarely needed to use them, unless it's a big bird.

Hope this helps!
Great response!!!
 
The freezer has 5 picanha's in it right now.
I will have a hard time spinning those when they come off the indirect like nobodies business.....
It cuts like a steak and is some of the best beef I can make.
Of course searing at about 122, it comes out wall to wall pink.
Looking at some rib roasts, looks hard to get centered enough to spin true.
No counterbalance came with my rotis.


Back
Top