Need advice from Vision (B) Kamado owners...


RalphTrimble

TVWBB Diamond Member
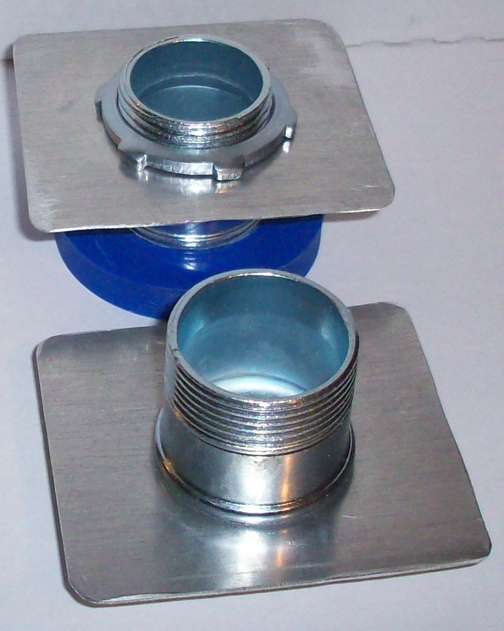
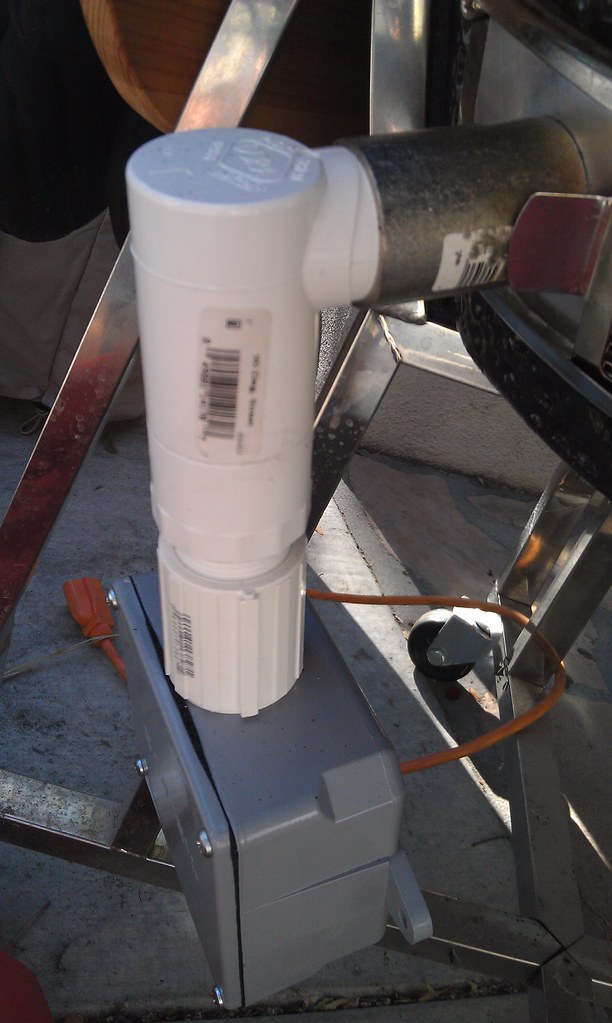
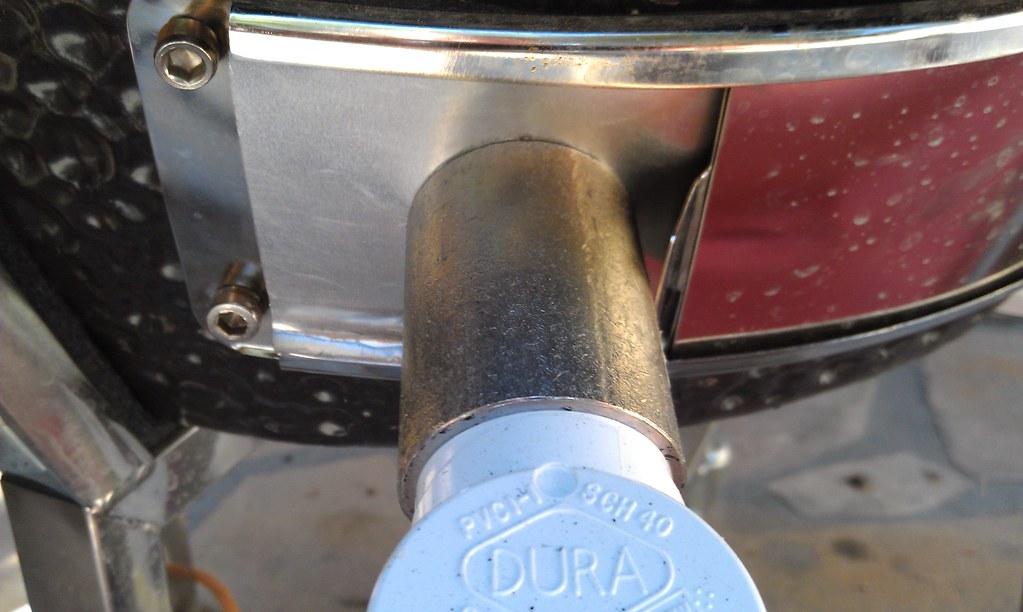
I need to make a grill mount plate for a Vision B Kamado for my Uncle to mount a Roto-Damper, unfortunately I can't seem to find a Vision Kamado to inspect the vent and make measurements. I am wondering if anyone out there has made a mount plate for the Vision B that can be inserted and removed, if so, could you please provide the dimensions of that plate? Also, I assume there has to be a slight curve to the plate? Pics would be helpful...
 
Ralph,

I have a BGE, but if the Vision B is also known as a Classic, BBQ Guru makes this adapter and claims it fits. I have it and can measure it for you. Probably not good enough for your purposes but as a last resort it might work.

Edit:
In case it is helpful, it is 84mm wide x 71 mm tall. The clip that you can put on it allows you to add roughly 15 mm in either direction if you need it. For $25, it was easier for me to just buy it than to try and make a custom plate.
 
Last edited:
I already have the mounting tube (threaded conduit connector) and a hole saw to fit, I just need to know the dimensions of the plate that fits into the vent on the Vision B Classic Kamado....
 
Ralph,
Edit:
In case it is helpful, it is 84mm wide x 71 mm tall. The clip that you can put on it allows you to add roughly 15 mm in either direction if you need it. For $25, it was easier for me to just buy it than to try and make a custom plate.

Thanks for that info, does that plate fit into a Vision B without the clip? Also, which orientation?
 
Last edited:
Thanks Allan, since I have finished up some other projects it's time to move on to this one... I don't like to delay, I like to keep busy. Your feedback when you get around to making your adapter will still be appeciated. The link you posted gave me the info I've been seeking, or more specifically this link has the info laid out nice and clear.
Thanks again.
 
Ralph:

I'm building one of these myself for a Vision Kamado Classic (model B), and a friend of mine is building two for his two Visions. I like your idea of using 3/4 inch copper tubing for the duct to the fan, as this would allow the fan to hang below the smoker such that it would be easy to just leave the fan on the smoker permanently, and just throw the Vision's cover when done. I'm just curious about how you attach the pipe to the flange/adapter that slides into the air inlet vent on the smoker. Did you just solder the 3/4 copper elbow to the copper plate? Where did you source the copper sheet metal?

Thanks!
 
I used copper plate that I got at Ace Hardware, in the section that has SMALL sheets of copper/brass/aluminum etc. They had a little display that had copper/brass/aluminum in rods, sheets etc in a different section from where all the larger metal sheets were kept, it was more in the tool section. To assemble the unit I drilled a very accurate hole (tight on the copper pipe) in the plate, then used a small section of pipe sandwiched between an elbow in front and a coupler in back. The copper pipe fit through the hole in the plate but the elbow and coupler would butt up against it, then I soldered the whole thing together with a torch like you would do a water pipe.
That said, what I am doing this time around is using a conduit connector that has a lip on one side and a nut on the other....
 
I FINALLY was able to see one of these Vision B Kamado's in person at Sams Club today. My measurements confirm that 67mm is the right height for that vent, the width should be fine anywhere from about 75-100mm. So a 1" conduit conduit connector, or even the 1.25" should fit as they need about 44mm or 52mm respectively to clear the nut on the inside.
 
A numeric system based on 10's is just more logical than dealing with fractions and measures based on 12's or 16's... I embrace the power of the decimal point!

Take the 67mm dimension for instance, converted to inches its 2.6378" which is 2+3189/5000", I'll go with 67mm thank you.... lol
 
Last edited:
Ralph:

Okay, thanks for the info. I had seen some builds where some had used conduit fittings, and I wonder about how you would fit the flange onto the vent plate. The Vision kamado has a metal window that slides along a stainless channel to vary the airflow through this window. If one were to use a flange with a conduit fitting, how can you slide that flange in the channel with the conduit fitting protruding out like this? Sorry if that's not clear, as I don't really know the technical terms for these.
 
That's kind of funny. In my day job, I run a couple of research labs where all measurements are made in metric units. But, around the house, it's all in imperial/US units. Oddly, I rarely need to convert between the two because they are just two different worlds. It's easier to think in terms of a 2x4 instead of a 38 mm x 89 mm!
 
Last edited:
If I read you correctly, you are talking about sliding the plate in the vent from the left side?
If you make a plate just the right size you should be able to slip it into the top lip all the way up and it will just slip past the bottom lip, then you can drop it into the bottom lip and the top lip will still hold it in place... That and the slide from the vent you close onto it. Some of the vents have a little bit larger top lip on the vent which makes for an easier fit. At least that how it worked out on my "FauxMado"...
Here's a pic of a couple of adapters I made tonight with the 1" conduit connectors.
VisionPlate.jpg

I guess I should probably sneak back out to Sams Club and see if it fits as expected...
 
That's kind of funny. In my day job, I run a couple of research labs where all measurements are made in decimal units. But, around the house, it's all in imperial/US units. Oddly, I rarely need to convert between the two because they are just two different worlds. It's easier to think in terms of a 2x4 instead of a 38 mm x 89 mm!

Yeah, I have to admit that we're still stuck on imperial units for some things here in Canada. Meat is primarily advertised by the pound since 6 pounds looks like a better deal than 2.7 kilograms. Almost all building supplies are in feet and inches, same for advertising sizes of housing units, because 2000 sq. feet sounds way bigger than 185.8 sq. metres and for cars, 300 horsepower sounds better than 220.65 kilowatts.

We had relatives from Switzerland over not too long ago and they were highly baffled by our random use of imperial units for things.
 
If I read you correctly, you are talking about sliding the plate in the vent from the left side?
If you make a plate just the right size you should be able to slip it into the top lip all the way up and it will just slip past the bottom lip, then you can drop it into the bottom lip and the top lip will still hold it in place... That and the slide from the vent you close onto it. Some of the vents have a little bit larger top lip on the vent which makes for an easier fit. At least that how it worked out on my "FauxMado"...
Here's a pic of a couple of adapters I made tonight with the 1" conduit connectors.
VisionPlate.jpg

I guess I should probably sneak back out to Sams Club and see if it fits as expected...

Okay, I think I get it now. So you are not sliding it into place from left to right, but instead, slipping the plate into position from the top and then adjusting it so it's held by the top and bottom lips on the vent flange. BTW, how are you cutting the sheet metal? Those plates look quite nice!
 
BTW, how are you cutting the sheet metal? Those plates look quite nice!

I just using some quality "aviation snippers" to cut the metal... I smoothed and rounded them a bit with a bench grinder and bastard file, flattened where needed with a bench vise. I drilled the hole with 1/4" to 1-3/8" step drill bit, one step from the top...
 
I just using some quality "aviation snippers" to cut the metal... I smoothed and rounded them a bit with a bench grinder and bastard file, flattened where needed with a bench vise. I drilled the hole with 1/4" to 1-3/8" step drill bit, one step from the top...

So I ended up building my own blower box (with provisions for adding a servo controlled damper later) out of a PVC electrical box and 1" PVC fittings. The blower sits at the bottom of a gray PVC box, with a 1" PVC threaded to unthreaded adapter at the top. This connects to a 1" PVC threaded coupler, and then to a 1" PVC elbow. The blower has the top side blocked with some duct tape, and the bottom side of the blower is mounted against the back of the box with a hole cut into the box to allow for airflow. The box itself is quite waterproof, and I configured an RJ45 jack at the bottom, affixed to the bottom side of the box with JB Weld.


14174407465_f36cc83012_b.jpg


The PVC elbow is then connected to the aluminum adapter plate via a 1" steel female coupler. The plate is attached to the steel coupler using a 1" male conduit bushing. The adapter plate itself was made from a piece of 70 x 90 mm aluminum sheet, and I bent about 3/16 inch sections along the top and bottom to better fit the plate into the Kamado's flange the holds the screen and vent cover. I cut a 1 1/4" hole in the plate using a large step bit (with plenty of WD40 to lubricate the metal), and the bushing was screwed into the coupler through the plate. The bushing protrudes only about 1/8" or so out of the back of the plate, so it is possible to slide the plate into the vent cover flange on the kamado quite easily. To enhance the fit, I also bent the plate to give it a radius, and I cut off the 3/16 inch sections on the right side of the adapter to allow the vent cover and screen to slide over a portion of the adapter. In this configuration, the fit is quite tight and secure, with little air leakage.

14171739712_6119e14af9_b.jpg


Overall, this worked reasonably well. I had a bit of an overshoot at the beginning because I didn't have the top vent closed down enough. Without the servo (which will be added soon), the natural convection pulls in too much air if the top vent is not minimizing airflow. After this, I had a pretty stable temp for most of the day, with me playing around a little with the pit temp (varied between 275 and 260). Also, things got a little crazy during the end of the cook, but that was because I was cooking both a pork butt and a brisket and needed to take out the former and wrap the latter. But, I'm very impressed by this!

14194524053_3138b316a5_b.jpg
 
Last edited:
Actually, the parts used to connect the plate to were a 1" rigid chase nipple...

http://www.homedepot.com/p/Raco-1-in-Rigid-Chase-Nipple-Connector-1664-15/203671552

and a rigid 1" threaded coupling...

http://www.homedepot.com/p/Raco-1-in-Rigid-Threaded-Coupling-1854-10/203671548

Both of these items were found near the electrical conduit section of Home Depot. After cutting the aluminum plate with aviation snips, I cut the hole for the chase nipple with a cheapo step bit from Harbor Freight. This was then threaded through the hole in the plate into the metal coupling. BTW, the metal coupling dissipates heat nicely, and was only warm to the touch throughout the cook (which was centered around 275F in the pit). The PVC parts did not seem to be affected by the heat.


Back
Top