First gasser rehab - Genesis Jr. - Modified with 3rd burner


If a picture is worth a thousand words, is a video worth a thousand pictures? Does that make a video worth a million words? I hope so, because I just didn't have the energy last night to do a proper summary of yesterday's work . . .

The day began with installing the black durawood slats in the z bars. The bottom shelf has one 9-slat rack from the 3000 and a 4-slat rack cut from the 3000's other 9-slat rack. (Not pictured: cutting, shaping and re-drilling the remaining 5-slat remnants to create the top right shelf)
2VWB023yusDNOA1vBqa0o1eoUYlYiCe2q5zIliZyxwaNzN9t4kkozJX-zJjymvGJfmP-qIFDYTl5ShSG3V7mcgKqDOponNx-lI4hOyAqUl9mLabplHxEdRXCUAre1CxydvB4-zsoAJs=w800


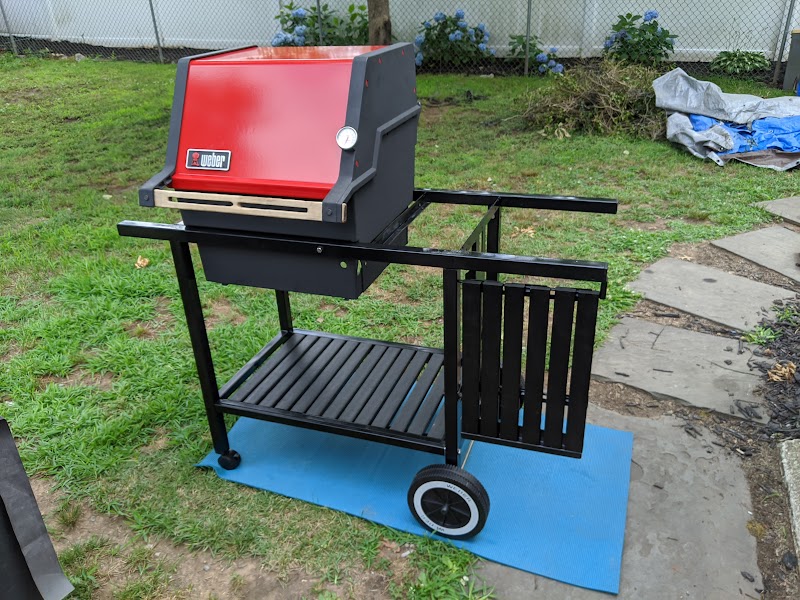
Looks fairly complete, no? NO. Lesson #472: It's relatively quick and easy to make it look like a grill; it's another thing entirely to make it work like a grill . . .

So, a valve cleaning was in order.
8qcXG5TbsGuWbVYdiovqVjVLbabPlQiKygw5WEh-LuxivSy2__pJyzIkKdzkRtOGz53Ib0jL42CzpSaTfEtthQLhB88NPooMZprLVEdmocqqJKsZV4L_hXQf8vqaatTzkvg6gMKh4X0=w800


Then, a combination of a C clamp, 3lb hammer, angle grinder and foul language to modify the 3000's center burner.
q_Z_IdePVxBVYO6snFol-jJPicm7DuNP9iWg2tryH1kDFtkSE95bx8YSMWw6YkDWk__bsip4jEycBRXEC9IKSlwHxPUIYZhtPWamX_Q2AprD9Kj1aju1-q3Ipc9-SBLswmPOHISdDZo=w800

RztdR_CqUYtmJFOdUm0B33FDOz3RnI2269DqW6bjl69hOCQB2YY19_UlazCmWu3QAXn6N7qEB3qIeGcXCqLkrwEn_odDMSuhXNKhsfmhdSGqjFhM7cKJUXJil601MWogHt-5pxoWIW0=w800


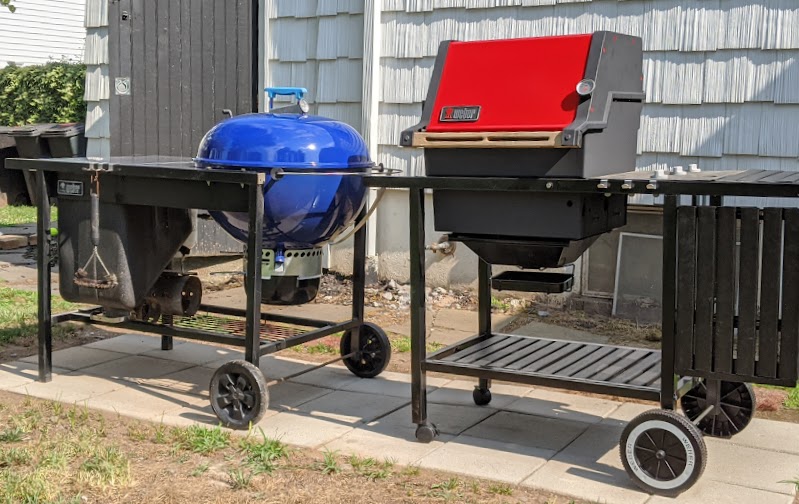
After looking at the first picture, I wasn't happy with the apparent gap at the end of the tube, so I took it back out and spent considerably more time trying to whack the thing shut. I tested it by covering all of the burner holes with duct tape and shooting water through the tube from a hose. Then a little break for beauty pageant . . .

l6T0P8hnMK4PIACPo5L4tJnU3Wdyk41sVFl0FEIiHKnCt-XXffX0ZuoCalBKE67ioQ4ipOVQQSsWuxA82FgieazGxjQRJL-RaC24h1pHt6-W_OFV0MH3D5kRJMkCNwpagdHiEAdlJTY=w800


Then onto the control panel and the actual functional bits. Clearly the control panel needed some cosmetic help.
90w27VEM1hEuRVlktKqQG-HM53qkQg2cgcPASWkaZBSKu7DxIR3VDnNAYROqoxTQ_rC1mo8di-YFUTamQngUvC66_Ks_VEsZRy8MFnfLX_drufLt9Iq3pJsILTTxfzSJ6Xc4d5fr3Zo=w800


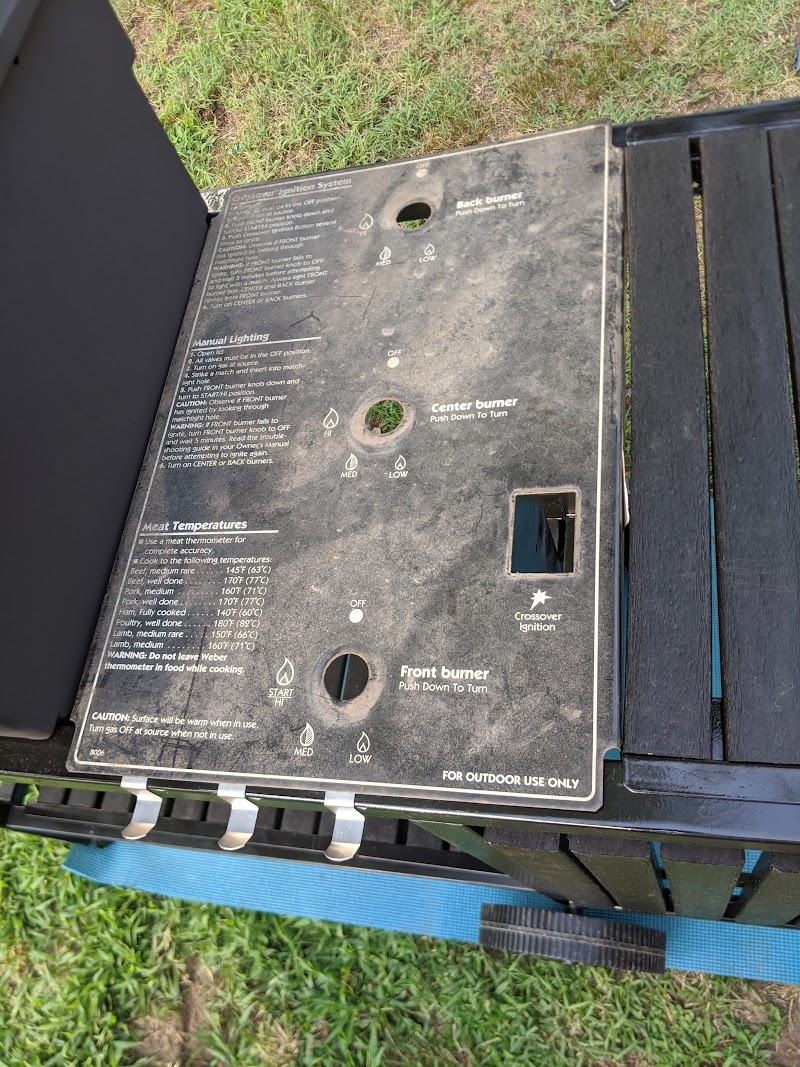
With a little hard work (and buying a new panel off of Offerup ;) ), it now looks like this . . .
AyaKRkao5N9xnlL762VeRSsl_VHGYRB7w-hFb7Ni5dwahRvBrSXBfH6V7ePrlxHbbFNRaZijTJJdAqMtw66jR1gO-DPN89O2qn_zH7Rx1eb5cNJCj-Jhp9UjaNxdlJiU1Zpv5LNzoHQ=w800


Then onto the manifold and panel support. The 1000's manifold brackets mount directly to the Jr.'s firebox and manifold support with no modification. I had previously cut the igniter bracket from the 3000. It's now installed with just a nice, tight compression fit. I may revisit to add some kind of L-bracket if necessary. One of the choices created by going to a 3-burner setup was what to do about the igniter. The Jr.'s igniter is mounted vertically on the front, directly underneath the control panel. The igniter panel also functions as a trim panel to cover the gap between the firebox and the right leg. I harvested the corresponding trim panel from the 1000. I'm not sure whether I'm just going to modify the plain trim panel from the 1000, or use the Jr.'s panel -- perhaps with an S-hook coming out of the unused igniter hole.
vGRSuPA0Os1yS5L-yTp_Z2hQmDCgahrw0BycnWrDPavPwyA9jd4lc_M8JPGKrXpKpKORvDdQ8GPW74Ls37yBs_qkEY6OexRteC0g9qUrUo_epc7cyljW2gTWhiSIelmJDBhiag5aB1Y=w800


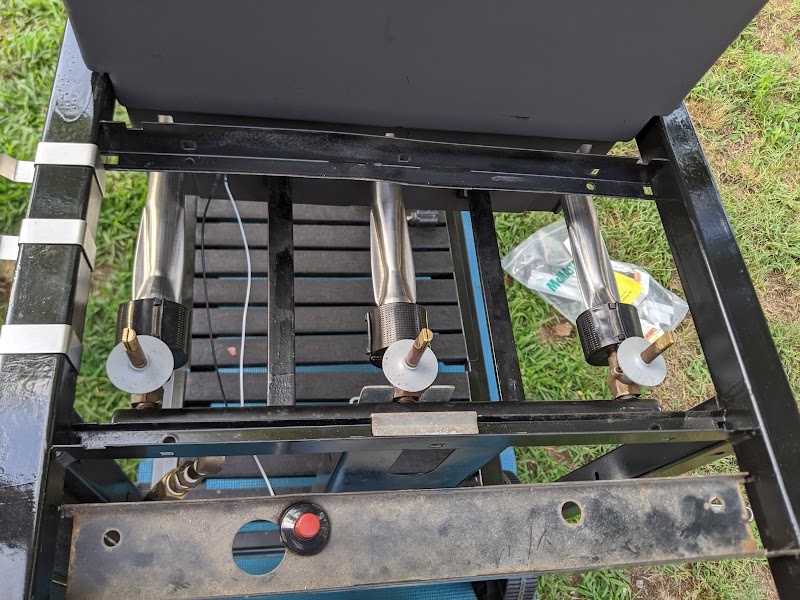
Once all the guts were in place, I did a flame test. Initially, the center burner only had flame at the crossover tube end, which made me think that maybe I didn't get the end sealed as well as I thought I did. Thankfully, an adjustment to the shutter fixed the issue.
PEVGvim_lwR_cGbdt4nB5t4D91PGxGEWOZj20O68ti5X4-I_eY8IjttcLWryVglJ4TZai3jJdZMtI5NC2SZ6FRffQReCnUtKk35jGj4CJYF071vQvK8G6WWh5-kk6C7T8O0Rt2bnq88=w800


So, now what? I'm not entirely happy with the top right shelf, so I'll probably dicker around with that to get the spacing the way I want. I still need to install the tank scale and figure out what to do about the front trim panel . . . and I guess I'll need to actually cook on it too. There will be pictures.
 
RE: front trim panel. I say you leave it as is and put an igniter in it for the side burner that you will be adding next.
t0sG1c6.jpg
 
RE: front trim panel. I say you leave it as is and put an igniter in it for the side burner that you will be adding next.
t0sG1c6.jpg

With the wider 3000 control panel, a side burner doesn't fit. I already checked. 🥴 For the time being, I put in the original panel.

IMG_20200704_091342.jpg

I also redid the top right shelf and put in one of the two surviving full slats from the original. IMG_20200704_094321.jpg
 
Drew,

I am going to be trying to restore a Jr. as well. Mine has that piece but it doesn't have the "Igniter" label. If you decide you would want to go with a plain panel - since you are moving the igniter - I would be very interested in buying/swapping to get one with the label. PM me if you are interested.

A VERY COOL grill. We all want to hear how hot that thing gets and how it grills with the bumped up three burner setup. You may well have come up with the solution to the Jr.'s mediocre grilling reputation :cool: !
 
Drew,

I am going to be trying to restore a Jr. as well. Mine has that piece but it doesn't have the "Igniter" label. If you decide you would want to go with a plain panel - since you are moving the igniter - I would be very interested in buying/swapping to get one with the label. PM me if you are interested.

Let me mull that over -- perhaps there's a way to reproduce the stickers.
 
For the first cook, I went with a slathered and rubbed London broil. IMG_20200704_180028.jpg

Let it warm up with the front burner on medium and it went to about 275. Turned the front burner up to high and started the cook.
IMG_20200704_182553.jpg

After about 20ish minutes, the meat was around 120, so I took it off and turned it up to 11
IMG_20200704_183936.jpg

Four minutes later
IMG_20200704_184425.jpg
IMG_20200704_184347.jpg

With the cast iron grates, it didn't take long to get grill marks. I'm thinking pizza might be next.
IMG_20200704_184806.jpg
00100lrPORTRAIT_00100_BURST20200704185537006_COVER.jpg
 
Last edited:
This morning, I peeked under the hood and found that last night's cook did a great job of releasing the crud on the flavorizers that I didn't feel like cleaning before a cook. I wire brushed them down and wiped them with some mineral oil. Then I figured it would be a good idea to heat things up to burn off any excess.

From a cold start with all burners set to warp speed: 1 minute to 300 degrees; 5 1/2 minutes to 550; 15 minutes to whatever this is.
00100lrPORTRAIT_00100_BURST20200705094209639_COVER.jpg


Back
Top