71’-75’ Redhead Resto Leg Socket Question (Pics Included)


Jeff_M_S

New member
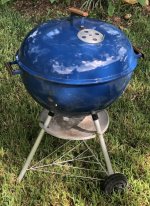
Hello everyone, I am the owner of a new Redhead I believe is from 71’-75’. FYI found in my (deceased) uncles’ garage, which he probably bought new. She was unfortunately left to rot, and I have luckily rediscovered her and intend to bring her back to life.0.jpg
unnamed6.jpg
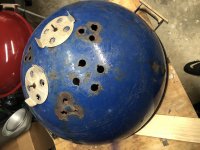
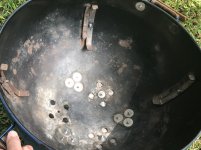
Unfortunately, 2 leg holders have completed rusted through the bowl and came out entirely with minimal effort when removing the legs (sucked getting them out). The third, while firmly attached, is also started to rust through and I can clearly see light coming through the cracks.

unnamed8.jpg

Anyways, I intend to use a drill and shore up with fender washers to reattach.

unnamed14.jpg
unnamed11.jpg
My questions are…

1. What size bolt should I use to reattach (e.g. ¼ - 20 )? This is the most stressful part of this resto and am worried about sizing.

2. Should I also shore up the third leg holder that is also rusted through enough to see light?

3. What type of drill bit is recommended for this. I want as much precision as possible.

Any help is greatly appreciated!
 
Last edited:
1) 8-32 or 10-24
Clearance drill for 8-32 11/64”
Clearance drill for 10-24 13/64”
2) yes shore-up the third leg socket. If you don’t have to remove, then don’t.
3) standard high speed steel HSS or cobalt drill with 135 degree point. A 118 point will work too.....Do not run at high rpm, as it will dull your drill bit quickly.

If the red leg sockets are not salvageable. Get a donor kettle and use an angle grinder to remove sockets and install on your red kettle.

I rehabbed a blue kettle last summer with two donor leg sockets. It was in much worse shape than your grill. Three grate hangers were also fabricated and installed with 6-32 screws.

Cheers
 

Attachments

  • 46637DC4-0B6B-46E5-A379-1499BF79ACFE.jpeg
    46637DC4-0B6B-46E5-A379-1499BF79ACFE.jpeg
    142.5 KB · Views: 24
  • 5B55C513-C1BE-4478-B553-07D6341E6EAB.jpeg
    5B55C513-C1BE-4478-B553-07D6341E6EAB.jpeg
    247.6 KB · Views: 24
  • 65EE0A08-BCDD-4EFF-9989-769067B38AFE.jpeg
    65EE0A08-BCDD-4EFF-9989-769067B38AFE.jpeg
    133.4 KB · Views: 24
Last edited:
When drilling the leg sockets, there is a small dimple where it was welded to the kettle. Try and start drilling in the center of the dimple. Clamp leg socket to a work bench.

Congrats on your red MBH kettle!
 
1) 8-32 or 10-24
Clearance drill for 8-32 11/64”
Clearance drill for 10-24 13/64”
2) yes shore-up the third leg socket. If you don’t have to remove, then don’t.
3) standard high speed steel HSS or cobalt drill with 135 degree point. A 118 point will work too.....Do not run at high rpm, as it will dull your drill bit quickly.

If the red leg sockets are not salvageable. Get a donor kettle and use an angle grinder to remove sockets and install on your red kettle.

I rehabbed a blue kettle last summer with two donor leg sockets. It was in much worse shape than your grill. Three grate hangers were also fabricated and installed with 6-32 screws.

Cheers
Thank you very much for the recommendations. I made a trip to Ace and decided to go with the 10-24, eight 1.25 inch fender washers, one 1.5 inch fender washer for the big trouble spot, and assorted washers/lock washers).

Also, not sure how good of an idea this was but there is one tab on one of the leg holders that is very weak and rusted through. I decided to try some jb weld high heat on that tab. Fingers crossed it works out.
3A7FF0CE-2818-46C4-A715-F75EF5A1F862.jpeg
1034D254-EA1E-4239-A990-C72A9888AB48.jpeg
 
I don’t have enough experience to weigh in, but I am very interested in what you are doing. I have a much rougher patent-pending red 26” kettle, the “Aristocrat.” I hope to do similarly to what you are trying on the leg repair. Mine has many large chips that I am going to attempt using the JB ultra high heat like bondo. From there sand smooth and paint with high heat caliper red and high heat clear coat (just on the repairs), possibly feathering gently with a Dremel tool.
 
On an other Kettle site I’ve seen guys using JB weld successfully. I’ve personally not encountered a kettle that would require it.

I have a few early 70s colored kettles where I’ve used either 8-32 or 10-24 to secure one tab on a leg socket.

Keep us posted on your progress. I’d like to see pics when your done with your rehab.

Cheers
 
I don’t have enough experience to weigh in, but I am very interested in what you are doing. I have a much rougher patent-pending red 26” kettle, the “Aristocrat.” I hope to do similarly to what you are trying on the leg repair. Mine has many large chips that I am going to attempt using the JB ultra high heat like bondo. From there sand smooth and paint with high heat caliper red and high heat clear coat (just on the repairs), possibly feathering gently with a Dremel tool.
I will definitely report back with results. For this initial repair, I am going to let jb weld extreme high heat set for at least 48 hours (24 hours is recommended) before I gently drill (very small to desired diameter). I have no initial plans of painting or finishing, but I will sand a bit to be flush. FYI, this is my first time using any jb weld product, so, for better or worse, I’ll know if it works or doesn’t.
 
Last edited:
On an other Kettle site I’ve seen guys using JB weld successfully. I’ve personally not encountered a kettle that would require it.

I have a few early 70s colored kettles where I’ve used either 8-32 or 10-24 to secure one tab on a leg socket.

Keep us posted on your progress. I’d like to see pics when your done with your rehab.

Cheers
I can’t wait for the final reveal, she has cleaned up very nice. I can guess what the “other kettle site” is, and I tried to initially to post this thread over there and was stuck with the “secret pass phrase” to make a post and gave up. Seriously, not sure what their deal is with user security over there, but obviously they want to make it next to impossible to join their community. Bold move if you ask me for such a niche hobby. Especially as a relatively younger person trying to break into this fun past time.
 
I will definitely report back with results. For this initial repair, I am going to let jb weld extreme high heat set for at least 48 hours (24 hours is recommended) before I gently drill (very small to desired diameter). I have no initial plans of painting or finishing, but will sand a bit to be flush. FYI, this is my first time using any jb weld product, so, for better or worse, I’ll know if it works or doesn’t.
That’s a good idea to let the Jb weld fully cure for 48 hours. before drilling and sanding.

I would not paint the bare metal. You can apply cooking oil to the bare spots when the kettle is warm. You can do this procedure a few times and it helps prevent rust.

Cheers
 
That’s a good idea to let the Jb weld fully cure for 48 hours. before drilling and sanding.

I would not paint the bare metal. You can apply cooking oil to the bare spots when the kettle is warm. You can do this procedure a few times and it helps prevent rust.

Cheers
I agree, this kettle has some battle scars, but I appreciate the history of the kettle and didn’t even think about painting over the “love dents” on the exterior... 4A93D9BB-B704-48DD-A971-218FC5B2A825.jpeg
There is a large spot on the top of the kettle that my aunt says she vaguely remembers being associated with a funny story. Unfortunelty, she could not remember the exact circumstances. I love the fact that this kettle was bought new by a family member anywhere from 45-50 years ago!
 
I do understand the view of not painting. I guess it comes down to how you feel about restoration of older things. In the gas grill restoration side, we are all trying for a like new look. While that isn’t practical for kettles - unless you can find a place to re-porcelain coat your grill and are willing to pay - I still think there occasions to resort to paint as part of making a kettle look nice again.

When I have access, I will post a few pictures of my Aristocrat. It looks so rough I feel I don’t have a lot to lose.
 
Cool pictures and back story on the red kettle!

I'm sure it's been mentioned, but keep those rust spots oiled up with some cooking oil to prevent the "infected" area from spreading or getting worse.
 
Just wanted to give a quick update. The restoration is complete and “Ruby in the Rough” is standing on her own again. I will have a full update this weekend with full pics. I liberally applied cooking oil to all rust spots and plan on doing a very hard bake (vortex full blast) to set the oil. Is this the right thing to do? Anyways see below for a small preview.
6B08074E-3E04-47B8-9B92-81B8B0355D4D.jpeg
A542160E-3857-47AB-AEA4-B09EF6DC3B8C.jpeg
Stay tuned!!
 
Nice restore on the lid and wood handle. Applying oil to the porcelain pops is the correct thing to do.

Any new pictures?


Back
Top