$25 Facebook Marketplace Find/Silver B Restore


RDean

TVWBB Member
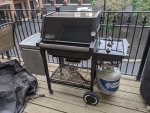
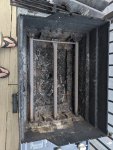
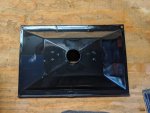
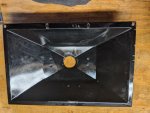
Thought this venue may appreciate my $25 Facebook marketplace pickup today. My old gas grill is rotten and have been on the lookout for one. This one just need some tlc cleaning, a new ignitor and possibly grate replacement but even the burner covers are in good shape. I did do a test light and all burners light nicely.

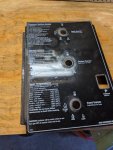
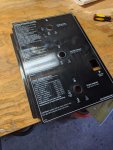
I was wondering if anyone could help with the serial number? It looks like it is a Weber Genesis Silver somewhere around the 2000 era. The sticker behind the plastic molding is not legible in the slightest.
 

Attachments

  • IMG_20200712_191109.jpg
    IMG_20200712_191109.jpg
    212.3 KB · Views: 110
Took my first pass at stripping her down tonight, I have her down to just the firebox and the frame right now. Everything came apart relatively easy, the end caps took some coaxing. The only sacrificial damage was a threaded insert in one of the end caps, I may be able to glue a new one in place.

One question, the burners and manifold look like they are in decent shape showing no major signs of corrosion. When I did a test light they light right up with all blue flame and very minimal yellow. Is it worth putting much effort into cleaning this stuff up or should I just purchase new? I assume the manifold might be a more expensive part so may be worthwhile cleaning that piece up.
 
From what you describe, the burners are doing great as is. It still wouldn't hurt to run a wire brush over the holes though. There really isn't much you need to do to the manifold. Unless it is a rusty mess, it is fine. The only thing is that you might want to lube the valves if they are sticky at all. There is a good sticky thread for cleaning the valves.
 
From what you describe, the burners are doing great as is. It still wouldn't hurt to run a wire brush over the holes though. There really isn't much you need to do to the manifold. Unless it is a rusty mess, it is fine. The only thing is that you might want to lube the valves if they are sticky at all. There is a good sticky thread for cleaning the valves.
Thanks Bruce, I'll send some pics out tomorrow
 
IMG_20200715_203851.jpg

Got everything stripped down fully, gonna start next with cleaning up the frame and kind of work in reverse order. I have pretty minimal work space to lay stuff out in.

Had a struggle with one of the lower frame bolts and a rotted threaded insert. I saw a couple other posts about replacement inserts that I will probably give a shot. Ended up having to cut the firebox frame bolt off and that one threaded insert that came off out. In retrospect I should have taken more time and tried to coax it a little better with a heavy dose of PB blaster.

After taking apart the frame I think I am going to try to run a wire brush to the areas I can reach, lots of internal rust powder.
 

Attachments

  • IMG_20200715_195837.jpg
    IMG_20200715_195837.jpg
    102.2 KB · Views: 33
  • IMG_20200714_200853.jpg
    IMG_20200714_200853.jpg
    218.3 KB · Views: 34
lol everybody seems to get the feet shot when they post birds eye view of the grill. Check the manifold piece that was the weak point on mine.
 
lol everybody seems to get the feet shot when they post birds eye view of the grill. Check the manifold piece that was the weak point on mine.
Didn't even notice! Don't call OSHA on me! 😂

The manifold needs a thorough cleaning but seems to be in good shape along with the burners. I think I am going to replace the crossover piece though it is showing some early signs of degradation.
 
Didn't even notice! Don't call OSHA on me! 😂

The manifold needs a thorough cleaning but seems to be in good shape along with the burners. I think I am going to replace the crossover piece though it is showing some early signs of degradation.
Dont worry i am guilty of the same feet shots i just happen to catch it before i posted mine. :p
Just wanted to clarify. You mentioned manifold and crossover piece. The vertical bar connecting all three burners is the manifold from what I was told. Which piece is the crossover or are you referring to another part that's not burner related? Still learning of course.
Here's my new burners for my model. You mentioned 2000 era. Funny how mine was also 2000-2001 model year too. I wonder if the burner and rest of the parts are the same. I have a Genesis Gold C.

IMG_2092.jpg

Depending on the part # for the complete burner kit with manifold Amazon has them anywhere from $20-$30 online. I'm sure thr guys here can post that part number for your mode specificallyl. Bruce, JGrotz, Bobby Segars and Sam Bee were able to to assist me with the correct part numbers for mine.
 
I may be a little late here, but that grill looks like it was made on the same day as mine. Other than mine missing the basket in the bottom, I can't spot a single difference from mine. Identical to the T. Single folding table, 3 burners, etc. I would say 2000 Silver B in black, model number 2251001.
 
The crossover tube is on the left. Its function is to deliver flame to each burner. The manifold is outside the cook box and is what distributes gas to each burner via valves.

Crossover.jpg
 
The crossover tube is on the left. Its function is to deliver flame to each burner. The manifold is outside the cook box and is what distributes gas to each burner via valves.

View attachment 9540
Bruce for some reason when you responded to me last time I thought the crossover tube was the manifold. LOL. The tube sort of does what you were describing so I didnt question it but was sorta scratching my head.
"George, I think you are talking about the manifold which supplies gas to all three valves and thus all three burners. Yes, they are sold seperately, but to buy a new one is cost prohibitive."
Now I get it this pic below is the manifold correct? Gotcha now!
IMG_2084.jpg
 
IMG_20200720_202449.jpg

A couple of progress pics from my evening spent cleaning, was able to get the attached pictures done and all of the major frame pieces. Starting to get excited as little by little gets done.

Any tips for repairing the porcelain on the drip pan? The pan does not have any holes and overall minimal but has a little porcelain damage on both sides. I would be concerned high temp paint may it just wear off overtime.
 

Attachments

  • IMG_20200720_192441.jpg
    IMG_20200720_192441.jpg
    159.7 KB · Views: 19
  • IMG_20200720_193742.jpg
    IMG_20200720_193742.jpg
    171.1 KB · Views: 19
  • IMG_20200720_192240.jpg
    IMG_20200720_192240.jpg
    123.2 KB · Views: 18
  • IMG_20200720_192230.jpg
    IMG_20200720_192230.jpg
    144 KB · Views: 19
  • IMG_20200720_184333.jpg
    IMG_20200720_184333.jpg
    209.9 KB · Views: 18
Not much you can do about the drip pan. It isn't a show piece, so as long as it is serviceable, just keep using it.
You look to be coming along quite well.
 
I got some of the Eastwood frame coating to spray up inside of the frame and was then going to give everything a couple coats of paint.

Would you guys have a recommendation on whether it would be better to reassemble the frame before painting or if it is better to paint apart? I have some concerns about spray bolt threads and things of that nature is the reason for the question. I have a cheap set of taps that I could get se to clean up the threads I supposed if it becomes an issue.
 
I guess I would do some before assembly, but you probably want to do most of it after wards so that you are not chipping and scraping it away during reassembly. Maybe get inside the top parts before hand.
 
I got some of the Eastwood frame coating to spray up inside of the frame and was then going to give everything a couple coats of paint.

Would you guys have a recommendation on whether it would be better to reassemble the frame before painting or if it is better to paint apart? I have some concerns about spray bolt threads and things of that nature is the reason for the question. I have a cheap set of taps that I could get se to clean up the threads I supposed if it becomes an issue.
It's much easier to paint in pieces if you are spraying the Eastwood inside. Careful with the Eastwood on the upper frame that comes in contact with the firebox. I was a bit heavy handed with the Eastwood and noxious fumes emanated from the frame for a couple of hours when I initially fired it up.

The Eastwood frame paint is very messy to work with. It's designed to be runny to get into every nook and cranny. You will likely have to sand down the overspray that runs out and sticks to the outside of the frame before you paint the outside. Get the Eastwood paint prep spray. You can mount the 24" nozzle from the frame paint to the prep spray to clean out the 24" nozzle when you're finished.

Here's the issue I had:
https://tvwbb.com/threads/genesis-1000-restoration-almost-finished-and-my-grill-is-smokin’.79899/

Something like this might be better because it is heat rated to 400 degrees:
https://www.amazon.com/dp/B07W7T48TY/?tag=TVWB-20

I know Eastwood sells that 24" nozzle separately, so the heat rated encapsulator with that nozzle might be safer to use.


Back
Top