INTRODUCING: the "Roto Damper"


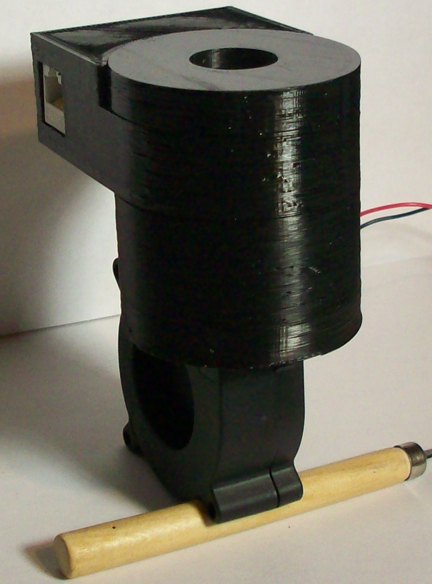
I put all the junk in the top part so the bottom only holds the blower, and the output is out the side so I can hook it to the grill using a 80 cent 1" electrical conduit connector. Your design looks cleaner from the front because mine has the input jack messing up that smooth curve. It works ok, but I still need to make the bottom piece, which will be pretty small because it just needs to hold the fan.

I debated on where to put the servo, I decided that I would use the bottom half because I wanted the top half to be as sealed off as possible, cause a leak on the top half undermines the effectiveness of the valve. The servo would fit into the top half of my design, but there would have to be a hole for the servo wire to come out. I guess the hole could be sealed off with silicone, but I put it down below cause a little leak down there will not effect the valves performance at all.

If I put the servo up top the bottom half could be much smaller (like your design), which is another reason I put it down below. I kinda like having the bottom half large enough so you can see it rotate as it does it's thing. One of the motivations for this design came from my experience with my flap valve damper, the flap was all internal and so I could never really tell what position it was in (FOR SURE). The Roto-Damper has a true WYSIWYG design, when you see it's position you KNOW how much the valve is open. And this all makes the Roto-Damper easy to set manually if you don't have your HM hooked up for some reason...
 
OK, if it is just kinda pushed over the vent tabs then it might indeed work loose...
How about using a spring inside the tube, clip it though the hole on the grill vent and on the end of the tube (or to a screw you add to the tube)? That should hold it tight to the grill....

I'm not sure. A spring might work okay. I might be able to hook it to the piece on the inside of the drain.

11810103174_a69855cec4_c.jpg


I'm a little concerned about the restriction of air flow caused by the nylon washer and the crisscross pattern. But, I don't seem to have issues with temps now, especially on the low end. I could trim it and use the spring like you suggested. I don't know.
 
I'm not sure. A spring might work okay. I might be able to hook it to the piece on the inside of the drain.

I would use a spring (and perhaps a wire loop on one end) to pull it tight to the grill... Simple enough. I think it should work well as long as you are able to control the pit with it the way it is now....

That takes care of the grill end, so you just need to mate that pipe to the roto-damper. I can make a custom cap to do that, but you will have to tell me the dimensions to make it. I would say the cap should be made to press into your drain tube, hopefully I could get it tight enough to press and fit and hold snug like that. If it is a bit loose you could wrap some tape around it until the press-fit is tight enough.

Can you give me the inner and outer dimensions of that drain pipe you have there?
 
Hi Ralph,

I was wondering if you'd be willing to print me up a copy of the roto damper? The only 'issue' is that I live in the uk so postage is a bit more difficult to arrange!

Let me know if you're willing.... Many thanks

Nick
 
This this is awesome and built like a plastic tank. I made my own cap to allow a 1" electrical conduit fitting to slide right on. Cut a piece of 80mm x 50mm sheet metal, made a hole with a conduit punch, then rounded down the edges with the dremel.


OpenSCAD code for the 1" conduit cap
Code:
e=0.01;
$fn=128;
difference() {
  cylinder(r=30, h=10);
  translate([0,0,5]) cylinder(r=55/2, h=5+e);
  translate([0,0,-e]) cylinder(r=33.6/2, h=10+2*e);
}
 
This this is awesome and built like a plastic tank. I made my own cap to allow a 1" electrical conduit fitting to slide right on. Cut a piece of 80mm x 50mm sheet metal, made a hole with a conduit punch, then rounded down the edges with the dremel.

OpenSCAD code for the 1" conduit cap
Code:
e=0.01;
$fn=128;
difference() {
  cylinder(r=30, h=10);
  translate([0,0,5]) cylinder(r=55/2, h=5+e);
  translate([0,0,-e]) cylinder(r=33.6/2, h=10+2*e);
}

Looks awesome Bryan, I like the conduit connector for the grill adapter!

I tried to design the unit to be sturdy, and in V2 I wanted to add some versatility, the caps work out great cause you can make a cap for any blower or any type of grill adapter. Hard to believe it only took those few lines of code for you to make your custom cap!

Glad to see you got a unit together, hope it works well for you...
 
I made my own cap to allow a 1" electrical conduit fitting to slide right on. Cut a piece of 80mm x 50mm sheet metal, made a hole with a conduit punch, then rounded down the edges with the dremel.

Bryan, what size BGE are you running? I am trying to make notes on the grill adapter size for different grills... I think different size BGE have different size vents?
 
These look fantastic, guys. Just got by Heatermeter working with a fan, now I can't wait to get a servo working next.
 
Bryan, what size BGE are you running? I am trying to make notes on the grill adapter size for different grills... I think different size BGE have different size vents?
I have the large BGE. I haven't seen another sized egg in years so I don't know if the have different sized vents. 80mm height is enough that you can insert it into the top part of the vent and then drop the bottom half in, so no sliding. I blew it drilling the hole for the servo wire though. "Hrmm, here seems to be the center of travel" Nope! That's not even close. The cord is plenty long to be able to reach the other side though so no big loss.

I don't know who pointed out that the top channel is deeper than the bottom, but you're a genius! I was having a really had time sliding a flat piece of metal into a curved space and had even tried to work out a spring-loaded affair. Oh, so much wasted time.

The rotodamper is working great, keeping the grill at 300F +/-2 degrees for the past 3 hours. I had the blower fall out when it first fired up but it might have just worked its way loose as I carried it to the grill... or might not have been all the way in to begin with. This could easily be remedied with any tiny dot of adhesive though. Again, I love the caps idea!
 
The rotodamper is working great, keeping the grill at 300F +/-2 degrees for the past 3 hours. I had the blower fall out when it first fired up but it might have just worked its way loose as I carried it to the grill... or might not have been all the way in to begin with. This could easily be remedied with any tiny dot of adhesive though. Again, I love the caps idea!

Thanks for the feedback on the BGE adapter...

I think something is a bit off with the tolerance of your prints, cause my parts tend to be on the tight side rather than loose. The blower and caps hold really tight on my prints, so much so that they are hard to get apart at times. The beauty is a dab of silicone or glue will fix you right up, I prefer silicone cause it is removable.

I noticed you screwed the pooch on the hole drilling for the servo wire. I used to use the mount for the blower as my reference but now that the blower mount is a separate unit you need to make note of the back side when the valve is half open and drill there...

Kinda fun to watch it work isn't it!
 
I just got a new spool of black ABS filament and am printing the first run of Roto-Damper V2 parts with it....

Introducing.... Darth Damper... "Roto, I am your father!" LOL

DarthDamper.jpg
 
Introducing.... Darth Damper... "Roto, I am your father!" LOL
hahahahah love it

Now that you mention it... When I first tried to fit the blower into the square hole it was wicked tight. So tight that it buckled the blower output and separated the seam on it. I hit it with a file for X seconds (I can't remember, there was scotch involved, but not more than a minute) and it fit tight and didn't look like it was going to break the blower. I completely forgot I did that, maybe I was just too excited to get it together. :-D
 
Bryan,

Any idea what that style of conduit fitting is called? I stopped by the local hardware store and they didn't have anything that looked quite like that.

Thanks,

Aubrey

This this is awesome and built like a plastic tank. I made my own cap to allow a 1" electrical conduit fitting to slide right on. Cut a piece of 80mm x 50mm sheet metal, made a hole with a conduit punch, then rounded down the edges with the dremel.


OpenSCAD code for the 1" conduit cap
Code:
e=0.01;
$fn=128;
difference() {
  cylinder(r=30, h=10);
  translate([0,0,5]) cylinder(r=55/2, h=5+e);
  translate([0,0,-e]) cylinder(r=33.6/2, h=10+2*e);
}
 
Bryan,

Any idea what that style of conduit fitting is called? I stopped by the local hardware store and they didn't have anything that looked quite like that.

Thanks,

Aubrey

I'm pretty sure this is what he used. I've been over at Home Depot a few times recently checking out parts for grill adapters and that is what I came up with.

The conduit nut side would go into your grill mounting plate, it has a nice fat lip so it shouldn't be picky about the hole size (which needs to be 1.25" for this connector) and it should seal off pretty well... The other side you just pull the nut off and it will thread into a Roto-Damper cap with a 35mm hole in it. Another nice thing is it is very affordable at $1.07!

I was looking for a right angled solution as well, which isn't as easy. With the BGE or similar Kamado's the roto damper needs to be offset either outward before the bend or downward after the bend. The above connector will mate with 1" conduit, unfortunately I don't think you can make a very sharp right angle with 1" conduit, and I didn't find any molded 1" right angles (or the ones I found were plastic). That was just the local Home Depot, I haven't checked Menards or online outlets yet, got derailed by repairs/mods to my 3D printer.....

EDIT:

Searching HomeDepot.com I came up with what looks like a few viable right angle options.

1" Metal Right Angle Compression Connector

or if you step down to 3/4":

3/4" Short Radius Elbow

Both of those look like they would work easily, they have the lip for mounting to the grill plate. In the bottom side you would insert a piece of conduit to go down a few inches and connect to the Roto-Damper below the grill body.
 
Last edited:
Any idea what that style of conduit fitting is called? I stopped by the local hardware store and they didn't have anything that looked quite like that.
Not sure what it is officially called but it is an electrical (EMT) conduit connector. Home Depot $0.84 calls it a "set screw" connector. They have them in sizes from 1/2" to 2". I didn't see a really good right angle that didn't cost stupid amounts of money so I just went this direction. A piece of 1" PVC right angle Female to Male (street connector?), the female end fits over the conduit, but I didn't want to have to glue it in place because it looked like it could fall off under the weight.
 
I've always been leery of galvanized metal around any heat source, but perhaps I'm overly cautious... you don't actually have to reach the melt point of Zinc to have it be a problem - from wikipedia (yeah yeah, not the best source but it was a quick hit search) :

Galvanized steel is suitable for high-temperature applications of up to 392 °F (200 °C). The use of galvanized steel at temperatures above this will result in peeling of the zinc at the inter metallic layer.

I know that the pet food bowl I'm using to interface with the bottom of my mini-wsm has to be very close to that point during high heat cooks. I'm sure those with BGE's or other ceramic cookers probably have less of a problem with heat there, but those of us with thin metal smokers who have to use significant standoffs to keep from melting fans might have an issue here & I'd sure rather be safe than sorry.
Haha I don't know, should I be? Am I going to melt the zinc off or something? It doesn't get 900F down there (melting point of zinc).


Back
Top