Got a problem! Any ideas


Troy Gamm

TVWBB Fan
Got a problem! Any ideas (Solved)

Ok, got everything done and tried to power it up tonight. Started with the 12V since I didn't read the instructions that stated it is preferred to use the micro USB for first boot. Upon power, the first and third lines on the display are solid rectangles in each character spot. The first time I tried to power it up, the yellow light came on then the green light. The green light stayed on until I pulled power. The second time I tried power with the Micro USB, the yellow and green led lights both stayed on. So I tried with the Micro the third time and this time the yellow led lights very briefly and then goes out with no led on. I hooked the HDMI up to my TV and here is the result:


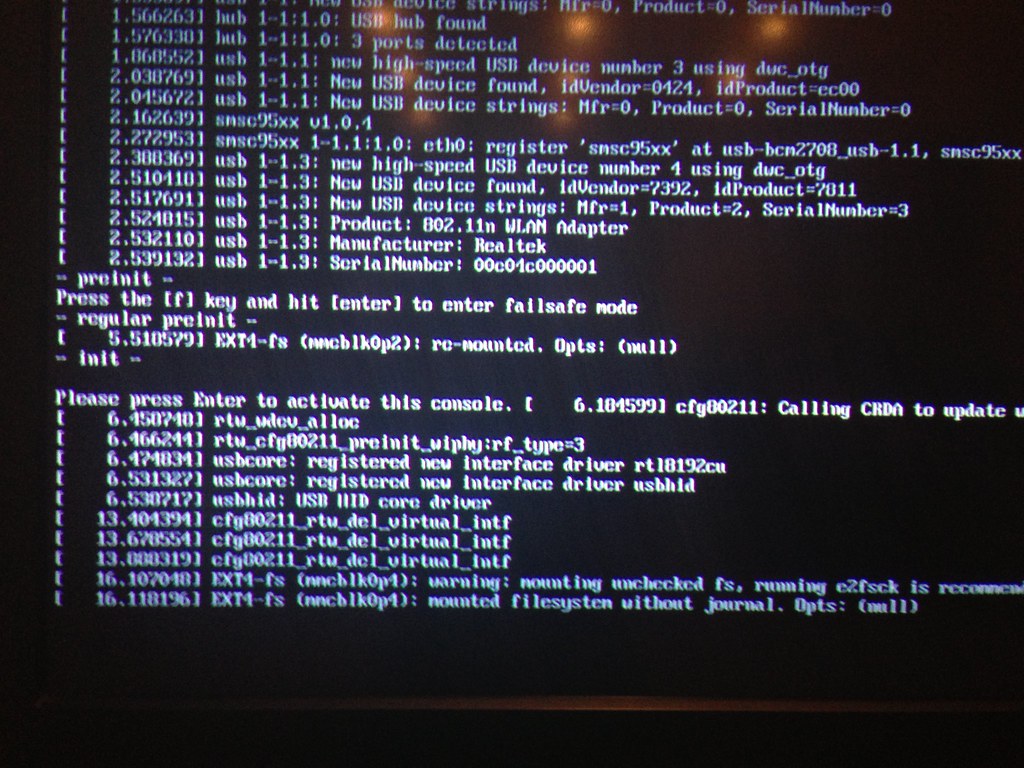
Note that I get the same output via the HDMI whether I power it from the MicroUSB or the 12V.


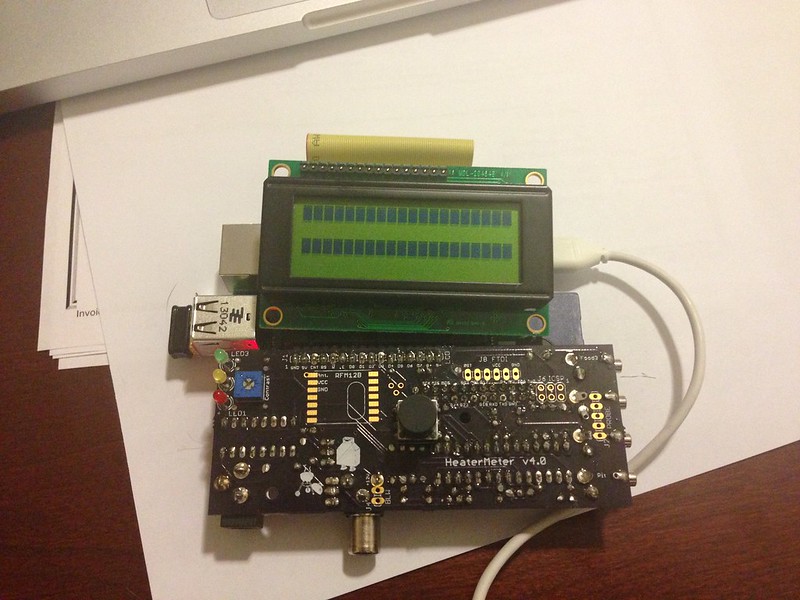
Here is a picture of the board and lcd:


Any ideas?
 
Last edited:
Plug in a usb keyboard, boot the rPi and after it stops at

"mounted file system without journal"

Hit ENTER to enter the console, then type "avrupdate /lib/firmware/hm.hex" (no quotes) and hit ENTER

This will force the ATmega on the HeaterMeter board to be flashed. Hopefully it will erase then flash the chip and you will see "no pit probe" in the heatermeter display soon there after...
good luck
 
Last edited:
Thanks Ralph. I will try that tomorrow. Was I not patient enough the first time and could have interrupted the initial boot phase? I waited a couple of minutes before unplugging it.
 
IDK really, but that is exactly what happened to me on first power up and that is how I got it working (in a nutshell)
It turns out I had soldered the two IC's a bit too lightly and solder hadn't made it to the component side of the board, on first boot the flash failed due to the bad solder, but it never tried to flash again. If you have trouble with the flash I would suggest you check your solder work closely on the IC's making sure solder has made it through to the component side of the board.
Good luck...
PS I wrote a more detailed post about getting mine up and running, you might find more help there when you get back to work on it tomorrow...
http://tvwbb.com/showthread.php?40900-Initial-Power-Up-some-issues-eventual-SUCCESS!
 
Thanks Ralph. How did you eventually get the solder to flow to both sides. I read your post about flowing to both sides so I tried to not be stingy with the solder but it would just build up on the back side of the board instead of flowing through the hole. I noticed that almost all of my Mega socket pads were still gold but I couldn't get the solder to flow to both sides.

Do I need a higher temp on the soldering station. One person recommended 650F and that is what I used.

Thanks for the help!!
Troy

It is funny but this is quite addicting. I haven't got my first one working yet and I just ordered enough components and HM boards for 4 more. Some will be gifts.


IDK really, but that is exactly what happened to me on first power up and that is how I got it working (in a nutshell)
It turns out I had soldered the two IC's a bit too lightly and solder hadn't made it to the component side of the board, on first boot the flash failed due to the bad solder, but it never tried to flash again. If you have trouble with the flash I would suggest you check your solder work closely on the IC's making sure solder has made it through to the component side of the board.
Good luck...
PS I wrote a more detailed post about getting mine up and running, you might find more help there when you get back to work on it tomorrow...
http://tvwbb.com/showthread.php?40900-Initial-Power-Up-some-issues-eventual-SUCCESS!
 
Was I not patient enough the first time and could have interrupted the initial boot phase? I waited a couple of minutes before unplugging it.
This actually made it to The FAQ! It is completely booted when you see it mount mmcblk0p4 (the configuration partition), but you can start doing things once you see it say "Press enter to activate this console" which you see in your screenshot about 10 seconds earlier.

The green and yellow lights aren't explicitly set by the HeaterMeter v7 software so they're not really indicating anything, and the red light will only blink twice on bootup once the firmware is installed. I'd try what Ralph said about the avrupdate command once you see the "press enter" and see what happens.
 
Ralph,

Tried the suggestion and it comes back with "permission denied". Does that tell us anything other than it doesn't see me as it's master:)

EDIT: I just had a thought. I used an existing SD card that I have used and tried to image it with my mac running parallels. When parallels couldn't see it I thought that maybe it needed to be reformatted so I used the mac to reformat it with a fat32 file system. I then was able to image it and I thought everything was good then. Was I not supposed to reformat it fat32?


Plug in a usb keyboard, boot the rPi and after it stops at

"mounted file system without journal"

Hit ENTER to enter the console, then type avrupdate /lib/firmware/hm.hex and hit ENTER

This will force the ATmega on the HeaterMeter board to be flashed. Hopefully it will erase then flash the chip and you will see "no pit probe" in the heatermeter display soon there after...
good luck
 
Last edited:
If your rPi is booting as shown in your screen shot then it is reading the SD card fine. It looks like your rPi is working and loading fine, now you just need to get it to talk to the Arduino board (HeaterMeter) and program the ATmega chip.

On the permission denied, I have never run into that so perhaps Bryan could comment on that.

My guess is still that your ATmega is not flashed, and prob because one of the two chips is not soldered in well (as were mine of first power up). This may be the reason for the permission denied, but I'm not sure.

If I were you I would get a magnifying glass and inspect your solder work, make sure there are no bridges between solder joints (some of them are pretty close together and easy to bridge). As for getting solder to flow to the component side, sometimes it helps if you move the leg you are soldering around a little with the soldering iron, this sometimes opens up the path for the solder to flow down the leg though the hole.

Ordered FOUR more? That's a LOT of smoker controllers man, WOW!
 
Tried the suggestion and it comes back with "permission denied". Does that tell us anything other than it doesn't see me as it's master:)

EDIT: I just had a thought. I used an existing SD card that I have used and tried to image it with my mac running parallels. When parallels couldn't see it I thought that maybe it needed to be reformatted so I used the mac to reformat it with a fat32 file system. I then was able to image it and I thought everything was good then. Was I not supposed to reformat it fat32?
I can't even imagine what would cause it to say permission denied. When you press enter does it say:
Code:
root@OpenWrt:/#
If you just type `avrupdate` (no quotes) what does it say?

EDIT: But no the card doesn't have to be formated fat32, that is wiped when you flash it. You can also flash the image directly from the mac command line using a procedure like there is here, up through step 4 (copy to entire disk)
http://www.embeddedarm.com/support/faqs.php?item=10
 
SUCCESS!!

Here is what I did.
1. Took Ralph's advice and since I had plenty of solder on the backside I just put the iron back on and wiggled the pins to try and get better flow. Not perfect through flow since I can see gold still on alot of the frontside pins. Put the Mega back in and booted it up. It still stopped at the same spot but I then took Bryan's advice and typed avrupdate. Then it looked like it flashed the Mega and now it looks good. Display is lit and says "- No Pit Probe -".

SWEET!!

Wanted to see if it was ok after turning off and back on. After I pulled the power and plugged it back in, the boot up process still stops at the same mounted file system without journal but the display says "- No Pit Probe -" so I am guessing it is good to go.

I am one happy camper.

Thanks for the help guys!!! Now to figure out best way to rig the fan. I will start a new post for that.
 
Congrats on you success! That is EXACTLY the same scenario I faced on my first build, I've been good to go ever since I saw the magical words "no pit probe", so I think you are set now...
Not sure if you got your network sussed out yet, but I detail the steps I took to get mine working on the thread I linked earlier, including links to the posts I searched out that helped me...
 
I can't even imagine what would cause it to say permission denied.....

If you just type `avrupdate` (no quotes) what does it say?....

Bryan, to flash the AVR will the command avrupdate work alone just like that, or do you need to reference the file like "avrupdate /lib/firmware/hm.hex" ?? I found the latter (including path to file) in another thread, it worked for me, but I am wondering why it didn't work for Troy? (maybe he typed just the path and didn't type avrupdate before it?, could that be why he got the permission denied?) Anyhow, I just want to know the proper command to force flash the AVR for reference....
 
When avrupdate runs, if it detects a blank chip it will flash /lib/firmware/hm.hex before anything you pass on the command line.
Code:
root@hmpi:/# avrupdate
Stopping LinkMeter OK

LinkMeter platform is BCM2708
AVR fuses 62d907 blank ATmega chip detected, flashing default
hmdude: compiled on May 31 2013 at 14:47:01
Using port: /dev/spidev0.0
Loading ihex file: "/lib/firmware/hm.hex" (24614 bytes)
Device signature: ATmega328P
Low: 0x62 High: 0xd9 Ext: 0x07 Lock: 0x3f
Chip erased
  100% |##################################################| 24614 (9.5s)
Verifying...
  100% |##################################################| 24614 (8.5s)

If there's something already on the chip then it will only flash what's on the command line, or nothing if you don't specify
Code:
root@hmpi:/# avrupdate
Stopping LinkMeter OK

LinkMeter platform is BCM2708
AVR fuses ffd705 OK

So if you know the chip is blank you can just do avrupdate, but if you want to force it back to the bundled firmware regardless of what is on it then you have to pass the path or a URL


Back
Top