Post your HM4.0 success here!


D Peart

TVWBB Pro
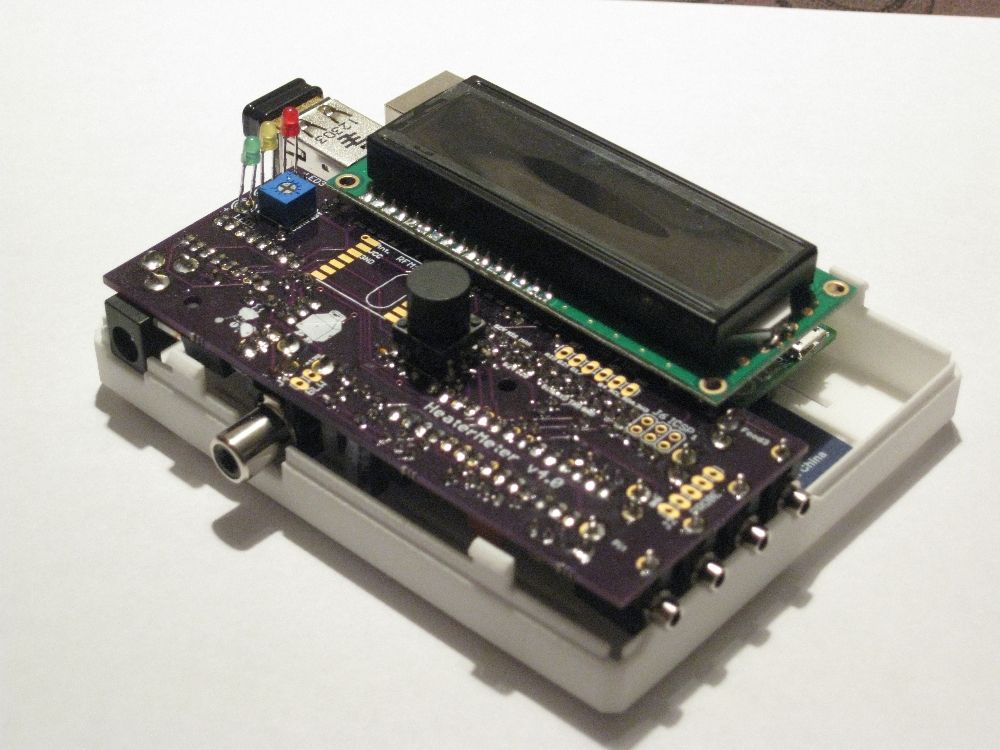
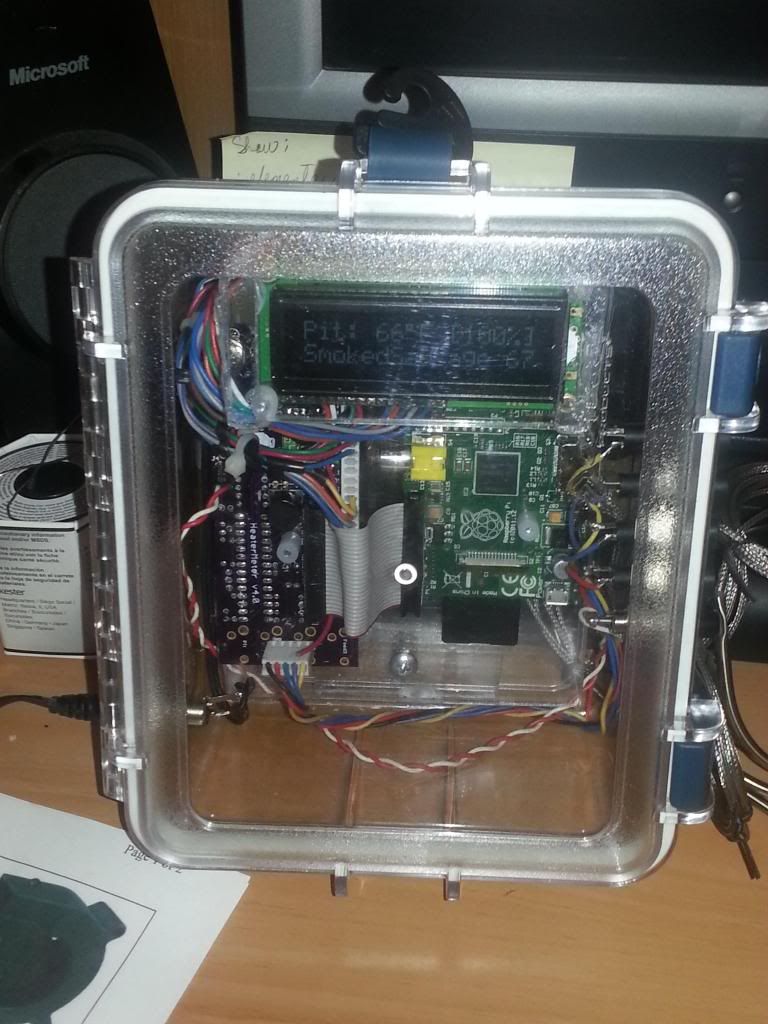
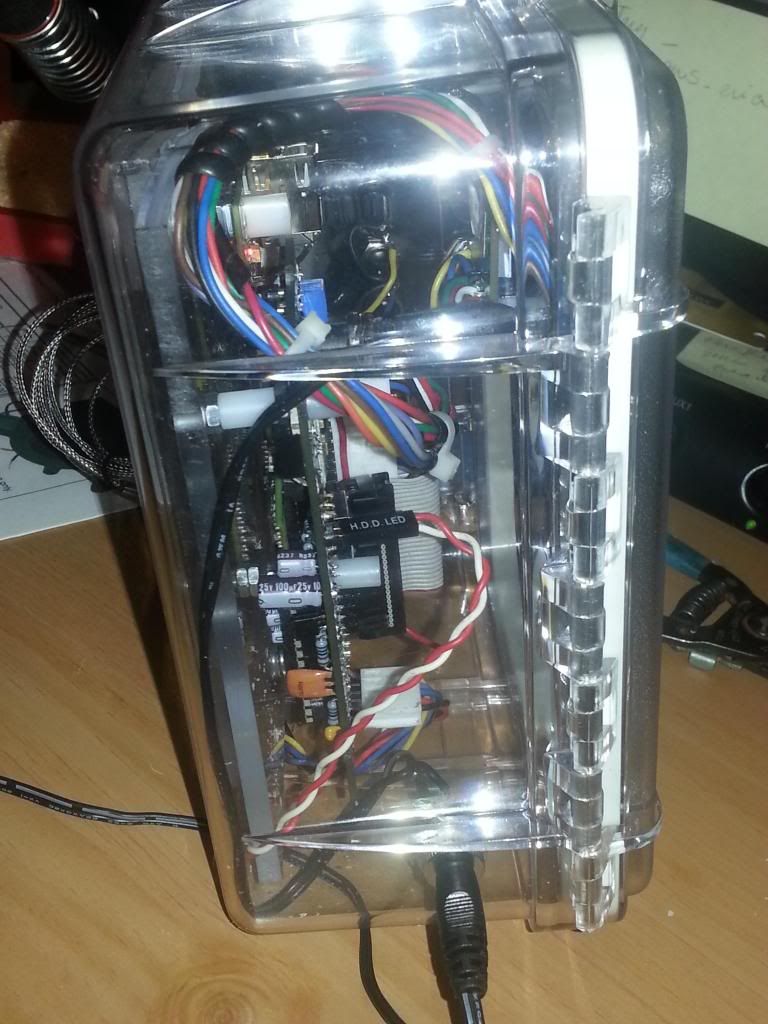
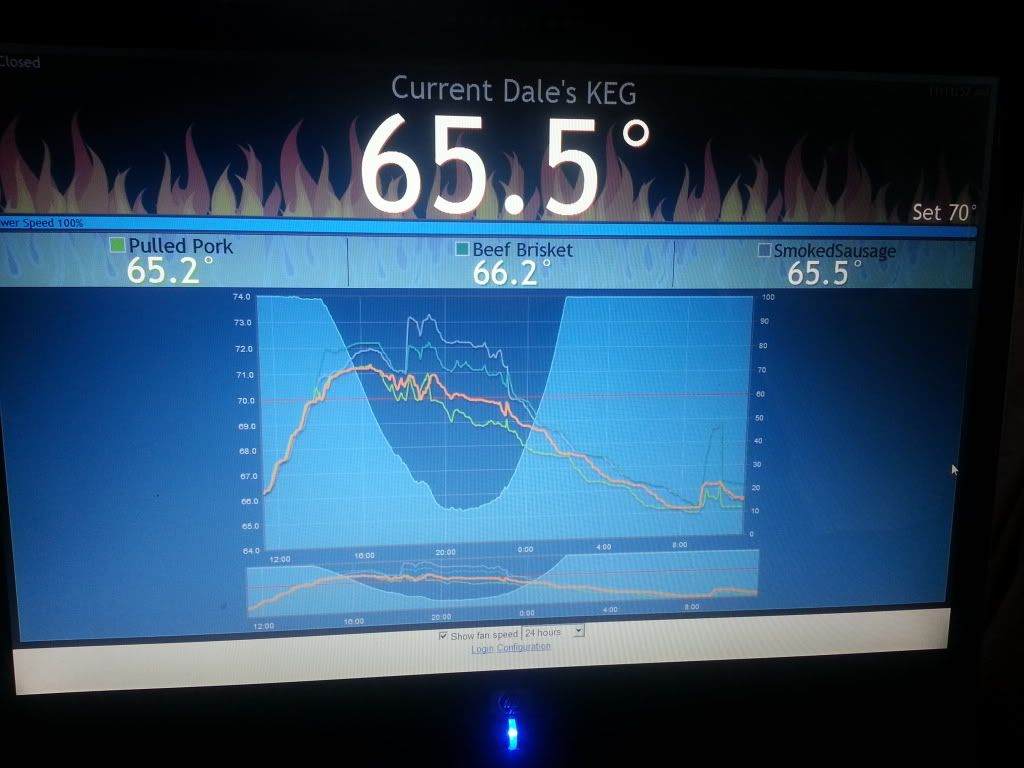
Got my boards yesterday, finished up a different electronics project today so I thought I'd whip up a 4.0 HM. Built the board using the awesome directions. I had previously gotten the rPi up and running. So I hooked them together, powered up and no love :( I thought that it would flash the AVR automatically, like mentioned in the wiki, but I just manually flashed it with v3.2+ and it is up and running.

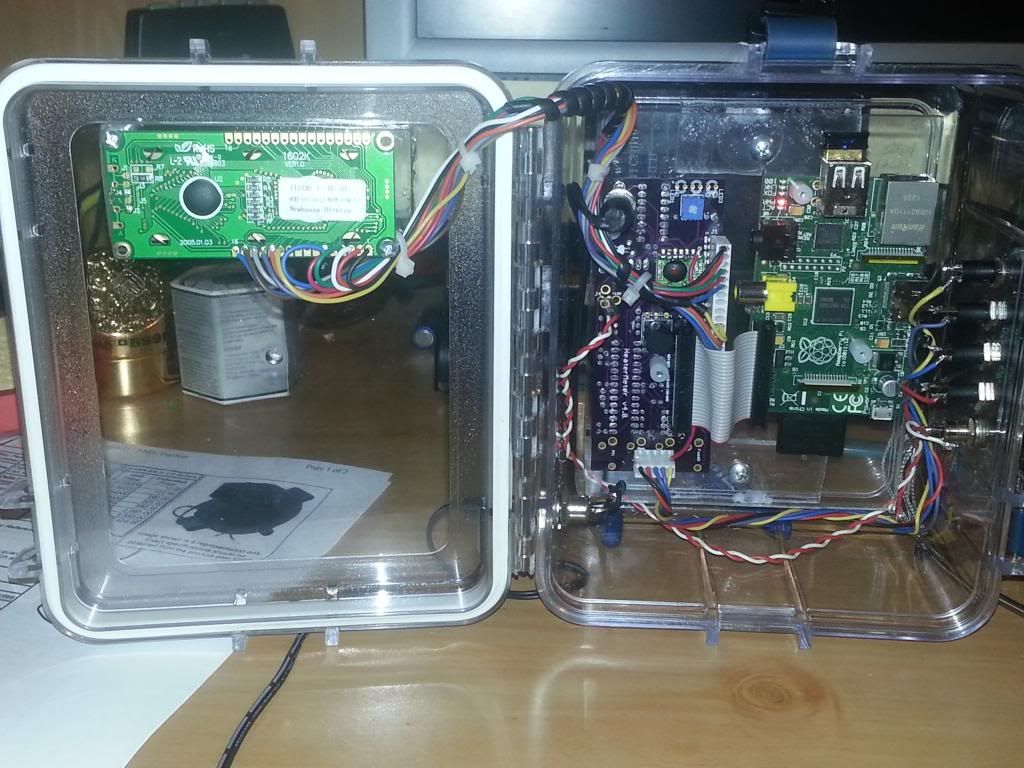
I did remove the composite video connection so that it would all fit nicely.

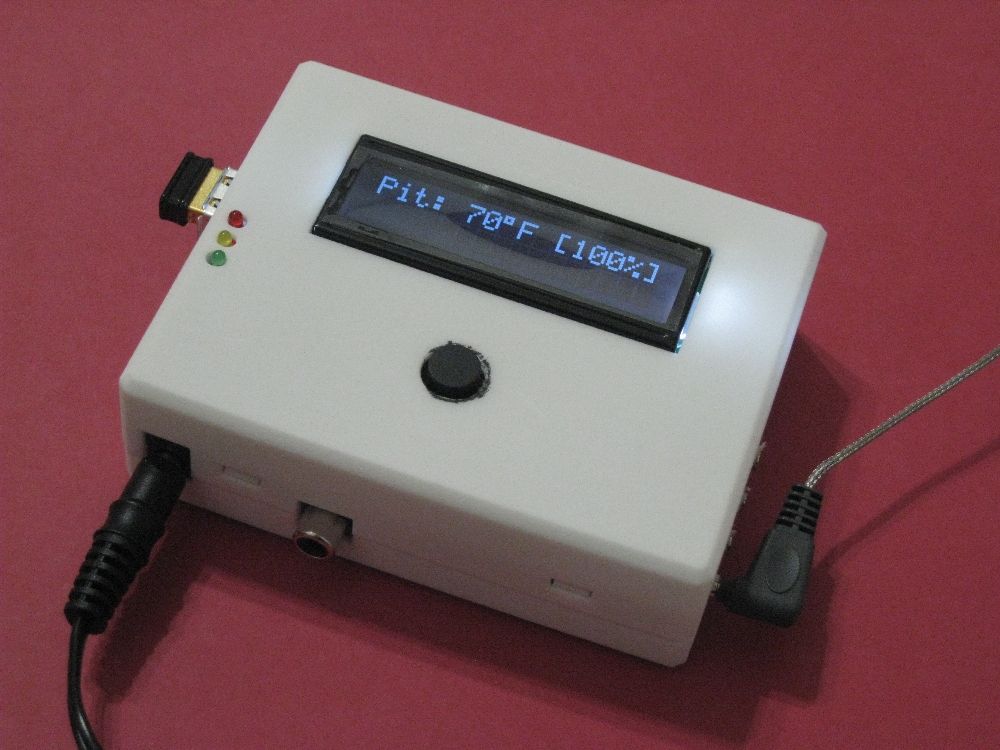
Now to order one of Tom's awesome cases and I'll be set.

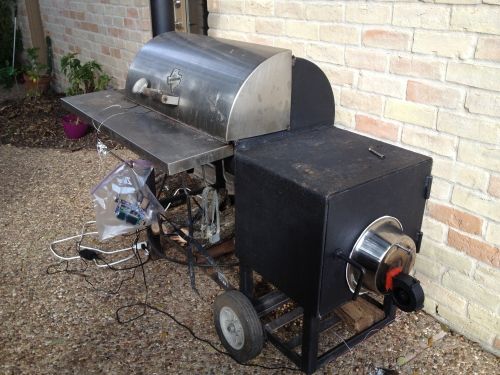
Now I just need to make a RCA<->DC power converter so I can use it. I didn't want to have to modify the board to enable me to use a power jack for the fan, so I'm stuck making a converter.

dave
 
I had previously gotten the rPi up and running. So I hooked them together, powered up and no love :( I thought that it would flash the AVR automatically, like mentioned in the wiki, but I just manually flashed it with v3.2+ and it is up and running.
Yeah to clarify, it only will attempt to flash a chip on the first boot. If you'd already booted once without a chip it won't try again. I originally did this because I didn't want to overwrite your AVR if you had a custom version of HeaterMeter on there but I'm thinking it might do more harm than good.

And yeah, suck it, composite video connector! I wouldn't have ordered a bag of 10x RCA jacks had I known I would be removing all these rPis.
 
Got mine up and running last week, longest time spent was getting the wireless to work properly. Finally got that working with some rearranging of my network IPs and a mixture of VI and the Browser UI after about 3 hours. Ordered my case Monday, hopefully I get it in a couple of weeks.
 
All finished!! I'll test the system tomorrow on some ribs, which will give me an idea on it's performance, and it's ability to withstand some temperature extremes (it's 16F right now). I have it aet upn my 3G wireless system so I can see the smoker from wherever I happen to be.
I cannot find the coefficients for the thermistor I installed. Where would I find this out? it's a mf52a1103F3380 10K NTC part. Right now, it is about 10F out at room temperature.
Thank you, Bryan, for all the time and effort in making this happen.
 
Yeah to clarify, it only will attempt to flash a chip on the first boot. If you'd already booted once without a chip it won't try again. I originally did this because I didn't want to overwrite your AVR if you had a custom version of HeaterMeter on there but I'm thinking it might do more harm than good.

And yeah, suck it, composite video connector! I wouldn't have ordered a bag of 10x RCA jacks had I known I would be removing all these rPis.

I was wondering is I can just space the HM further away/above the rPi to avoid the conflict between the composite video plug and the HM ?? maybe just stack two of the device you solder into the board ?? I really have no need for them to be as close as Bert and Ernie :).

Bill
 
I was wondering is I can just space the HM further away/above the rPi to avoid the conflict between the composite video plug and the HM ?? maybe just stack two of the device you solder into the board ??
The height of the jack makes it virtually impossible to find a connector that makes them at the right height. A floppy drive cable can also be used to connect to the two, or you can also make your own cable to link them up. All the pins aren't used so it doesn't have to have all the wires if you're going for the minimum.

The mating length of the conductors inside the rPi header socket we use is also long enough that you can just not fully seat it and it will still work. It will be level but there will be some pin visible outside the connector.
 
My PCB finally arrived while I was out of town. Spent an afternoon last week with Bryan's pictorial directions and now have a working HM ! No hw problems but it like others it took a while to get the wireless config working. Next up is creating an adapter to mate the blower to the smoker. Looking forward to putting it in a case, but until those problems get worked out, it's going to live in a ziplock bag.
 
I have a question about this.. I am in process of building my HM4.0 and waiting for some parts. Meanwhile, I was about to boot up my Rpi for the first time to tinker with it. If I do this, it looks like it won't flash the AVR. I don't understand how to manually flash it as D Peart describes. I've been pouring over the forum and wiki and am not sure exactly what I would need to do it. Can someone help me better understand? BTW, if it isn't obvious, I'm a complete Noob when it comes to electronics/arduinos/etc.
 
The first time a new install boots, it checks the AVR to see if it is "blank" and if it is it will flash it. It only does this automatically on the first boot of a new install. However, if you've already missed this opportunity, you can still easily flash it manually by going to LinkMeter -> AVR Firmware -> Bundled in /lib/firmware and selecting hm.hex.
 
Bryan,
Let me make sure I understand correctly. If I have a new rpi and haven't loaded the AVR firmware on it, can i boot the rpi and tinker for now and when I'm ready, load the AVR software on the rpi and then boot and all is well? Or do I need to not mess with the rpi until everything is ready to go?

I'm a little unsure how all of this works, so sorry if questions seem basic. I'm trying to read and understand everything but a lot of this is very new to me.

Lastly, I've been looking thru the github and cannot find the LinkMeter->AVR Firmware...hm.hex that you're referring to..am I in the right place?
 
No worries, let me clarify:
rPi Firmware - OpenWrt - The image you write to the SD card and insert into your pi. Has the website.
AVR Firmware - The stuff that run on the microcontroller on the HeaterMeter board. There's a copy of this included in the rPi firmware.

You can put the rPi firmware on, poke around the website, configure your networking, etc. however the automatic install of the AVR firmware will not occur the first time you have the HeaterMeter attached. You'll have to go into the website on the rPi and there's a tab for LinkMeter -> AVR Firmware there. Once you have a HeaterMeter attached you go there and tell it to flash the bundled hm.hex.
 
Bryan,
Thanks for the help. This is starting to make a lot of sense to me. I have a couple more questions (and perhaps better suited for separate thread) about the rPi.

If I understand correctly, once I write OpenWrt, the rPi is really functioning as a router much in the same way my DSL router is working. When BBQ'ing, it acts as stand alone network and I can connect using a connection from phone, computer, etc over it's own wireless.
Further, it has the same IP address as my home router. Can you then connect it to my home network (what do you do about the IP) and can you access thru the internet instead of directly from it's own wireless? For example, If I wanted to run to the store or something, could I have it hooked to my home network and monitor it thru the internet? Is all of this configuration/how-to documented somewhere?

Thanks so much for your help and patience.
 
OpenWrt is just a very extensible tiny Linux distribution. While you /can/ theoretically make the rPi an access point with it and connect to that instead of your home network, what I think everyone (except one person) has done so far is to just make it a client on your existing WiFi network. It just joins your home network and then any computer in your home can access it without altering their configuration. If you want it visible from the internet you just make a hole in your firewall to let incoming HTTP connections go to the web server on the Pi.

The configuration is rather straightforward once you're into the web site, but I have been meaning to do a wiki article about connecting to the rPi for the first time, which is at http://192.168.200.1 for the ethernet port, and joining a network.
 
I'd just like to express my gratitude to Bryan and Tom for sharing the fruits of their labor. I had all of the necessary parts available two months ago but couldn't summon enough courage to put them together. I finally got down to building the unit the week before last. Prior to this, I didn't have any soldering experience so this undertaking was pretty scary. It took only one attempt and the HeaterMeter powered up with only one minor issue, the LCD was dark. I gave the Contrast pot a few turn (can't remember which way) as a member had advised and the LCD glowed. After some tinkering, I was able to connect to the unit via my wireless router with the bridge mechanism (I still don't understand how it works.) To me the assembly instruction couldn't be any clearer. It took me 2.5 hours straight to do all of the soldering. Because of my beginner's soldering skill, the assembly didn't perfectly fit the case, I had to enlarge the probe port openings and the control button hole so the button can click up and right. My confidence level got way up. It was a great learning experience. Thanks again.

IMG_0501_zpsb9347077.jpg


IMG_0505_zps6a55f9ed.jpg
 
Last edited:
First cook with the HM

This pit gets little use because it is so hard to keep a stable temp. When the wind changes it affects the draw and therefore the temp. On Friday I did a test run without food to test the HM and the blower and tune the PID parms. Got it to hold temp within a few degrees even when the wind was changing direction. Today it is working on a pork butt. Again many thanks to Bryan and all who have contributed ideas.

Good looking case !

smoker_zps10d99191.jpg


graph1_zps628b2770.jpg
 
Internet Explorer 8 alert! I'm happy to hear how well it works, hopefully that means more delicious BBQ in your future. A ziplock bag? Hey, it works! And finally, 92F ambient? Must be Texas.
 
Ambient temp is not accurate because the bag is holding some of the heat from the HM, and picking up some heat from the smoker. It's Houston alright but we're only in the 70's today; it is winter. One feature of the ziplock which those fancy 3D printed boxes can't do is keep the HM dry such as in the unexpected 5min downpour we just had.

Actually I'm hoping to get in on a 3D printed box when someone figures out a solution they are happy with. I'll still put it in a bag to keep from spilling things on it.

IE 8 gets used to log into my router and to the HM, because it has no restrictions on it. Firefox is locked up so tight it can't be used to set the temp.
 
Yet to do first smoke still have to get a blower. It will replace my IQ and 3 wireless thermometers.

20130205_095810_zpsb984fde9.jpg


20130205_100000_zps02d2fef9.jpg


20130205_095834_zps65acf5a5.jpg


20130205_095850_zps4a54a549.jpg


20130205_095933_zpsc3003193.jpg


20130205_111159_zpsb527a194.jpg


Water Proof Case from Big Five sporting goods, all mounted with screws on removable in acrylic back board. sealed other than power and probe jacks
 
Last edited:


Back
Top