Whomper Damper


JayC

TVWBB Fan
Guys, thanks again to all of you that have worked on the HM project and I wanted to share a little about what I've been working on too.

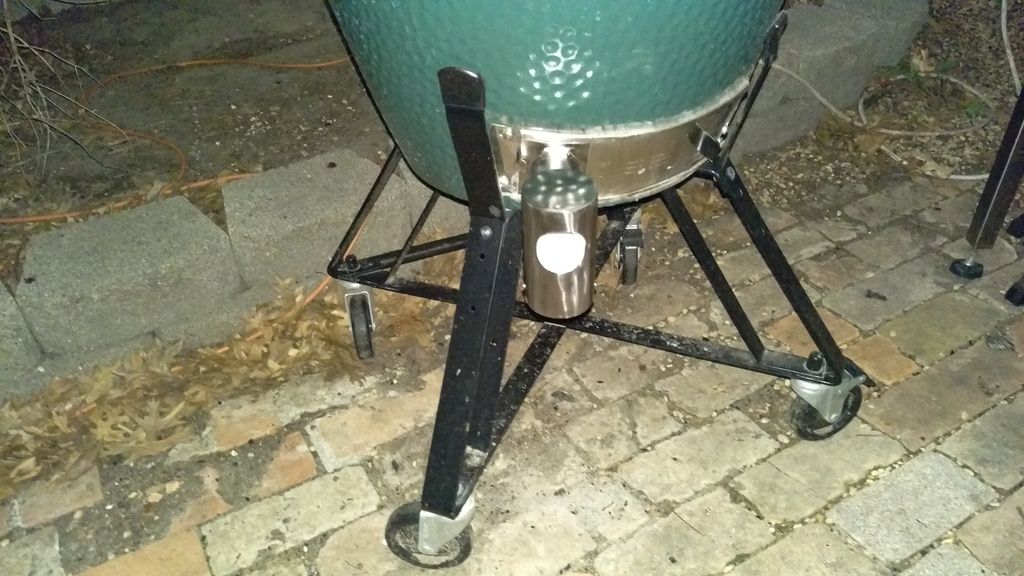
I've got zero talent when it comes to electrical/software stuff like you guys have but I certainly an capable in other disciplines. This is the BGE stand I built from 316 stainless and cedar as an example:

FrontBGE_zps8d75ed12.jpg


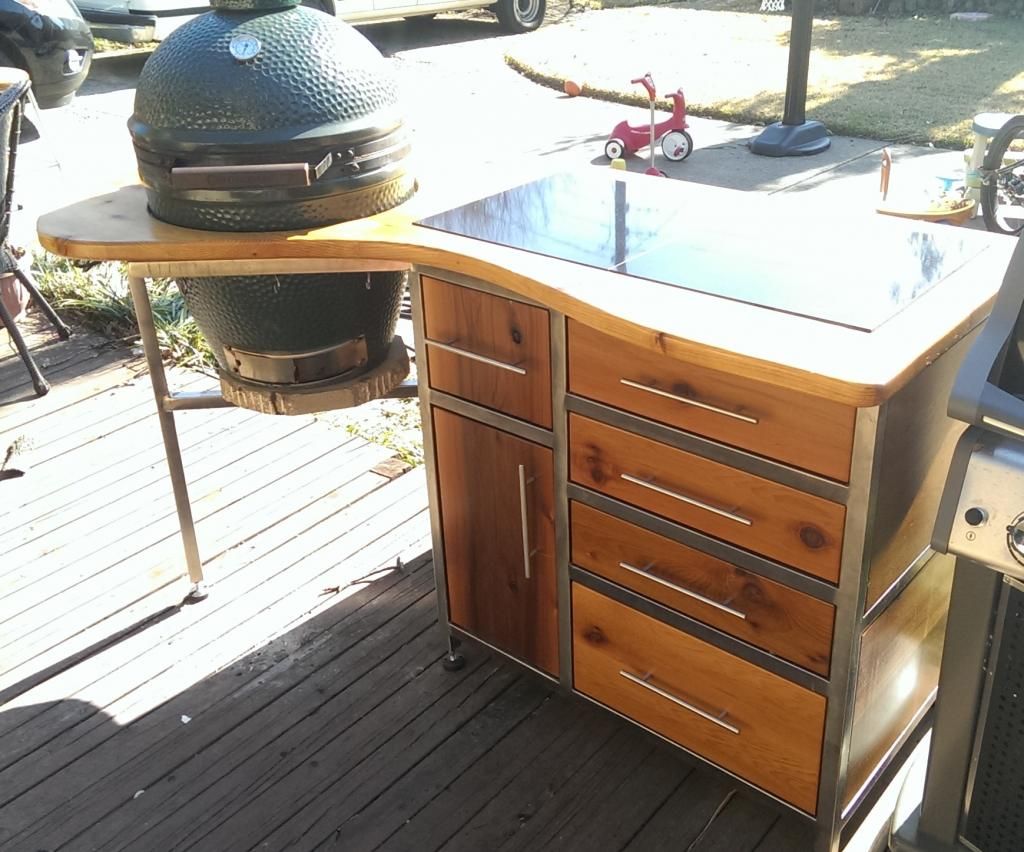
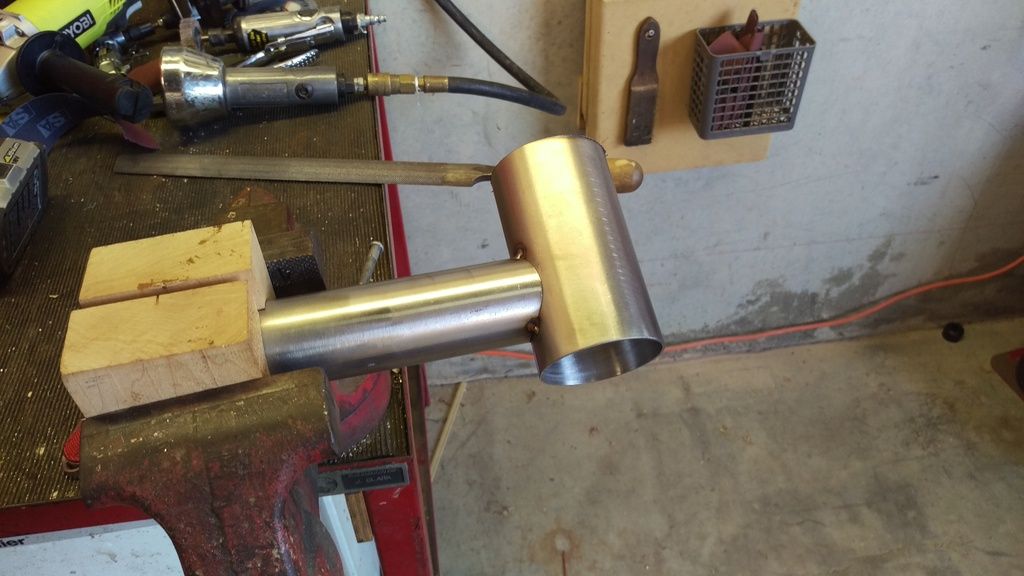
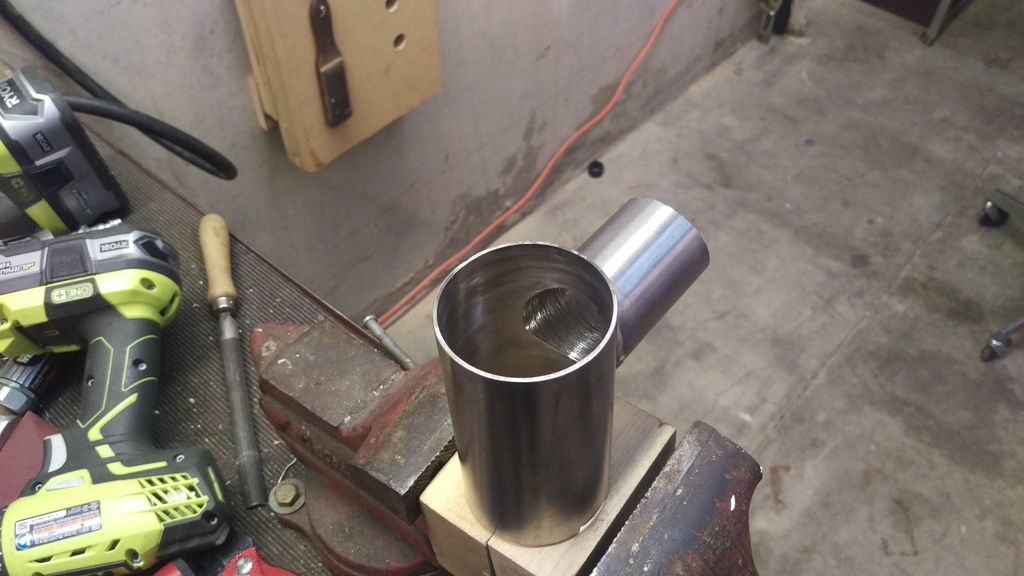
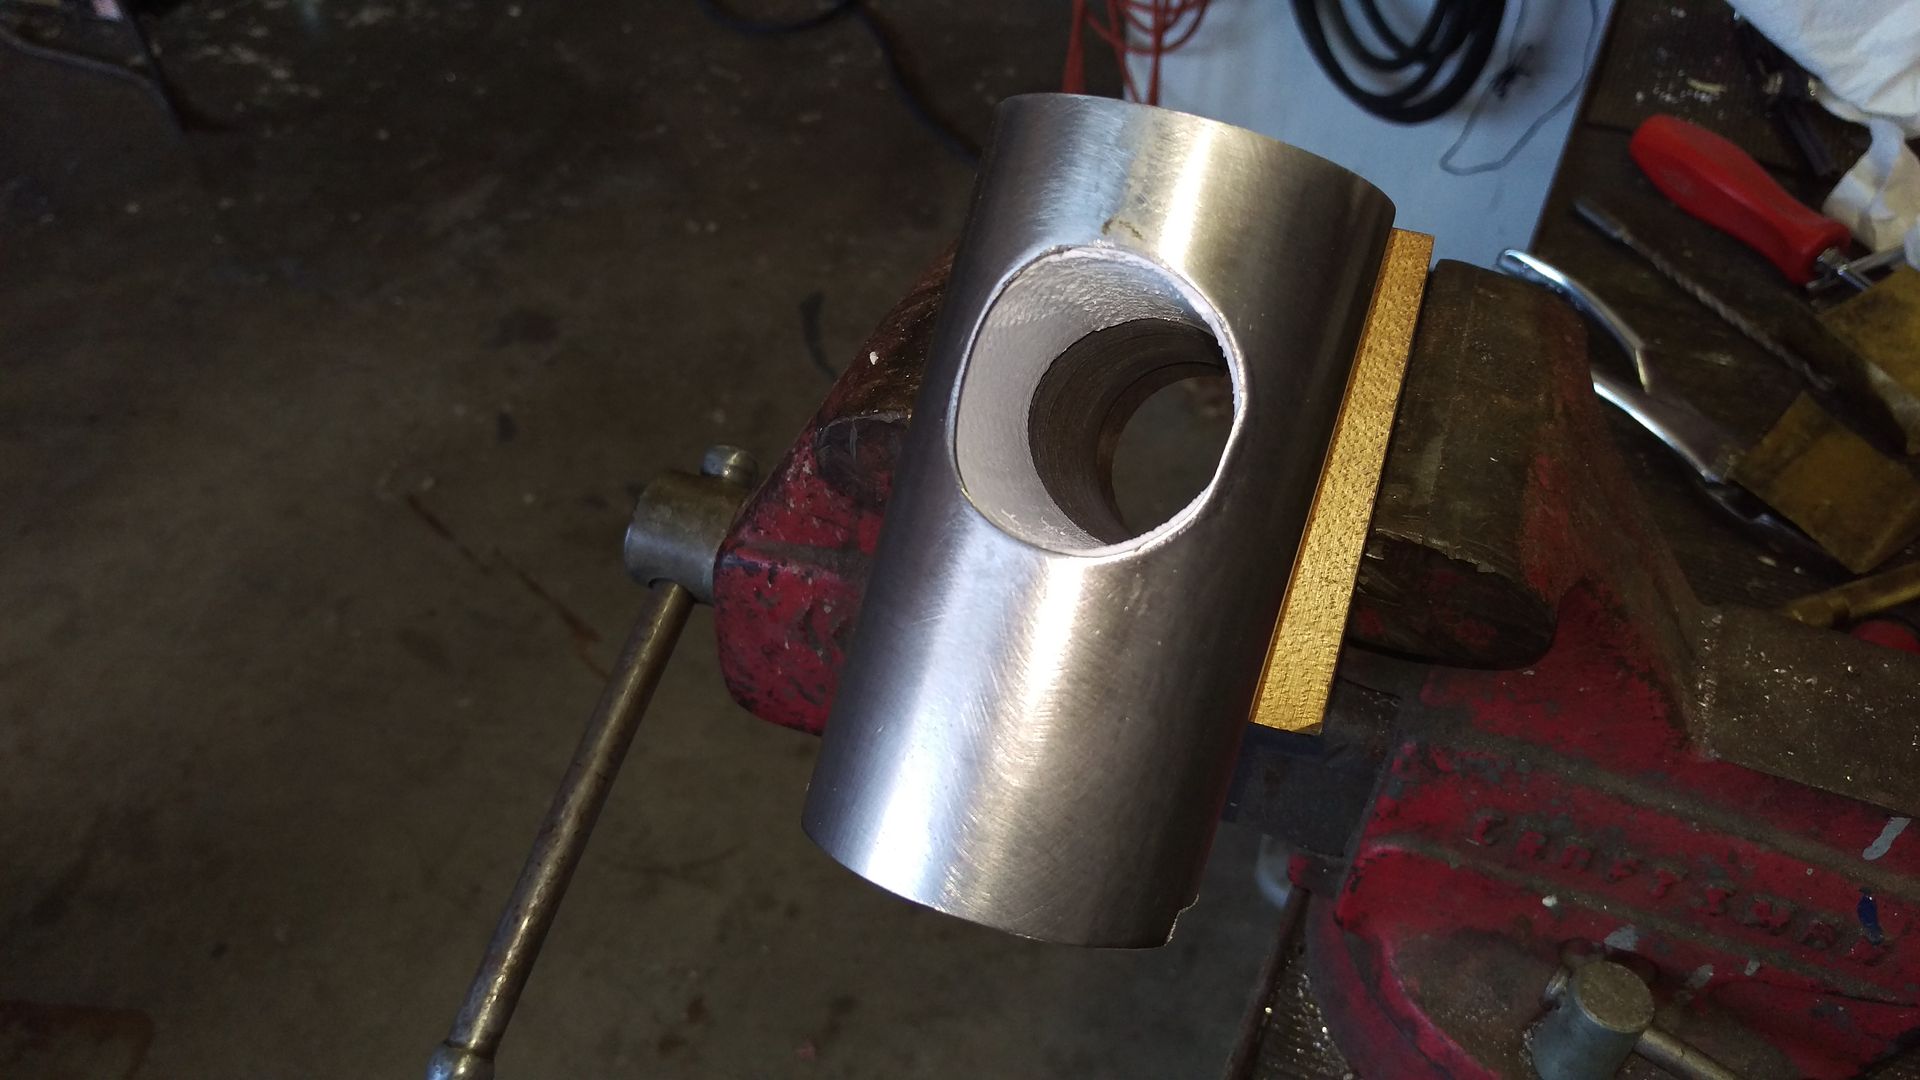
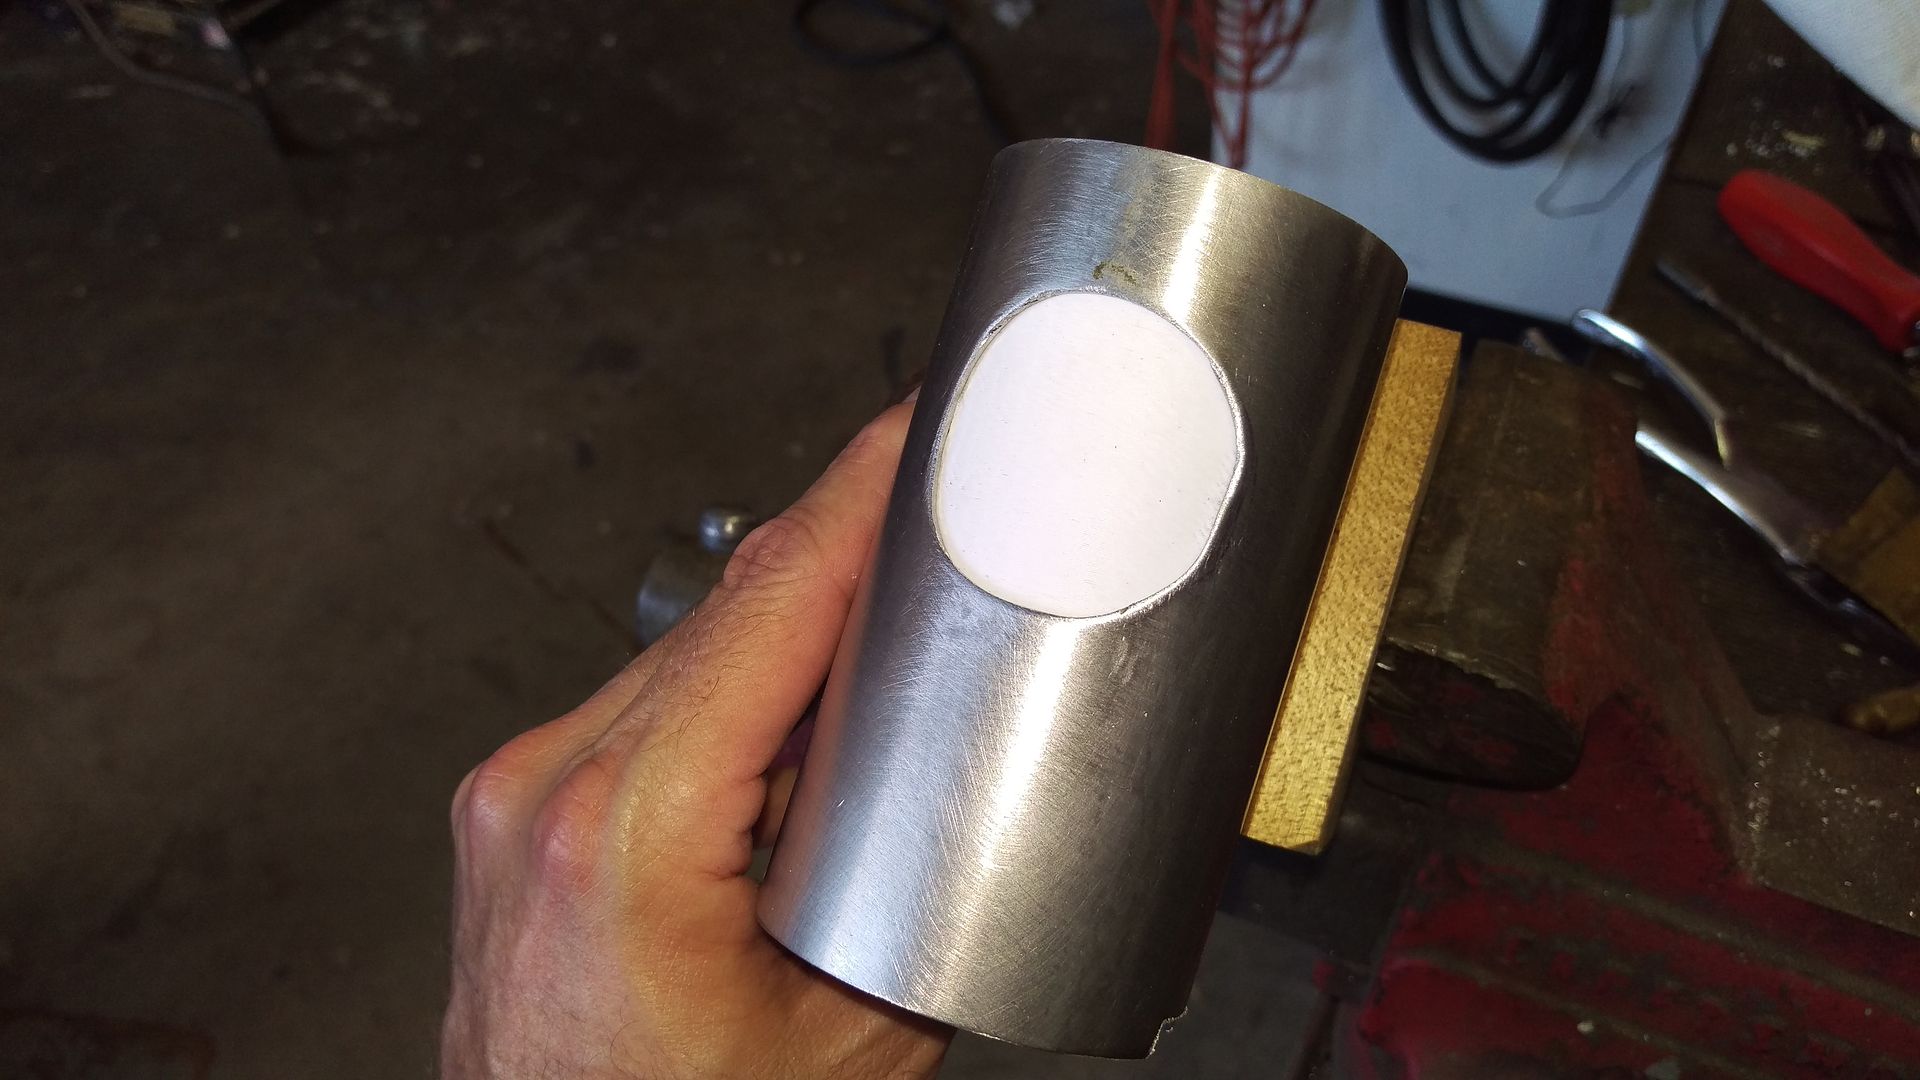
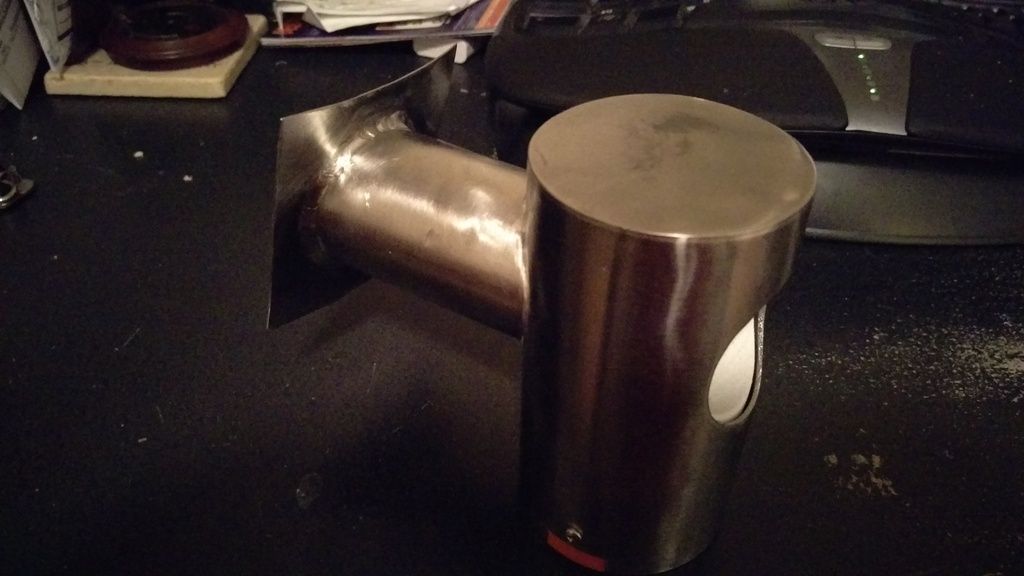
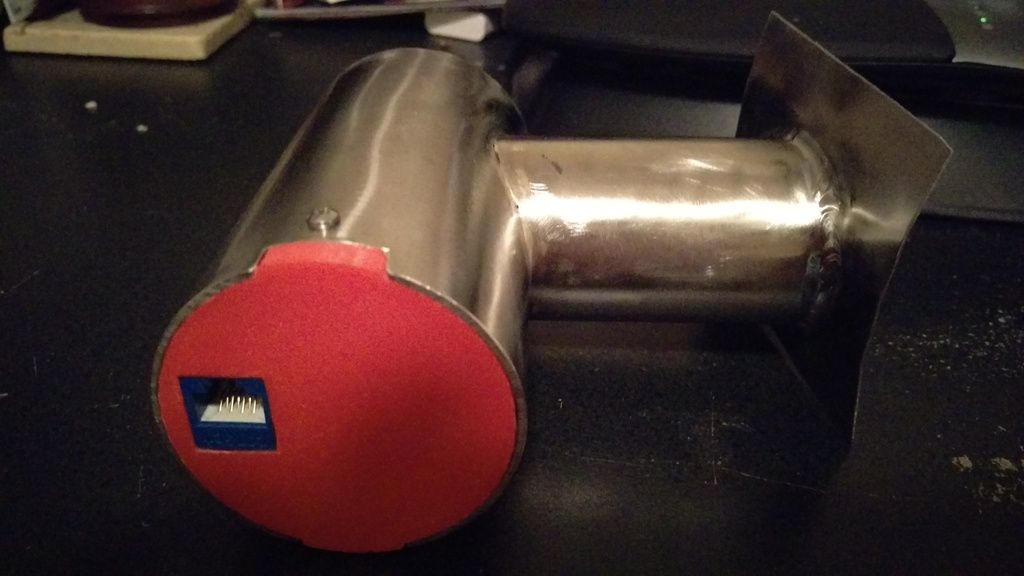
Since I first got my HM, I knew I wanted to build my own servo controlled damper but didn't really have the time to get busy with it until recently. The thing that I wanted to do was make the BGE breathe more naturally with a damper only instead of relying on the fan. That coupled with my library recently attaining a 3-D printer has let me do a quick proof of concept of my design and I did a test cook this weekend on a pork butt.

I've been using one of Tom's designs for the past year and it's worked really well for me but it did require that the fan kick in every now and then especially toward the end of the cook. I don't know what the surface area allows for for flow rate but it's clearly under one square inch. The damper I'm working on is just over two square inches and doesn't have anything (including a fan) blocking the air path. I was also hopeful that it would work better for cooks in the range of 375-425 and so far it seems to be ok for that as well after a quick test cook on Friday night. I'm not going to post pictures of the prototype but will certainly follow up this thread with the real thing as I get it done. Hopefully I can work on it some this week so they won't be too far away.

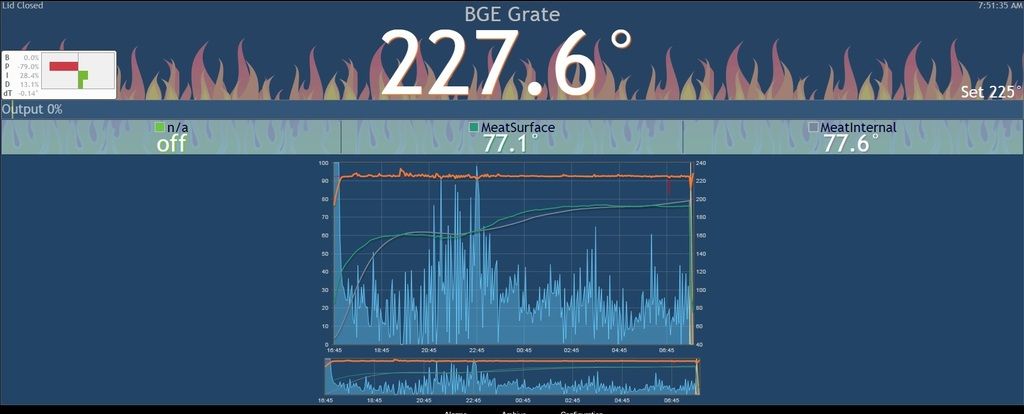
What I do have is the first cook temperature profile here:

ProtoCook_zpstukv7ibl.jpg


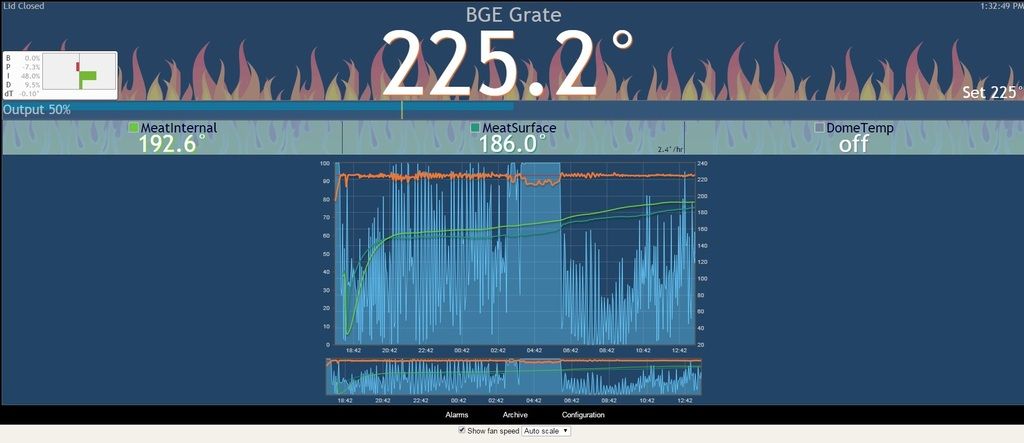
It took me forever to get the PID settings as they are wildly different than anything I've seen posted so far and from Tom's design. I finally gave up last night after having no success and went to bed hoping it would settle out and never really did until I recalculated this morning (thanks to Excel using the TLC tuning rules) and finally got something that's looked good since mid morning:

P=30
I=.0227
D=95

It's still not quite dialed in but it's working a lot better than it had been working for sure. I'll keep monkeying with it but for me this is enough to go from the POC to construction of the final design. I'll certainly post details up as this project progresses.

As far as "whomper damper", I sail and other sailors may remember the movie "Wind" from the early 90s and the big sail that won the race was named the Whomper. Having this thing breathe through such a large cross section reminded me of that movie so whomper damper it is.
 
That table is freaking outstanding.

My Green Egg table that I made of treated pine from Home Depot caught on fire this weekend after the crappy Green Egg replacement gasket caught fire and fell onto my table. I walked outside 3 hours after dinner to more smoke than I had during the cook. This design is indeed awesome. I don't have the tools to do the metal work, but I could get close using all wood.

As far as your damper, have you seen the RotoDamper3? Other than technically having the fan in the way of the air path, it is still more than capable of high heat cooks (higher than you are mentioning in your post). Plus it's nice looking and all contained, so the fan isn't vulnerable to weather as much as if it were on the outside. And by turning down the fan power you can effectively make it a damper only system, and use less fan.
 
Andy, thank you. It's not 100% done because I always intended for the top to be either poured concrete or granite but had to settle with wood for now because again, the budget on the project was stretched already. What's really cool is that each of the drawers that hold stones or grates also have the 18" granite tiles in them so stuff can be put away immediately after coming off the BGE to keep my work surface clutter free. Unfortunately, the whole project was designed and almost finished before I found out about the HM or I would have had a better solution for integrating the HM into the design and it still may get retrofitted one of these days.

Chris, I didn't know anything about the RotoDamper3 until just now. I just went through the thread and found that and yep, you're right, that's pretty neat. The damper I'm working on will also be sealed and nothing will be exposed to weather either. I'm hoping to get some time working on the real thing tonight and tomorrow night so hopefully I'll have a picture or two this week.
 
I watched your cook live with the link you PMed me and the damper appeared to work quite well. The constants at the time looked to be pretty appropriate for the response time of the damper (was P=30 at the time). The newer version of linkmeter might help you tune it a bit more easily (where it tracks the peaks and periods for you), but I haven't done a snapshot release yet with it. I do remember the womper though! I'm not sure if it was just because I was into sailing back then or if it was a general craze about taking back the cup in '87 that made me remember that movie so well. They made it seem like it was the first time technology had ever been brought into racing sailboat design. haha but I digress.

Also I have to say that your egg table is gorgeous. I can't wait to see some of your other work!
 
Bryan, thanks for checking in on my cook. I was wondering if you got to see that or not while it was live. I just saw your snapshot post so I'll certainly load that soon. Funny how folks remember that goofy movie.

I did get a little work done this week on my damper. I had to make a tubing block which was a hassle for 1.75" tubing but I got that done as well as coping the draft tube to the valve body. I tacked it together with the TIG welder. I'd really rather weld this all the way around but I'm concerned that with the thin walled 316 stainlesss tubing that it's going to deform to the point where I'd need to get a 2-3/8" reamer--MSC Direct has those but they range from $250-$900 so that's out. Instead, I'm going to use 56% food grade silver and braze it together the rest of the way. I probably should have just tacked it with silver from the get go for a cleaner look but I hate doing since things move around when the flux starts running and I really do need this to be right or the draft holes aren't going to line up. I also cut the valve body to length so that's the actual length that it will be.

Life is too busy right now so if I could get the thing brazed today and in soak between leaving work and picking up the kid, I'll be happy--but it could be another couple of days before I get that done and cut the draft tube.

I'll post up as things progress.

And yes, I did cope that tube with the file and the cutoff wheel that you see on the table. I do all my tubing miters by hand with tube blocks, files (and sometimes a cutting wheel to rough it in) and a vise.

IMAG0458_zpsowgrwcqg.jpg
 
Last edited:
Well, brazing went faster than I'd imagined it might so I went ahead and cut the draft tube to length, drilled out the draft hole for the BGE side of the damper and roughed in the notches in the bottom that hold the servo assembly.

I need to put the other hole on the opposite side of the valve body but was out of time. I'm hoping to get that done this evening and may just be able to finish this thing over the weekend if my luck keeps going this way:

IMAG04591_zps3iay1qgq.jpg
 
We've been moving from one house to another but this weekend I got to at least smoke a pork butt and I wanted to update on this project. I'm still stalled with the stainless steel version of the Whomper but I used my prototype along with the new guts that go in the SS version to see how they'd perform. I didn't tweak my PID settings at all, just left it alone and let it go. It started off a little rocky but then I spun the chimney to about 70-80% open instead of wide open and things settled out a lot after that. I suppose it was just breathing a little too much.

I'm still recovering from the move so it will be a couple of weeks or so before I get to work on the stainless version but it's on my list of things to do. I'll update accordingly.

Whomper2_zpsxh4iijzs.jpg
 
I'm still working on this despite the move to a new house and getting things done there.

IMAG04671_zpsy2bvqgxy.jpg


IMAG04681_zpsiohr6ywh.jpg


One step at a time I suppose. I need to tack on an adapter plate for the BGE and do a test run. I'm hoping to do a brisket or pork butt the weekend of the 17th with this guy before I braze top on for good and it's finished.
 
Well, this is finally done!

Between moving out of our house for a fairly extensive remodel, having a new baby boy, already having another toddler, it's just been tough to find time to get this done with all the other things I've been working on.

So here it is. The finish isn't perfect and this is just the first pass with Scotch Brite but probably no one would notice but me.

IMAG1199_zpsbjlr41kj.jpg


The servo holder/base is 3D printed at my local library and also hosts the keystone network port. The valve just sits on top.

IMAG1197_zpsk0amubpb.jpg


Since we're not in our house, I have the BGE out of my stand at the moment as I'm working on a new top for the stand for when we move back in but here it is in the BGE:

IMAG1203_zpsou73yq6f.jpg

IMAG1202_zpszzfbsvhx.jpg


So far, this thing is working about like the prototype worked. I don't use it for high heat cooks, just slow and low (I feel like the BGE is easy to keep in check above say 350 just by adjusting the draft doors) so I'm pleased with it. I've got enough material to make another one so I'm planning on building one more so that I've got a spare.

Thanks for following the project and let me know if you have any questions about it.

I also printed a "hat" that slides on the top for raining days so that there is no possibility of water getting between the valve and the valve body. I'll have to put that on and take some a picture I suppose.
 
Guys,

I wanted to share some results. I finally have the new stainless steel whomper working nicely with some minor adjustments and this past weekend's cook went really great. We had two parties on Saturday (hence the pork butt's names) and I decided to do pork butts for each host. Both turned out great.

PorkButtWeekend_zpsk6ps7axw.png


The low on the cook was 221.7 I believe and the high was around 227.3 if I remember right. Most of the time it just hung out around that 225 sweet spot. The wife said that these were the best ones I've made. They were certainly more moist inside and I really do equate that to not having a fan blowing the moist air out the chimney when it kicks in. Maybe I'm biased since I'm now 100% committed to being fanless but it's sure working well. I'd love to see some more folks experiment with fanless designs and see what you think.
 
Last edited:
Excellent results!

I am currently running my FlatDamper fanless on my PBC. I don't have it quite dialed in as good as you, but I think fanless is a super viable way to run a pit. The only thing it lacks, and it's not an issue for me, is the ability to quickly stoke coals and ramp up the temp right now.
 
Looks like great results! I've been working out my damper only bge controller as well.

Can we get more pictures of the internals of the damper? I'm a little confused about how it's operated.

Also, do you have anything to protect ashes and little bits of lit charcoal from falling in there and burning up the 'burnable' bits?

[edit] Oh, wait, I see. The white part just twists to open up, like a ball valve? Whats the what part's material?
 
Excellent results!

I am currently running my FlatDamper fanless on my PBC. I don't have it quite dialed in as good as you, but I think fanless is a super viable way to run a pit. The only thing it lacks, and it's not an issue for me, is the ability to quickly stoke coals and ramp up the temp right now.

Benjamin, I haven't been following the forum that much lately but I'll look up this flatdamper and check it out. I'm interested to see what other folks are trying for sure.

One thing I did do that I wish I had a picture of... I took a piece of sheet metal and welded a hunk of tubing to it and mounted the fan so that it blows into the draft door. It's hard wired with a 12vdc adapter on the end so I just plug it in to get my fire started when I'm getting the BGE hot and ready to cook. It's not useful for slow and low but it is useful for the rest of the time when I'm not using the damper. I only get the HM/damper out for slow and low. Occasionally I'll get it out for higher cooks but find that I can set the draft door/chimney pretty close for anything 375 and above. I did find that setting 425 with this thing works great and to ramp quickly I'll just leave the draft door open until I get close and then shut it so that it's just running on the damper at that point.

I think to your point, if you're looking to ramp the temp for some reason that the fan would be nice but like you--it's a non issue for me too.
 
Kenny, the internal is just that white part and it is 3D printed. It just sits on the standard servo (MG90S sound right?) that all the guys seem to be using and the servo is fitted into the red part that also houses the network jack. It has a key on either side so that the whole deal doesn't twist in the stainless steel. I could post some pictures if you really are interested in seeing the guts but it's really just that simple.
 
Last edited:
Kenny, the internal is just that white part and it is 3D printed. It just sits on the standard servo (MC90 sound right?) that all the guys seem to be using and the servo is fitted into the red part that also houses the network jack. It has a key on either side so that the whole deal doesn't twist in the stainless steel. I could post some pictures if you really are interested in seeing the guts but it's really just that simple.

That's okay, I got ya. But I am curious if the plastic is protected from falling embers? I know embers fall down to my bottom damper all the time.

Finally, I know you said this is just for low and slows, but what is the highest temp you've manged to get with it? (BGE is just too easy to run manually for higher temp/shorter cooks)

I forgot to answer that--someone walked into my office. Yes, for falling embers, I use the stock BGE screen. The sheet metal is cut (I don't remember the exact dimension now) exactly such that if you insert the bottom of the sheet metal into the draft door tray that it will go all the way down in the slot. Then, the top portion is pushed against the screen and fits below the top slot on the draft door. Then, you can essentially center it in both the upper and lower slots and push the door so that it wedges the thing tightly and you don't get any air gaps around it. That also means that I don't have to take the door or screen out.

In the event that something does fall through the stock screen, then it surely wouldn't get too far down the stainless tube I wouldn't think.

I've done 475 degrees with it for short cooks (~30 minutes) but haven't tried to go higher with it. I cook pizzas at 475 dome temp and it works well for that. Even then, I rarely use the thing with pizzas as I can control that without problems just on the draft door--don't even use the chimney for pizza so I can look in and see how it is cooking without opening the lid.
 
Got it, thank you.

ONE last question, then I'm done... no promises. What's the size of the draft tube?

Kenny, no problem. Happy to answer questions. I know that all I did on this forum was ask questions during my first HM build... I didn't remember so I logged into onlinemetals.com and found the order:

2.5" OD x 0.065" Wall T316 Seamless Stainless Tube
1.75" OD x 0.065" Wall T316 Seamless Stainless Tube

That means that the hole through the draft tube is 1-5/8" which I do remember now because I needed a 1-5/8" hole saw to cut the valve body holes and clean up the 3D printed valve cylinder. I'm not sure how long it is either--seems like I just eyeballed it and cut it such that I thought I had enough length to keep embers out and keep it from getting hot at the valve which it does fine. I didn't want to make it too long though because I didn't want to restrict flow or have to store something too big either.

Where in N. Texas are you?


Back
Top