Bryan Mayland
TVWBB Hall of Fame
For information about the HeaterMeter-in-a-Linksys-Router project, check the LinkMeter thread.
This thread was created to sum up the information found in the other homebrew controller thread relating to the HeaterMeter PID controller that I built based on Bob Hruska's design. The thread was over 25 pages long despite the best efforts by some participants to keep it as to the point as possible.
What is HeaterMeter?
The History of HeaterMeter
HeaterMeter's main purpose was to make me as lazy as possible without disrupting the fantasy that I was still 100% involved in the long cooking process normally associated with great BBQ. More specifically, it is a controller box:
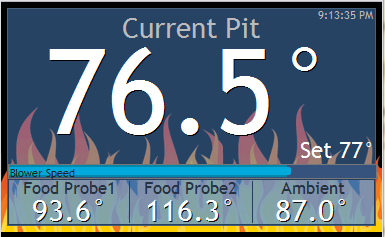
With a built-in web server that lets you see what is going on in the grill and adjust the temperature all without having to put down your beer:
You can also do some fun things with it like this or just this if you're handy with some shell scripting.
In my case it was more designed to allow me to BBQ without leaving the comfort of the World of Beer drinking establishment down the street from my apartment. Through the tubes of the internet I was able to know exactly when it was time to pay the tab and stumble home with my friends for delicious pulled pork I had slaved all day drinking Dogfish Head over.
Hardware
The basic guts of the HeaterMeter is an Arduino development board. I used a Duemilanove, although the replacement Uno board works just as well. The WiFi was handled by an AsyncLabs WiShield board with a chunk of flash storage on it for holding a few web pages. The Arduino only has ~31k of storage and most of that is taken up by the web server code so having the flash helps a lot. Unfortunately, AsyncLabs has stopped production of the WiShield so hopefully someone will come up with a replacement.
The device uses standard Maverick probes, either the high-temp or standard versions which are terminated with 2.5mm mono headphone jacks. HeaterMeter supports up to 3 probes (1 pit, 2 food) so if you've already got these you can save a good bit of cost. Speaking of cost
What does it cost?
HeaterMeter can be economical to build if you can do without the extras (denoted with *)
Arduino $30
Blower $13
Enclosure $10
12V wall wart $5
* WiShield $55
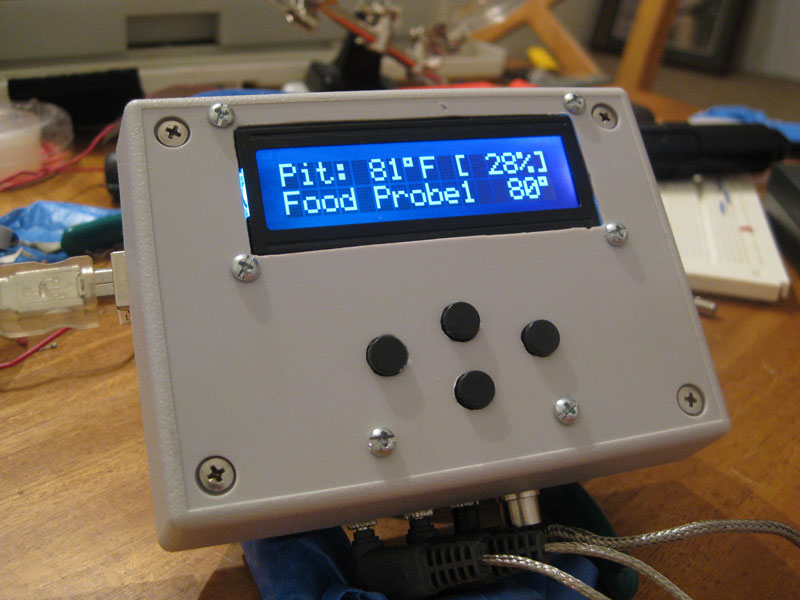
* LCD $15
* Buttons $5
Electronic parts $10-20
You'll of course need tools like a soldering iron, breadboard, maybe some sheet metal to build a fan enclosure as well. You're ordering from at least 3 different places here too, so shipping will add a significant overhead.
Without the LCD and buttons, to change the temperature you need a USB cable and a computer, so they are highly recommended. If you have a WiFi router with a USB port an open source distribution on it, like DD-WRT, you can actually connect HeaterMeter to it and use that to serve the pages and control the device. This uses code from the LinkMeter project which is something else Ed Pinnell and I are working on.
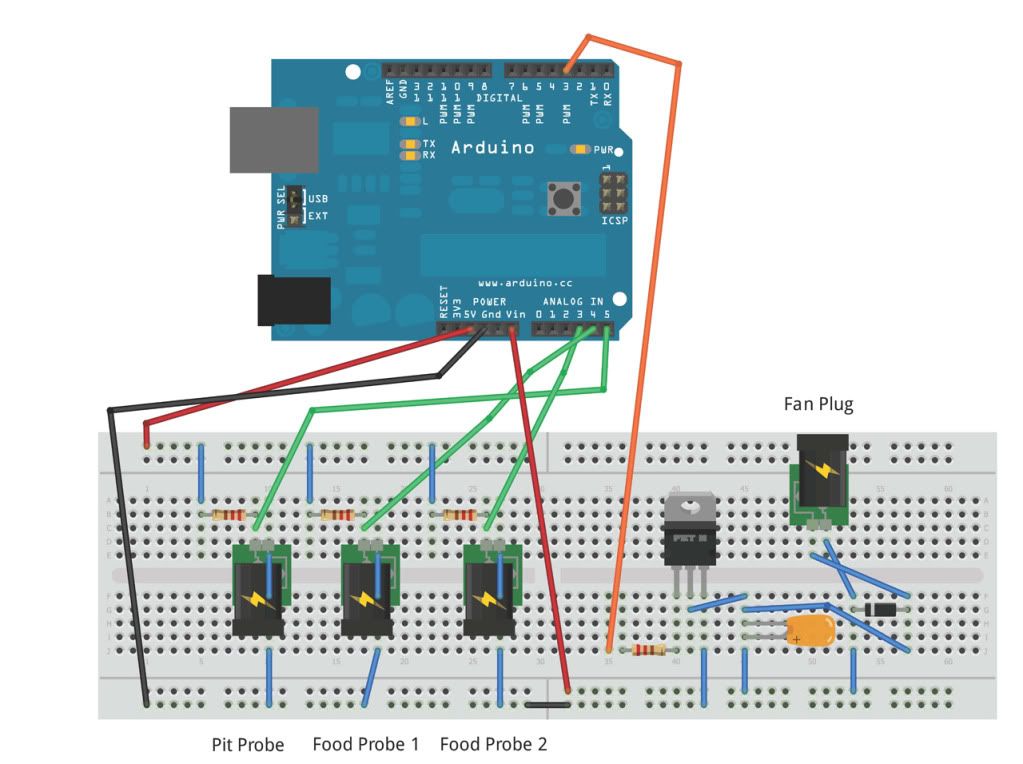
Schematic
Schematic version 2011-05-03 is here.
Parts list is in the next post.
Hardware Photos
First version
Second implementation uses a second 5V power supply, the ArduinoPro from SparkFun can't supply the power needed to support the WiFi.
Software
The latest released version is r97. Download
This includes all the necessary libraries with fixes needed to work properly. If you're not doing the WiFi route, you can just ignore the WiShield and DataFlash libraries. Extract this to your Arduino folder (usually inside My Documents). If you don't have the Arduino development environment you'll need that too.
Or bleeding edge from GitHub
README.txt unironically holds information regarding all the configuration parameters for WiFi, changing temperature probes, etc.
If you're going the WiFi/DFlash route, you'll also need a tool to flash the web files into dflash. I've provided this buggy piece of junk.
-- Upload the Flash_SerialProg.pde sketch to your arduino
-- Launch the ArduinoSerialUpload application (requires .NET 3 iirc)
-- Select your COM port of the Arduino on the right and check the Open box. You should get a line in the textbox from the Arduino describing its flash
-- Change the directory next to the SendDir button to the location of the web files (Documents\Arduino\HeaterMeter\www\)
-- Press the SendDir button and hopefully you'll see a few lines of text going about files transferring and then it will spit out a C header file.
-- Check the C header file offsets to make sure they match those in HeaterMeter\flashfiles.h if not, adjust them. Note that "mockup.html" is called just "" in flashfiles.h because it is the default web page.
I'll be updating this post as needed to clarify things and post new version if developed.
This thread was created to sum up the information found in the other homebrew controller thread relating to the HeaterMeter PID controller that I built based on Bob Hruska's design. The thread was over 25 pages long despite the best efforts by some participants to keep it as to the point as possible.
What is HeaterMeter?
The History of HeaterMeter
HeaterMeter's main purpose was to make me as lazy as possible without disrupting the fantasy that I was still 100% involved in the long cooking process normally associated with great BBQ. More specifically, it is a controller box:
With a built-in web server that lets you see what is going on in the grill and adjust the temperature all without having to put down your beer:
You can also do some fun things with it like this or just this if you're handy with some shell scripting.
In my case it was more designed to allow me to BBQ without leaving the comfort of the World of Beer drinking establishment down the street from my apartment. Through the tubes of the internet I was able to know exactly when it was time to pay the tab and stumble home with my friends for delicious pulled pork I had slaved all day drinking Dogfish Head over.
Hardware
The basic guts of the HeaterMeter is an Arduino development board. I used a Duemilanove, although the replacement Uno board works just as well. The WiFi was handled by an AsyncLabs WiShield board with a chunk of flash storage on it for holding a few web pages. The Arduino only has ~31k of storage and most of that is taken up by the web server code so having the flash helps a lot. Unfortunately, AsyncLabs has stopped production of the WiShield so hopefully someone will come up with a replacement.
The device uses standard Maverick probes, either the high-temp or standard versions which are terminated with 2.5mm mono headphone jacks. HeaterMeter supports up to 3 probes (1 pit, 2 food) so if you've already got these you can save a good bit of cost. Speaking of cost
What does it cost?
HeaterMeter can be economical to build if you can do without the extras (denoted with *)
Arduino $30
Blower $13
Enclosure $10
12V wall wart $5
* WiShield $55
* LCD $15
* Buttons $5
Electronic parts $10-20
You'll of course need tools like a soldering iron, breadboard, maybe some sheet metal to build a fan enclosure as well. You're ordering from at least 3 different places here too, so shipping will add a significant overhead.
Without the LCD and buttons, to change the temperature you need a USB cable and a computer, so they are highly recommended. If you have a WiFi router with a USB port an open source distribution on it, like DD-WRT, you can actually connect HeaterMeter to it and use that to serve the pages and control the device. This uses code from the LinkMeter project which is something else Ed Pinnell and I are working on.
Schematic
Schematic version 2011-05-03 is here.
Parts list is in the next post.
Hardware Photos
First version
Second implementation uses a second 5V power supply, the ArduinoPro from SparkFun can't supply the power needed to support the WiFi.
Software
The latest released version is r97. Download
This includes all the necessary libraries with fixes needed to work properly. If you're not doing the WiFi route, you can just ignore the WiShield and DataFlash libraries. Extract this to your Arduino folder (usually inside My Documents). If you don't have the Arduino development environment you'll need that too.
Or bleeding edge from GitHub
README.txt unironically holds information regarding all the configuration parameters for WiFi, changing temperature probes, etc.
If you're going the WiFi/DFlash route, you'll also need a tool to flash the web files into dflash. I've provided this buggy piece of junk.
-- Upload the Flash_SerialProg.pde sketch to your arduino
-- Launch the ArduinoSerialUpload application (requires .NET 3 iirc)
-- Select your COM port of the Arduino on the right and check the Open box. You should get a line in the textbox from the Arduino describing its flash
-- Change the directory next to the SendDir button to the location of the web files (Documents\Arduino\HeaterMeter\www\)
-- Press the SendDir button and hopefully you'll see a few lines of text going about files transferring and then it will spit out a C header file.
-- Check the C header file offsets to make sure they match those in HeaterMeter\flashfiles.h if not, adjust them. Note that "mockup.html" is called just "" in flashfiles.h because it is the default web page.
I'll be updating this post as needed to clarify things and post new version if developed.