Bryan Mayland
TVWBB Hall of Fame
While OpenWrt (the basis of the LinkMeter operating system) is traditionally used in routers as an access point, most will find it more convenient for their HeaterMeter to be a device on their home wifi network instead of being its own standalone network. If you can't wrap your head around what "being a device on your network" means, it means you can access LinkMeter to watch your BBQ from any machine your home network without jumping through any hoops or changing your network settings.
Step 1: Plug the wired ethernet connection into you RaspberryPi / HeaterMeter, insert your WiFi adapter into one of the USB ports, and power it up. On first boot there's a lot to do so give it a minute to make sure the system is fully booted. A minute is nothing. I used to wait 10 minutes to download a 320x240 image of a topless woman at 2400 baud and I still feel that was worth it.
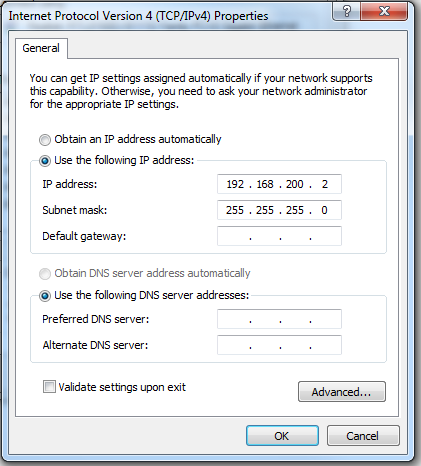
Step 2: From a computer on your network change your IPv4 address to 192.168.200.2. Depending on your operating system this could be anywhere, because Microsoft likes to invent a jaunty new place to put it with every version, and Apple doesn't think you need to be mucking with this sort of information.
Step 3: Use a web browser to go to http://192.168.200.1/ which should land you on the HeaterMeter home page. It's blue. It has flaaaaames. It's pretty American. (No photo, you'll know it when you see it)
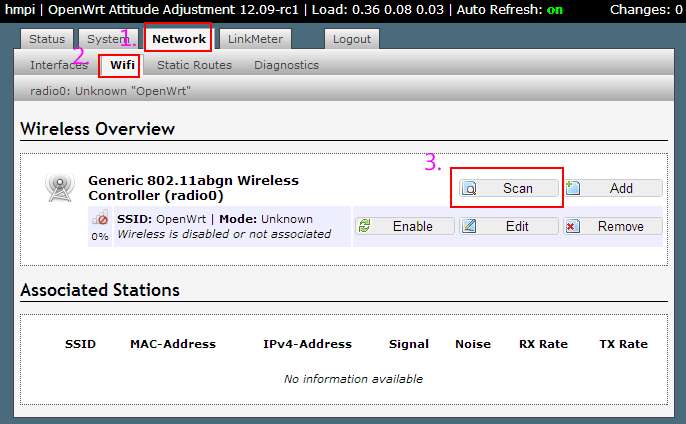
Step 4: Click the configuration link on the bottom of the page then navigate to Network -> WiFi and click Scan. If there is no WiFi listed, either your WiFi adapter is not supported or you don't have a power supply capable of providing enough power to the wireless adapter.
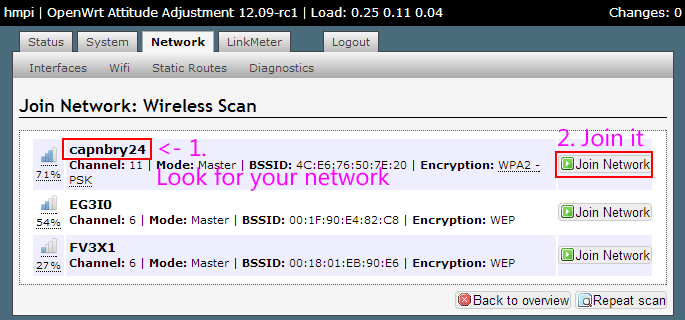
Step 5: Find your wireless network and click Join. My name is lame. Yours I'm sure is hilarious and expresses your individuality.
Step 6: Enter your wireless password. I'm guessing it is "12345"!
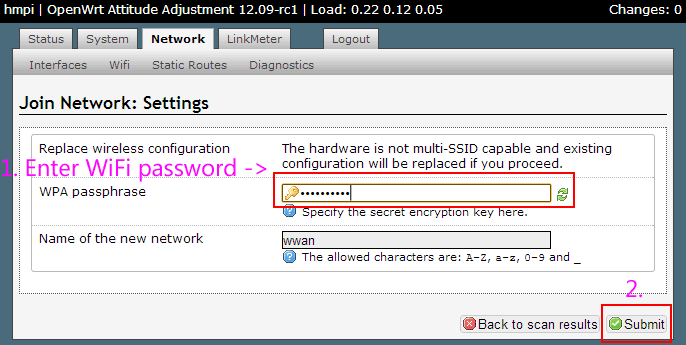
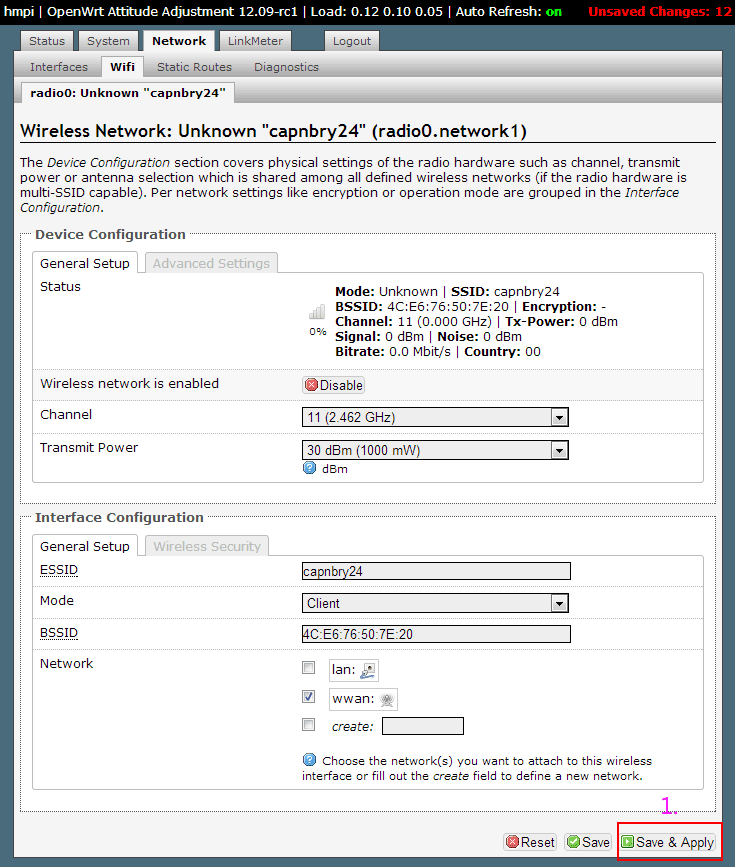
Step 7: Don't touch a cotton pickin' thing on the page that comes up. You're not smarter than the defaults or else you wouldn't need this guide. Just press "Save and Apply"
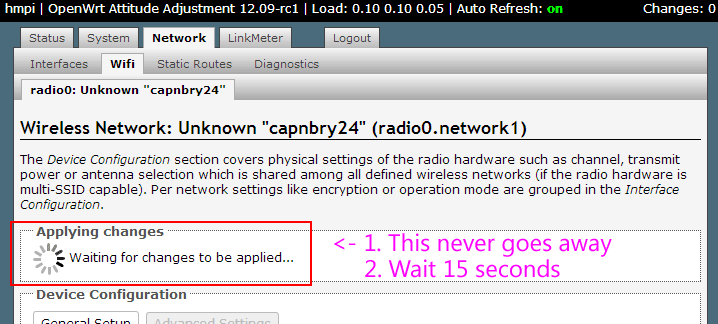
Step 8: This is where you think things have gone wrong because the "Waiting for changes to be applied..." never goes away. I don't know what it is waiting for, perhaps a new pope to be elected. I've never waited that long. Just wait 15 seconds and move on.
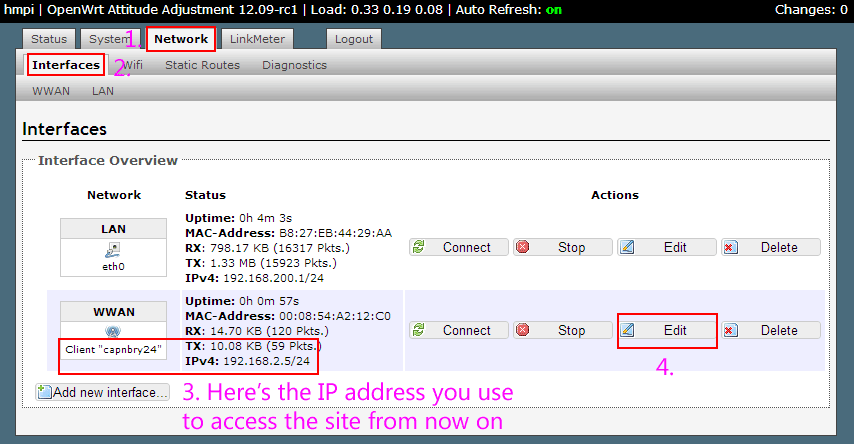
Step 9: Navigate to Network -> Interfaces. You should see you're on your wifi network now and you can see the IP address on your home network you can use to see the LinkMeter site. I'm not good with numbers so I like to use a name. To use a name, click "Edit" on the wireless network
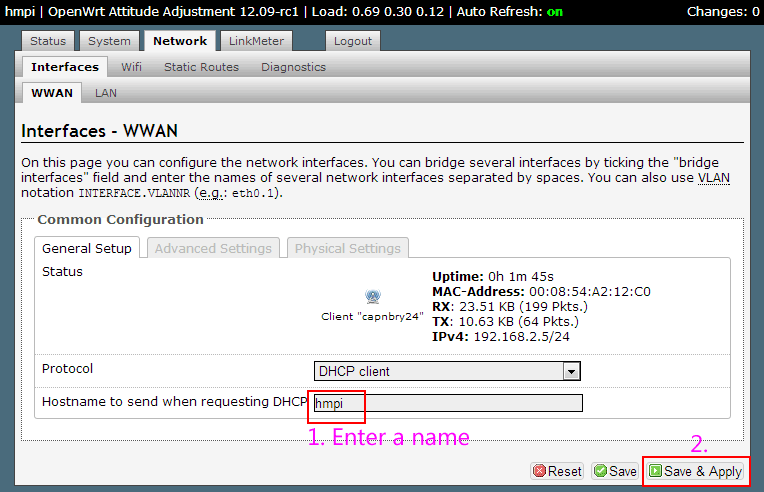
Step 9: Enter a name. I like short names "hm", "hmpi", or "bob". "Save and Apply" to commit the change. You'll get our old friend the "Waiting for changes..." pope-watcher but rest assured next time this puppy boots it will register on your home network with that name. Not all routers support named DHCP registration so if it doesn't work, use the IP address from the previous step 9.
You can now change your computer's IPv4 address back to DHCP and should be able to access the LinkMeter site (after rebooting once) via http://thenameyouchosewhichishopefullyshorterthanthis/
IMPORTANT Don't change the wired ethernet configuration on the RasberryPi. If you change that interface to DHCP or give it a static address on your network, the WiFi won't work unless the wired ethernet is plugged in. This is because you've put two adapters on the same network and Linux doesn't know which you want the packets to go through without you setting up that configuration properly.
Step 1: Plug the wired ethernet connection into you RaspberryPi / HeaterMeter, insert your WiFi adapter into one of the USB ports, and power it up. On first boot there's a lot to do so give it a minute to make sure the system is fully booted. A minute is nothing. I used to wait 10 minutes to download a 320x240 image of a topless woman at 2400 baud and I still feel that was worth it.
Step 2: From a computer on your network change your IPv4 address to 192.168.200.2. Depending on your operating system this could be anywhere, because Microsoft likes to invent a jaunty new place to put it with every version, and Apple doesn't think you need to be mucking with this sort of information.
Step 3: Use a web browser to go to http://192.168.200.1/ which should land you on the HeaterMeter home page. It's blue. It has flaaaaames. It's pretty American. (No photo, you'll know it when you see it)
Step 4: Click the configuration link on the bottom of the page then navigate to Network -> WiFi and click Scan. If there is no WiFi listed, either your WiFi adapter is not supported or you don't have a power supply capable of providing enough power to the wireless adapter.
Step 5: Find your wireless network and click Join. My name is lame. Yours I'm sure is hilarious and expresses your individuality.
Step 6: Enter your wireless password. I'm guessing it is "12345"!
Step 7: Don't touch a cotton pickin' thing on the page that comes up. You're not smarter than the defaults or else you wouldn't need this guide. Just press "Save and Apply"
Step 8: This is where you think things have gone wrong because the "Waiting for changes to be applied..." never goes away. I don't know what it is waiting for, perhaps a new pope to be elected. I've never waited that long. Just wait 15 seconds and move on.
Step 9: Navigate to Network -> Interfaces. You should see you're on your wifi network now and you can see the IP address on your home network you can use to see the LinkMeter site. I'm not good with numbers so I like to use a name. To use a name, click "Edit" on the wireless network
Step 9: Enter a name. I like short names "hm", "hmpi", or "bob". "Save and Apply" to commit the change. You'll get our old friend the "Waiting for changes..." pope-watcher but rest assured next time this puppy boots it will register on your home network with that name. Not all routers support named DHCP registration so if it doesn't work, use the IP address from the previous step 9.
You can now change your computer's IPv4 address back to DHCP and should be able to access the LinkMeter site (after rebooting once) via http://thenameyouchosewhichishopefullyshorterthanthis/
IMPORTANT Don't change the wired ethernet configuration on the RasberryPi. If you change that interface to DHCP or give it a static address on your network, the WiFi won't work unless the wired ethernet is plugged in. This is because you've put two adapters on the same network and Linux doesn't know which you want the packets to go through without you setting up that configuration properly.
Last edited:


